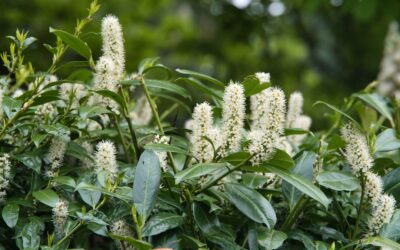
If you want an evergreen screen that smells wonderful, tolerates hard shearing, and hands you fresh cooking leaves all year, a bay laurel hedge is one of the most rewarding plants you can put in the ground. Laurus nobilis, the true bay of the Mediterranean, is the same plant that flavors your soups and stews, and it takes to clipping so well that it has been used for formal hedges and topiary for centuries. Left alone it can reach 40 feet, but as a hedge you keep it in the 6-to-10-foot range with an annual trim. Here is how to plant one and keep it dense, healthy, and productive for decades.
Is Bay Laurel Right for Your Climate?
Bay laurel is a warm-temperate evergreen, hardy in USDA zones 8 through 10, where it shrugs off winters and grows into a substantial shrub or small tree. In zone 7 it survives with protection but may drop leaves or die back in a hard freeze below about 20 degrees Fahrenheit, recovering from the roots in spring. Anywhere colder than zone 7, treat it as a container plant you overwinter indoors rather than an outdoor hedge.
It thrives in the same conditions olives and rosemary enjoy: full sun to part shade, warm summers, and sharp drainage. In the hottest, driest zones it appreciates a little afternoon shade, while in cooler zones give it the sunniest, most sheltered spot you have, ideally against a south-facing wall that radiates warmth.
Spacing the Hedge Correctly
Spacing is the single decision that determines whether you get a solid green wall or a row of separate bushes. For a continuous hedge, set young plants 2 to 3 feet apart, center to center. Tighter 2-foot spacing knits together faster and suits a formal, clipped look; 3-foot spacing costs fewer plants and works if you are patient.
Do the math before you buy. To hedge a 30-foot run at 2.5-foot spacing, divide 30 by 2.5 to get 12, then add one for the end plant, so 13 plants. At 3-foot spacing that same run needs 11 plants. For a double-thick, extra-dense screen, plant a staggered double row with rows 18 inches apart and plants offset. Mark the line with a string before you dig so the hedge runs straight.
Soil, Site, and Planting
Bay laurel is not fussy about soil type, but it will not tolerate wet feet. It wants well-drained ground with a slightly acidic to neutral pH between 6.0 and 7.0. Heavy clay that stays soggy is the fastest way to kill it, so on clay sites amend generously with compost and coarse grit, or plant on a raised berm to lift the crown above standing water.
- Dig each hole twice as wide as the root ball and just as deep, no deeper.
- Mix a few shovelfuls of compost into the backfill, and add grit on heavy soils.
- Set the plant so the top of the root ball sits level with the surrounding grade.
- Backfill, firm gently, and water in deeply to settle the soil.
- Mulch with 2 to 3 inches of bark, keeping it a few inches off the stems.
The best planting windows are spring after the last frost or early fall in mild zones, giving roots time to establish before the stress of summer heat or winter cold.
Watering and Feeding
Young plants need consistent moisture for the first one to two years while they build a root system. Water deeply once or twice a week during the first summer, more in extreme heat, aiming to keep the root zone moist but never waterlogged. A deep soak that wets the whole root ball beats frequent shallow sprinkles.
Once established, bay laurel is genuinely drought tolerant and rarely needs supplemental water except in prolonged dry spells. Feed lightly in spring with a balanced slow-release fertilizer or a top dressing of compost. Overfeeding pushes soft, floppy growth that flops out of shape, so err on the lean side. Container plants need more regular feeding, roughly monthly through the growing season with a diluted liquid feed.
Pruning and Shaping
Bay laurel’s tolerance for pruning is what makes it such a good hedge. It responds to shearing with dense, bushy regrowth, and you can cut into older wood if you need to renovate a leggy plant. The main formative and maintenance pruning is done in late spring through summer, after the risk of frost has passed and while the plant is actively growing so cuts heal fast.
For a formal hedge, shear once or twice a season to keep the shape crisp, tapering the sides slightly so the base is wider than the top. That taper, called a batter, lets light reach the lower branches and prevents the bare-bottom look that plagues neglected hedges. For an informal screen, a single annual tidy-up is enough. Where you want the leaves for cooking, simply harvest by clipping, which doubles as light pruning. Bay grows a moderate 12 to 24 inches per year, so a hedge fills in over three to five seasons.
Pests and Problems
Bay laurel is tougher than most evergreens, but a few pests show up. The bay sucker is the most common, a small insect that causes leaf edges to curl, thicken, and turn yellow or brown. Prune out and destroy affected leaves, and encourage the natural predators that usually keep it in check. Scale insects and, on stressed or indoor plants, mealybugs can also appear as sticky honeydew and sooty mold.
- Bay sucker: Remove curled leaves; horticultural oil helps on light infestations.
- Scale: Wipe off or treat with horticultural oil in the dormant season.
- Yellow leaves: Usually cold damage, waterlogging, or nutrient shortage, not disease.
- Leaf spot: Improve airflow and avoid overhead watering.
Most problems trace back to poor drainage or cold, so getting the site right prevents the majority of headaches.
Growing Bay Laurel in Containers
Gardeners in zones 6 and colder need not miss out. Bay laurel is a classic container and topiary subject, and a potted specimen can move to a sheltered spot or an unheated garage when hard frost threatens. Use a large pot at least 18 to 24 inches across with free-draining potting mix, and pot up every couple of years as it grows.
Container bays dry out faster and need watering whenever the top inch of mix is dry, plus regular feeding through summer. Clipped into a ball, cone, or lollipop standard, a pair of potted bays flanking a doorway gives you the formal Mediterranean look and a supply of cooking leaves without committing to an in-ground hedge.
Propagating Your Own Plants
Once you have one healthy bay, you can grow a whole hedge for almost nothing, though it takes patience. The most reliable home method is semi-hardwood cuttings taken in late summer. Snip 4-to-6-inch shoots from the current season’s growth that have just started to firm up, strip the lower leaves, dip the cut end in rooting hormone, and set them in a gritty, free-draining cutting mix.
Keep the cuttings warm, humid, and out of direct sun. Bay is notoriously slow to root, often taking two to three months, and not every cutting takes, so start more than you need. Layering is an even easier if slower route: bend a low, flexible branch to the ground, nick the underside, pin it down under a little soil, and let it root in place over a season before severing it from the parent. Either way, growing your own turns an expensive hedge into a weekend project and a bit of a waiting game.
Harvesting and Using the Leaves
One of the quiet joys of a bay hedge is that your pruning produces a kitchen staple. Bay leaves can be picked fresh year-round, and the flavor is stronger and more aromatic than the dried leaves sold in stores. Pick mature, glossy leaves rather than tender new growth, which is milder. Every time you shear the hedge, set aside a bundle of the trimmed branches.
To store the surplus, dry the leaves flat in a single layer in a warm, dark, airy spot for a couple of weeks until they are crisp, then keep them in an airtight jar out of light. Dried this way they hold good flavor for a year or more. Between the privacy, the evergreen structure, the fragrance on a warm day, and the endless supply of cooking leaves, a bay laurel hedge earns its keep in more ways than almost any other screening plant.
Cost and Buying Tips
Bay laurel is sold at most garden centers, and price scales with size. Small starter plants in 1-gallon pots run about $15 to $25, while established 3-gallon plants suitable for quicker hedging cost $30 to $60 each. Large specimen topiaries can run well over $100. For a hedge, buying more smaller plants is usually the better value; they establish faster and knit together at a lower total cost.
Add up your plant count from the spacing math, then budget for compost, grit if your soil is heavy, mulch, and a soaker hose to simplify that critical first-year watering. Planted well and given a warm, well-drained site, a bay laurel hedge is a decades-long investment that pays you back in privacy, fragrance, and a lifetime supply of the bay leaves you would otherwise buy dried in tiny jars.