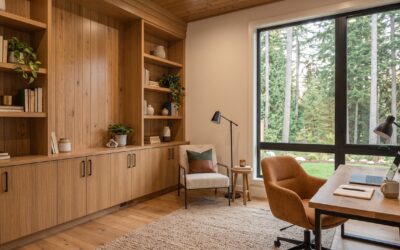
A built in desk and bookcase turns one blank wall into a complete workstation: drawers and file storage at your knees, a solid work surface at elbow height, and floor-to-ceiling shelving that holds everything you would otherwise pile on the desktop. The trick is that a desk and a bookcase follow different rules. The desk half is governed by your body, your chair, and your monitor, while the bookcase half is governed by shelf spans, book depths, and wall anchoring. Get those two sets of numbers right on paper and the build itself is straightforward finish carpentry.
Most successful office walls use a simple formula. Two stacks of base cabinets, usually 24 to 30 inches deep in kitchen work but trimmed to 20 to 24 inches for an office, support a continuous desktop at 29 to 30 inches. Open or glass-door bookcase uppers, 10 to 12 inches deep, rise from the desktop or from a short backsplash zone to the ceiling. The gap between the base stacks becomes the knee space, and a wiring chase behind it keeps cords out of sight.
- Built In Desk and Bookcase Dimensions That Actually Work
- Choosing a Layout for the Whole Wall
- Tools and Materials
- Step-by-Step: Building the Office Wall
- Wiring Chases, Outlets, and Task Lighting
- Anchoring and Structural Safety
- Troubleshooting Common Problems
- Cost Ranges for an Office Wall
- When to Call a Licensed Professional
- Frequently Asked Questions
This guide walks through the dimensions, the layout decisions, the build sequence, and the safety details that separate a sturdy office wall from a wobbly one. Whether you are assembling stock cabinets or building from sheet goods, the planning steps are the same.
Built In Desk and Bookcase Dimensions That Actually Work
Start every built in desk and bookcase plan with the person who will sit there. A standard desk height of 29 to 30 inches suits most adults using a keyboard on the desktop. If you plan a keyboard tray, you can raise the desktop to 30 or 31 inches. Measure your own seated elbow height with your chair adjusted, then subtract about an inch for the keyboard surface. That single measurement drives everything else on the lower half of the wall.
- Knee space width: 30 inches minimum, 36 to 48 inches is more comfortable, especially for a chair with arms.
- Knee space depth: at least 19 inches clear under the desktop; keep aprons and drawers out of this zone.
- Desktop depth: 24 inches is the practical minimum for a single monitor; 27 to 30 inches gives you room for a larger screen and a notepad.
- Monitor clearance: the top of the screen should sit at or slightly under eye level, which usually means the first fixed upper shelf lands 18 to 24 inches over the desktop.
- Bookcase depth: 10 inches for paperbacks, 12 inches for binders, large hardcovers, and printer paper.
- Shelf spacing: 10 to 12 inches between shelves for books, 13 to 15 inches for binders and storage boxes.
Notice the depth mismatch: a 24-inch desk and 12-inch uppers leave a 12-inch shelf-free zone at the back of the desktop. That zone is your monitor, lamp, and charging area. Many designers finish it with a painted or paneled backsplash so the wall between desk and uppers looks intentional rather than empty.
Choosing a Layout for the Whole Wall
A full office wall can take several shapes, and the right one depends on wall width and how you work. The most common arrangements for built in desk with bookshelves projects include the following.
Centered Desk, Flanking Towers
Two full-height bookcase towers sit at either end of the wall, floor to ceiling, with the desk bridging between them. Uppers span over the desk. This layout looks the most architectural and works well on walls 8 to 12 feet wide. The towers also act as structural bookends that stiffen the desktop.
Continuous Base, Continuous Uppers
Base cabinets run the full wall with a single long desktop and open shelves across the top. It is the simplest build and ideal for two-person offices or a desk that doubles as a craft counter. Plan a knee space for each seated person.
Offset Desk
The knee space sits toward one end, with a tall cabinet or file drawers on the other. This suits narrow rooms where the door swing or a window limits one side of the wall. It also lets you put a printer cabinet close to an outlet.
Whichever you choose, sketch the wall to scale on graph paper or a free design app. Mark outlets, switches, heat registers, windows, and the door swing. Built in office shelves that block a register or bury an outlet behind a fixed panel are the most common planning mistakes, and both are expensive to fix after the trim is on.
Tools and Materials
You can build this wall with stock base cabinets and site-built bookcases, or you can build everything from 3/4-inch plywood. Stock cabinets save time; site-built boxes let you hit exact widths. Either way, a typical list looks like this:
- Base cabinets or plywood carcasses (3/4-inch cabinet-grade plywood for sides and shelves)
- Desktop material: 1-1/4 to 1-1/2 inch hardwood, butcher block, or double-layered plywood with hardwood edge banding
- Solid wood for face frames, typically 1×2 and 1×3 poplar or maple
- Crown, base, and scribe molding
- Circular saw with a track or straightedge, miter saw, drill/driver, and pocket-hole jig
- A brad nailer for face frames and trim, plus 1-1/4 to 2 inch brads
- Level, stud finder, shims, and 2-1/2 to 3 inch cabinet screws
- Wood glue, filler, primer, and cabinet-grade paint or finish
- Grommets or a desk cable tray, and low-voltage LED under-shelf lighting with a plug-in driver
For shelf strength, 3/4-inch plywood spans about 30 to 32 inches under a full load of books before it sags noticeably. If your uppers are wider than that, add a vertical divider or glue a 1×2 hardwood edge on the front of each shelf, which roughly doubles its stiffness.
Step-by-Step: Building the Office Wall
- Remove the baseboard and locate framing. Pull the baseboard carefully so it can be reused elsewhere. Mark every stud with a stud finder and confirm with a small finish nail in a spot the cabinets will hide.
- Find the high point of the floor. Snap a level line across the wall at base cabinet height, measured from the highest floor spot. Every base unit will be shimmed to this line.
- Set and level the base stacks. Place the drawer or file cabinets, shim to the line, clamp neighboring units together, and screw through the back rails into studs.
- Build the wiring chase. Leave a 2 to 3 inch gap behind the desktop or cut a channel in the back of one base cabinet so cords drop from the desk to the outlet. Drill 2 to 3 inch grommet holes in the desktop at monitor and lamp positions.
- Install the desktop. Support it with the base cabinets plus a hardwood cleat screwed into studs along the back of the knee space. A desktop spanning more than 48 inches between supports needs a steel stiffener or a doubled apron at the front edge.
- Assemble and set the bookcase uppers. Build the carcasses, set them on the desktop or on a hanging rail, and screw them through their backs into studs. Use at least two screws per stud crossing at the top and bottom.
- Add face frames. Glue and nail 1×2 or 1×3 face frames across the fronts with the brad nailer so the separate boxes read as one piece of furniture.
- Trim it out. Scribe filler strips to the side walls, add crown at the ceiling and base at the floor, then caulk, fill, prime, and paint.
- Install lighting. Mount low-voltage LED strips or puck lights under the first upper shelf, aimed at the desktop, and route the plug-in driver into the chase.
Wiring Chases, Outlets, and Task Lighting
An office wall lives or dies on cord management. Plan where the monitor, computer, lamp, charger, and printer will sit, then plan a clear path from each device to power. A vertical chase at the back of one base cabinet, with a removable back panel, gives you access later without taking anything apart.
For lighting, understand the difference between low-voltage and line-voltage fixtures. Plug-in LED strips and puck lights run on 12 or 24 volts supplied by a UL-listed plug-in driver, which you can install yourself. Size the driver to the total wattage of the lights with about 20 percent headroom, keep the driver in a ventilated spot rather than sealed in a drawer, and do not cover or bunch the strips. Hardwired line-voltage fixtures and new switch loops are a different job.
If you need to move or add an outlet so it lands in the knee space or over the desktop, that is new wiring. Adding outlets, extending circuits, or putting a receptacle inside cabinetry should be handled by a licensed electrician, who will pull any required permit. If you are only removing a cover plate to fit a cabinet around an existing outlet box, turn off the breaker first and confirm the power is off with a non-contact voltage tester before you touch anything. Many jurisdictions also require box extensions so the outlet stays flush with the new cabinet face.
Anchoring and Structural Safety
A loaded bookcase is heavy. A single 36-inch run of shelves full of books can easily top 300 pounds, and tall units can tip forward if a child climbs them or a shelf is pulled hard. Every upper and every tall tower must be screwed into wall framing, not just drywall. Use cabinet screws through a solid hanging rail at the top of each carcass and a second rail near the bottom.
On masonry walls, use masonry anchors rated for the load. On walls without studs where you need them, add blocking before the drywall goes back or hang a continuous rail that spans several studs. Do not cut, notch, or remove studs or headers to recess a bookcase into a wall without a pro reviewing it; a bearing wall may be carrying the floor or roof over the room. Check with your local building department or HOA if the project involves opening walls, since some towns require permits for structural changes.
Troubleshooting Common Problems
- Desktop bounces when you type: add a back cleat into studs or a front stiffener; spans over 48 inches almost always need one.
- Shelves sagging after a few months: add a hardwood front edge, a center support, or switch to 1-inch material.
- Gaps between cabinet and wall: the wall is out of plumb; scribe a filler strip to the wall profile rather than caulking a big gap.
- Doors or drawers binding: the base was not shimmed level; loosen, re-shim, and re-tighten before the desktop goes on.
- Monitor glare: a window across from the screen reflects into it; angle the desk or add a shade, and aim task lighting down onto the work surface.
- Warm cabinet interior: a computer tower or power adapter inside a closed cabinet needs ventilation holes or an open back.
Cost Ranges for an Office Wall
Costs swing widely with size and material. As general ranges, a DIY wall built from stock base cabinets, a butcher block top, and site-built plywood uppers often lands in the low thousands of dollars for a 10-foot wall. Solid hardwood desktops, glass doors, and paint-grade trim push the materials higher. Hiring a finish carpenter for built in wood bookshelves and a desk run typically costs several thousand to well over ten thousand dollars depending on region, wall size, and detail. Custom cabinet shops sit at the upper end. Budget extra for an electrician if outlets need to move.
When to Call a Licensed Professional
Much of this project is carpentry a confident DIYer can handle. Call in licensed help when the plan includes new outlets, relocated circuits, or hardwired lighting; those require a licensed electrician and often a permit. Bring in a contractor or structural pro before opening, notching, or recessing into any wall that may be load-bearing. And if your built in office bookshelves need to reach a cathedral ceiling or span a stairwell, a finish carpenter with scaffolding is the safer choice.
Frequently Asked Questions
How deep should a built in desk be compared to the bookcase?
Most office walls use a 24 to 30 inch desktop with 10 to 12 inch deep uppers. The difference leaves room for a monitor and lamp at the back of the desk while keeping shelves within easy reach.
How high should the shelves start over a built in desk?
Set the lowest fixed shelf 18 to 24 inches over the desktop. That clears most monitors and lamps and keeps the screen at a comfortable viewing height.
Can I use kitchen base cabinets for a desk wall?
Yes. Many people use kitchen or office base cabinets, trimmed or set on a shorter base, so the finished desktop lands at 29 to 30 inches instead of the 36-inch kitchen counter height.
Do built in shelves need to be attached to studs?
Yes. Screw every tall unit and upper cabinet into studs or solid blocking. Drywall anchors alone cannot hold a loaded bookcase or prevent it from tipping.
Can I add an outlet inside a built in desk myself?
Adding an outlet is new wiring and should be done by a licensed electrician, often with a permit. You can safely use plug-in low-voltage lighting and power strips routed through a wiring chase.