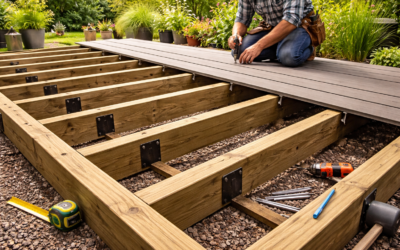
Composite boards can only perform as well as the structure beneath them, and getting the framing wrong is the single most common cause of sagging, bouncy, or warped composite decks. Properly planning composite decking joists means understanding the tighter spacing composite requires, the framing materials, and the blocking and support details that keep the surface flat and firm for decades. Because composite is more flexible between supports than solid lumber, it demands closer joist spacing than a traditional wood deck. This guide covers spacing rules, materials, and the code and construction details that make the difference between a rock-solid deck and a disappointing one.
Part of our Decks & Outdoor guide — explore the full guide →
- Why Composite Needs Closer Joist Spacing
- Standard Spacing Requirements
- Joist Material Options
- Blocking and Bridging
- Protecting the Joists
- Ledger, Beams, and Footings
- Code and Load Requirements
- Common Framing Mistakes
- Joist Spacing for Special Situations
- Fastening Composite to the Joists
- Retrofitting Composite Over an Existing Frame
Why Composite Needs Closer Joist Spacing
Composite decking is less rigid than the same-thickness solid wood plank, so it deflects more between supports. If you space joists as widely as you might for wood, the composite will feel spongy and can develop permanent waves over time. Manufacturers specify maximum joist spacing precisely to prevent this. Following those specs is not optional; exceeding them voids most product warranties and produces a bouncy, unsatisfying surface. The board’s span rating is one of the most important numbers in your plan.
Standard Spacing Requirements
Spacing depends on how the boards are laid, and manufacturers publish the numbers.
- Perpendicular (90°) installation: 16 inches on center is the typical maximum for residential composite decking.
- Diagonal (45°) installation: 12 inches on center, because the board spans a longer distance across angled joists.
- Stair treads: often 12 inches on center or closer, since treads carry concentrated loads.
- Picture-frame borders and multi-directional patterns: may require additional joists or doubled framing.
Always confirm the exact figures for your specific brand and product line, as some heavy-duty boards allow different spacing.
Joist Material Options
The joists themselves are almost always pressure-treated lumber, but options exist.
- Pressure-treated lumber: The standard and most economical framing, rated for ground contact or above-ground use as appropriate.
- Steel deck framing: Galvanized steel joist systems offer perfectly straight, long-lasting, non-warping framing at a premium, popular for high-end composite decks.
- Naturally durable woods like cedar are sometimes used but are costlier and less common for structure.
Whatever the material, joists must be straight and consistent, since composite telegraphs any waviness in the framing to the finished surface.
Blocking and Bridging
Blocking is critical and often skimped on. Solid blocking, short pieces of joist material installed between joists, prevents them from twisting and adds support where boards join and at pattern transitions.
- Board butt joints: Every place two deck boards meet end-to-end needs blocking or a doubled joist to support both ends.
- Perimeter and picture-frame: Additional blocking supports border boards that run parallel to the joists.
- Mid-span stiffness: Blocking rows reduce joist twist and improve overall rigidity.
Protecting the Joists
Because moisture is the enemy of any wood frame, protecting the tops of joists extends the deck’s life dramatically. Self-adhesive joist tape or flashing tape applied over the top edge of each joist keeps water from sitting in the fastener holes, preventing rot and rust and greatly extending framing life. This inexpensive step, a few dollars per joist, is one of the best investments in deck longevity. Cap the beams and ledger similarly, since trapped moisture at those connections is a frequent failure point.
Ledger, Beams, and Footings
Joists are only one part of a code-compliant structure. The ledger board attaching the deck to the house must be properly flashed and fastened with structural lag screws or through-bolts, since a failed ledger is a leading cause of deck collapses. Beams sized to your span carry the joists, and they bear on posts set on footings that reach below the frost line, typically 12 inches in warm regions to 48 inches or more in cold climates. Proper joist hangers, hurricane ties, and post-to-beam connectors keep everything fastened against uplift and lateral loads.
Code and Load Requirements
Decks must meet building codes, which specify minimum loads and connections.
- Live load: Residential decks are generally designed for 40 pounds per square foot live load plus dead load.
- Permits: Most jurisdictions require a permit and inspection for a new deck.
- Joist span tables: Local code and the IRC deck provisions (DCA 6) dictate maximum joist spans by lumber size and spacing.
- Guardrails and stairs have their own load and dimension requirements.
Check with your local building department before framing, since requirements vary and inspections protect you.
Common Framing Mistakes
- Spacing joists too far apart for the composite product, causing sag and voided warranties.
- Skipping blocking at board joints and borders, leaving unsupported board ends.
- Using crowned or twisted joists, which telegraph through the finished surface.
- Omitting joist tape, shortening framing life.
- Under-building the ledger or footings, a serious safety risk.
Joist Spacing for Special Situations
Beyond standard field decking, several conditions demand tighter framing than the baseline. Overlooking these is a frequent source of soft spots and callbacks:
- Hot tubs and heavy loads: Concentrated weight requires engineered framing, often doubled joists and closer spacing, sometimes with additional beams and footings.
- Diagonal and herringbone patterns: Reduce spacing to 12 inches on center because boards span a longer diagonal distance.
- Stair treads: Space stringers and add support so treads carry concentrated foot loads without flexing.
- Cantilevers: Limit joist overhang beyond the beam to code, typically no more than one-quarter of the backspan.
- Cooler-climate flush framing: Some products require even tighter spacing in commercial or public settings.
When in doubt, follow the tighter of the code requirement and the manufacturer’s spec, and consult an engineer for unusual loads.
Fastening Composite to the Joists
How the boards attach to the joists is the final link between good framing and a good deck surface. Two main systems dominate, and each has spacing and detailing requirements tied to the joist layout. Hidden fastener clips fit into a groove milled along the board edge and screw into the joist top, controlling the gap automatically and leaving a clean, screw-free surface, which is why they are the most popular choice for premium composite. Face-screwing with color-matched composite screws driven through the board top is stronger and required for the perimeter and stair treads, though it leaves visible fastener heads. Whichever you use, every fastener lands on a joist, so the joist layout must align with board joints and pattern lines; this is exactly why blocking at butt joints is essential, since each board end needs solid framing beneath it to fasten into. Pre-drilling near board ends prevents mushrooming, and using the manufacturer’s recommended screws avoids voiding the warranty. Getting the fastening right ensures the boards stay flat, the gaps stay consistent for drainage and expansion, and the surface remains firm and quiet underfoot for the life of the deck.
Retrofitting Composite Over an Existing Frame
Homeowners often want to lay composite over the framing of an old wood deck, but this requires careful evaluation rather than assuming the existing structure will do. First, inspect the joists thoroughly for rot, insect damage, and cupping, since composite is unforgiving of a wavy or weakened frame. Second, check the spacing against your composite product’s requirement; older wood decks were commonly framed at 24 inches on center, which is too wide for most composite and will require adding sister joists or new joists to reach 16 inches. Third, verify the joists are straight and plane the tops flat or shim low spots so the finished surface does not telegraph dips. Finally, add joist tape to the newly exposed tops and confirm the ledger, beams, and footings still meet code before investing in premium decking. If the frame is sound and can be brought to the correct spacing, reusing it saves significant cost; if it is marginal, rebuilding the substructure is the wiser investment given how long the composite surface will last on top of it.
Composite decking rewards a well-built substructure and punishes a poor one, so the framing deserves at least as much attention as the boards on top. The core rule is closer joist spacing than wood: 16 inches on center for standard perpendicular layouts and 12 inches for diagonal patterns, always confirmed against your product’s span rating. Use straight, properly sized pressure-treated or steel joists, add blocking at every board joint and border, protect the tops with joist tape, and build the ledger, beams, and footings to code. Get those fundamentals right and your composite deck will feel firm and stay flat for the full multi-decade life the boards are designed to deliver.