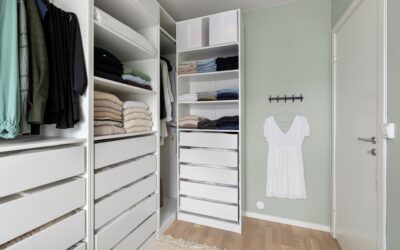
A standard builder-grade closet wastes an astonishing amount of space. One rod and one shelf typically use only about 40% of the available volume, leaving the floor cluttered and the upper wall empty. The best creative closet ideas diy projects reclaim that dead space using inexpensive materials and a weekend of work, often doubling usable storage for under $200. You do not need a custom installer or a contractor’s budget. You need a tape measure, a stud finder, and a willingness to think vertically.
- Start by Measuring and Mapping
- Double-Hang to Instantly Add Capacity
- Build a Floor-to-Ceiling Shoe Wall
- Add Adjustable Shelving With Cleats and Brackets
- Use the Door and the Walls You Forgot
- Light It So You Can Actually See
- Repurpose Furniture and Bins for Polish
- Budget and Timeline
- Corner and Awkward-Space Solutions
- Finishing Touches and Maintenance
Start by Measuring and Mapping
Before buying a single board, measure the closet’s width, depth, and height, then inventory what actually goes inside. Count how many feet of long-hang clothing you own (dresses, coats) versus short-hang (shirts, folded pants). Most wardrobes are 80% short-hang, which means you are wasting vertical space under every shirt. Sketch the closet on paper and assign zones before you cut anything.
This planning step saves money. Buying organizers blind almost guarantees you will own a closet system that fits your boxes but not your clothes.
Double-Hang to Instantly Add Capacity
The single highest-impact DIY move is adding a second hanging rod. Short-hang items only need about 40 inches of vertical space, so a single 80-inch closet wall easily fits two rods stacked. Mount the lower rod about 42 inches off the floor and the upper rod around 84 inches.
- Find studs and install 1×4 wood cleats on each side wall
- Mount flange-style rod brackets to the cleats, not to drywall alone
- Use a 1-inch wood dowel or a steel rod cut to length
This single change doubles hanging capacity on that wall for roughly $30 in lumber and hardware.
Build a Floor-to-Ceiling Shoe Wall
Shoes scattered on the floor swallow space and look chaotic. A vertical shoe wall fixes both. Cut 1×4 pine into angled cleats, mount them in rows about 7 inches apart, and rest shoes on the slanted ledges. For a closet full of sneakers and flats, this stores 24 to 30 pairs on a single 30-inch-wide wall section that previously held a messy pile of six.
Alternatively, repurpose a tension rod and S-hooks for heels, or mount slim cubbies from leftover plywood. The goal is the same: get shoes off the floor and into the wasted lower wall zone.
Add Adjustable Shelving With Cleats and Brackets
Fixed wire shelving from the builder is rarely in the right place. Replace it or supplement it with an adjustable system. Install vertical metal standards (slotted tracks) screwed into studs, then snap in brackets and lay 3/4-inch melamine or plywood shelves across them. Because the brackets move, you reconfigure the whole closet in minutes as your needs change.
For a cleaner custom look, build a simple plywood tower in the center of the closet with fixed shelves, flanked by hanging rods on either side. This “reach-in turned organizer” approach mimics expensive systems for a fraction of the cost.
Use the Door and the Walls You Forgot
The back of the closet door is prime real estate. An over-the-door organizer or a screwed-on pegboard holds belts, scarves, jewelry, hats, and small bags. Inside the closet, mount a pegboard panel or a row of Shaker pegs at eye level for everyday items you grab on the way out. Adhesive hooks and a slim wall-mounted rail can corral handbags that otherwise crush each other on a shelf.
Light It So You Can Actually See
Dark closets hide half your wardrobe. Battery-powered LED puck lights or a rechargeable motion-sensor light bar transform a black hole into a usable space, and they install with adhesive in five minutes. If you want a permanent solution and have an outlet nearby, a plug-in LED strip tucked above the top shelf washes the whole closet in even light. Good lighting is one of the cheapest upgrades with the biggest daily payoff.
Repurpose Furniture and Bins for Polish
A small dresser or a set of stacked drawers fits neatly under the short-hang rod and stores folded items, socks, and underwear without eating shelf space. Clear or labeled bins on the top shelf hold seasonal gear, and matching baskets give the whole closet a finished, intentional look for very little money. Slim velvet hangers, which are about a third the thickness of plastic, can add another 30% hanging capacity on their own.
Budget and Timeline
A full reach-in closet makeover using these creative closet ideas diy projects typically runs $100 to $250 in materials and takes one to two weekends. The double-hang rod and shoe wall alone, the two highest-impact projects, can be done in a single Saturday afternoon for under $80. Compare that to $1,200 or more for a professionally installed system and the case for doing it yourself makes itself.
Corner and Awkward-Space Solutions
Most reach-in closets have a dead corner where the side wall meets the back, a spot that swallows hangers and items into a black hole. A rotating corner shelf, a lazy-Susan unit, or a simple set of angled fixed shelves turns that dead zone into accessible storage. For deep closets where the back is hard to reach, install pull-out wire baskets or a rolling drawer cart so the back contents slide forward to you instead of disappearing.
Sloped-ceiling closets under stairs or in attics seem impossible, but they shine for shoes, bins, and folded items that do not need full height. Build short cubbies along the low side and reserve the tall side for hanging. Working with the awkward geometry instead of against it is what separates a frustrating closet from a smart one.
Finishing Touches and Maintenance
A few final details make a DIY closet feel professionally done. Paint the interior a bright white or a soft color to lift the whole space and make clothes easier to see. Add a full-length mirror on the door or an adjacent wall to create a dressing station. Label bins and baskets so the system survives busy mornings. And commit to a quick seasonal edit, swapping summer and winter clothing to the front and donating anything you have not worn in a year. A closet system only stays useful if you keep it from refilling with clutter, so build in the habit alongside the shelving.
The secret to a great closet is not a bigger room, it is using every cubic foot you already have. Map your clothes first, hang twice where you can, build vertically for shoes, add adjustable shelving, and light the space properly. With basic tools and a weekend, you can turn the most frustrating closet in the house into the most organized one.