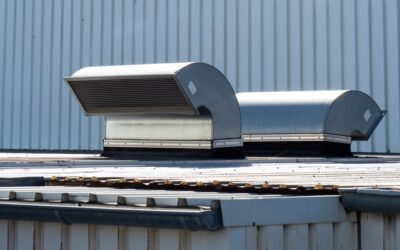
A cupola is the small tower-like structure perched on a roof ridge — usually a square or octagonal base, louvered or windowed sides, and its own miniature roof, often topped with a weathervane. Long before ridge vents existed, a cupola roof detail was how barns exhausted heat and moisture: hot air rises to the ridge and escapes through the louvers. Today cupolas do double duty as working ventilation and as the architectural focal point that makes a garage, barn, or shed look finished. This guide covers what cupolas actually do, the sizing rule that keeps them from looking like an afterthought, style options, prices, and what installation involves.
Part of our Roofing guide — explore the full guide →
Cupola Roof: What a Cupola Actually Does
Cupolas fall into two functional camps:
- Vented (working) cupolas have louvered sides open to the building interior through a hole cut in the ridge. They exhaust hot, moist air by natural stack effect — no fans, no electricity. On a barn, workshop, or garage without soffit-to-ridge ventilation, a vented cupola can move a surprising amount of air: a 24-inch cupola provides roughly 130–150 square inches of net free vent area, comparable to several standard roof vents.
- Decorative cupolas sit sealed on the ridge with no opening below. They add height, break up a long ridge line, and carry the weathervane. Many “vented-look” cupolas with louvers are actually installed decoratively, with no hole cut.
A third variation, the windowed cupola, uses glass panels instead of louvers and functions as a light monitor, dropping daylight into the space below — common on carriage houses and lake homes. Some large windowed cupolas are genuine walk-up belvederes, but on residential outbuildings they are almost always sealed light boxes.
The Sizing Rule: 1 Inch per Foot of Ridge
Undersized cupolas are the most common mistake, and the industry rule of thumb prevents it: the cupola base should measure at least 1 inch of width for every foot of unbroken ridge line. A 24-foot-long garage gets a 24-inch cupola minimum; a 40-foot barn needs a 40-incher or two smaller cupolas splitting the ridge. From the ground, roofs visually shrink anything on them — a cupola that looks huge in the driveway looks correct at ridge height.
| Building ridge length | Minimum cupola width | Typical choice |
|---|---|---|
| Up to 20 ft (shed) | 18 in | 18–22 in |
| 20–30 ft (garage) | 24 in | 24–30 in |
| 30–40 ft (large garage/small barn) | 32 in | 36 in |
| 40–60 ft (barn) | 42 in | 48 in, or two 30-in units |
| 60+ ft | — | Two or three cupolas, evenly spaced |
For a bolder, estate-barn look, size up 25–30% from the minimum. Height typically runs 1.25–1.5 times the base width, so a 30-inch cupola stands roughly 38–45 inches tall before the weathervane. When using multiple cupolas, keep them identical in size and space them symmetrically — thirds for two cupolas on a long ridge reads better than random placement.
Cupola Styles
Base Shape
Square bases dominate American barn and garage architecture — simple, traditional, and the least expensive to build and flash. Octagonal cupolas read more formal and Victorian and pair well with hip roofs and turned finials. Hexagonal and round versions exist but are mostly custom work.
Mid-Section
Louvered sides are the classic and the only choice for a working vent. Windowed sides suit light monitors and nautical or cottage styles. Solid-panel mid-sections with applied trim are purely decorative and the cheapest option.
Cupola Roof Caps
The cupola’s own roof echoes or contrasts the main structure: a pagoda/bell curve cap is the traditional barn profile; a straight pyramid cap looks cleaner on modern buildings; copper caps ($100–$400 upcharge) age to verdigris and are the most requested upgrade. Match the cap material to the main roof when you want the cupola to blend — a standing-seam cap on a metal roofing building, cedar on a cedar shake roof — or deliberately contrast with copper. Choosing a cupola whose proportions fight the main roof’s lines is a fast way to make a good building look off; if you’re still settling the overall massing, our roof styles guide covers how ridge features read on different roof forms.
Materials and Prices
| Material | Price range (24–30 in) | Lifespan | Notes |
|---|---|---|---|
| Vinyl/PVC (Azek-clad) | $300–$900 | 25+ yrs | No painting, most popular residential choice |
| Pine (primed) | $250–$700 | 15–25 yrs w/ paint | Cheapest; needs repainting every 5–7 yrs |
| Cedar | $500–$1,200 | 25–40 yrs | Rot-resistant, can weather naturally |
| Aluminum/composite | $600–$1,500 | 40+ yrs | Commercial and agricultural buildings |
| Custom copper | $2,000–$8,000+ | 75+ yrs | Estate and restoration work |
Add $75–$350 for a weathervane and $150–$600 for professional installation on an outbuilding, more on a tall or steep house roof. Large barn cupolas (48-inch and up) run $1,500–$5,000 delivered.
Installation Basics
Nearly all manufactured cupolas ship in two or three stacking sections — base, mid-section, cap — specifically so one or two people can handle them on a roof. The critical work is in the base:
- Find the pitch. Order or cut the base to match your roof pitch exactly (most manufacturers cut the base V-notch to your stated pitch, e.g., 6/12). A base cut for the wrong pitch rocks and leaks.
- Locate over the ridge board. Center the cupola on the ridge at the planned position. For a vented install, cut an opening through the roof deck on both sides of the ridge board — typically 2–4 inches smaller than the cupola’s inside dimension — leaving the ridge board and rafters intact. Never cut structural framing.
- Flash and seal. Set the base in a bed of sealant over the shingles or panels, then flash the perimeter the way you’d flash a chimney: step flashing or a formed apron up the slope side, counter-flashed by the base trim. On metal roofs, butyl tape plus stitch screws into the ribs, with the base skirt lapping the panels. Poor base flashing is the number-one cupola callback; a chronic leak here eventually shows up as a ceiling stain and a roof repair bill.
- Fasten sections. Screw the base to the roof framing (structural screws into rafters or blocking, not just the deck), then stack and fasten the mid-section and cap per the manufacturer. In high-wind regions, add the manufacturer’s hurricane strapping kit.
- Screen the vents. Working louvers need insect screen and, in many regions, 1/4-inch hardware cloth behind it — cupolas are prime real estate for wasps, starlings, and bats.
Budget half a day for a decorative install on a garage and a full day for a vented install with deck cutting and flashing.
Ventilation Math for Working Cupolas
Building code’s ventilation baseline is 1 square foot of net free vent area (NFVA) per 150 square feet of attic floor, split roughly half high (exhaust) and half low (intake). A vented cupola contributes its NFVA to the exhaust side. Manufacturer specs vary, but typical numbers run: 24-inch cupola ≈ 140 sq in NFVA; 30-inch ≈ 210 sq in; 36-inch ≈ 300 sq in; 48-inch ≈ 550 sq in. A detached 24 × 24 garage (576 sq ft) needs about 3.8 sq ft total NFVA, so a single 30-inch vented cupola plus soffit intake gets you most of the way there. Remember the intake half: a cupola exhausting without low intake vents pulls air from nowhere and does little.
Common Mistakes
- Buying too small. If you’re debating two sizes, buy the larger. No one has ever returned a cupola for looking too generous.
- Skipping the pitch spec. A universal-pitch base “adjusted” with shims and caulk leaks. Order pitch-cut.
- Cutting the ridge board. The vent opening goes through the deck beside the ridge, never through framing.
- Venting a cupola into an unvented conditioned attic. You’ll exhaust your heated air and pull moisture into the insulation. Decorative-mount only on sealed attics.
- Forgetting screening. Bats find unscreened louvers within a season.
- Mounting off-center on the ridge run. Center it, or space multiples evenly — the eye catches a 6-inch offset from 200 feet away.
FAQ
Does a cupola replace a ridge vent?
On a house, no — a continuous ridge vent almost always provides more NFVA per dollar. Cupolas make ventilation sense on barns, garages, and workshops where ridge vents are absent or where you want concentrated stack-effect exhaust plus the architectural feature.
Do cupolas leak?
A pitch-cut base, properly flashed, is as reliable as any chimney. Leaks trace almost exclusively to caulk-only installs on mismatched pitch cuts.
Can I add a cupola to an existing shingle roof?
Yes — decorative installs need no deck cutting at all, and vented installs cut only sheathing. It’s one of the few big-visual-impact projects doable in an afternoon.
Do I need a permit?
Usually not for outbuildings under typical height limits, but HOAs and historic districts frequently regulate rooftop structures. A 5-minute call beats a removal order.