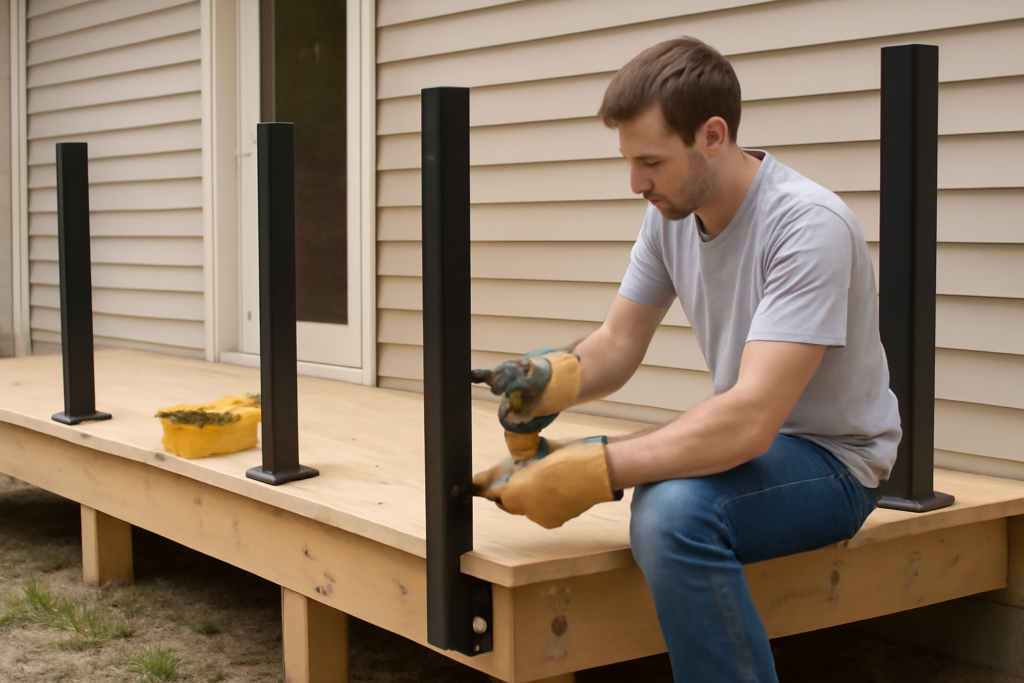
Setting a deck railing post outside rim joist style, bolted to the outer face of the frame rather than notched over the deck boards, is one of the most popular ways to build a clean, space-maximizing railing. It’s also one of the easiest to build dangerously weak. The physics are unforgiving: when someone leans on a 36-in.-tall post, that force multiplies into a powerful prying load at the bolts. If the framing behind those bolts isn’t beefed up, the post rotates and the railing loosens. Here’s how to do it so it holds for decades.
Part of our Decks & Outdoor guide — explore the full guide →
Why Mount Outside the Rim?
Mounting the post to the outside of the rim joist has two big draws. First, it keeps your deck surface completely clear; there’s no post base bolted to the boards eating into your walking space or collecting water. Second, it looks cleaner, with the posts sitting just outside the deck edge for a crisp, uninterrupted profile. Furniture fits better, sweeping is easier, and the deck simply feels bigger.
The catch, and it’s a big one, is structural. A post that stands on the deck can transfer load down into the framing through its base. A post bolted to the outside face has to resist the entire tipping force through its fasteners alone. That’s why this method demands more attention to blocking and hardware than any other.
The Code You Have to Meet
Under the IRC, a residential guard must be at least 36 in. high and is required anywhere the deck surface is more than 30 in. above the ground. The guard has to withstand a 200-lb load applied in any direction at the top, and the balusters must block the passage of a 4-in. sphere. When you mount a post outside the rim, every bit of that 200-lb load funnels into your bolts and the wood behind them. Some jurisdictions are wary of exterior-mounted posts and want to see an engineered detail, so talk to your inspector before you build.
Blocking: The Make-or-Break Detail
A rim joist is usually a single piece of 2x lumber, and a single board cannot resist the prying force of a railing post on its own. The bolts will crush and elongate the holes, and the post will work loose. The fix is solid blocking installed behind the rim at every post.
Run full-depth 2x blocking between the rim joist and the adjacent joist, directly behind each post location, and fasten it hard to the neighboring joists with structural screws. Now your through-bolts clamp the post to a thick, rigid sandwich of rim plus blocking instead of a lone board. Where you can, add blocking above and below the bolt line so the whole vertical span is backed up. This one detail is the difference between a railing that lasts 30 years and one that’s loose by next summer.
- Install full-depth solid blocking behind the rim at every post
- Screw blocking tightly into adjacent joists
- Back up the full vertical range where bolts pass through
- At corners, tie into the corner framing for maximum rigidity
Through-Bolts, Not Lag Screws
Fastener choice separates a code-passing railing from a lawsuit. Use 1/2-in. hot-dip galvanized or stainless through-bolts, carriage or hex, that pass completely through the post, the rim joist, and the blocking, with washers and nuts drawn tight on the inside face. Through-bolts clamp the assembly together and are vastly stronger than lag screws, which only bite threads into one board and pull out under prying loads.
Use at least two bolts per post, and spread them as far apart vertically as the post allows. The vertical distance between the two bolts is your resistance arm against tipping. Bolts jammed close together give the post leverage to rotate; bolts far apart lock it flat against the frame. Never rely on a single bolt, and never substitute deck screws.
Step-by-Step
- Mark post locations at 6 ft on center or tighter, per your railing system.
- Install full-depth blocking behind the rim at each post before anything else.
- Clamp the post to the rim face and plumb it both ways.
- Bore 1/2-in. holes through post, rim, and blocking, spread far apart vertically.
- Set through-bolts with washers front and back, tighten nuts inside.
- Shove-test the top of each post hard; zero movement is the only acceptable result.
- Add rails and balusters, keeping every gap under 4 in.
Corners and End Posts Need Extra Care
Corner and terminal posts take more abuse and often have less framing to grab. Tie corner posts into both the rim and the side joist where the frame meets, effectively bolting into an L of solid wood. For end posts near a stair, remember the stair guard and handrail heights differ from the deck guard, and plan the transition so nothing ends up under-height or unsupported.
Mistakes That Cause Loose Posts
Nearly every wobbly outside-mount post I’m called to fix shares the same causes: no blocking behind the rim, lag screws instead of through-bolts, bolts placed too close together, or a rim joist that was never properly fastened to the deck frame in the first place. If the deck’s rim-to-joist connections are weak or the wood is soft, reinforce the frame before you hang a railing on it. The railing can only be as strong as the structure carrying it.
Sealing the Bolt Holes
Driving 1/2-in. holes through the rim joist opens a path for water, and water sitting in a bolt hole is how rot gets started in the very wood your railing leans on. Before the bolts go in, seal the drilled holes and coat the bolt shanks so moisture can’t wick into the framing, and lay a bead of exterior sealant where each bolt penetrates the rim face. If a fascia board or any cladding covers the rim, flash and seal the top so runoff sheds away from the connection instead of trickling down into it. On a deck exposed to rain and snow, this small step is the difference between a connection that stays sound for decades and one that quietly softens from the inside.
Pay special attention to the condition of the existing rim before you commit. Probe it with an awl or screwdriver; if the wood is soft or punky, especially near the bottom where water collects, that framing won’t hold a bolt under a 200-lb prying load no matter how good your hardware is. Sister a new sound member alongside it or replace the rim outright before you hang a railing. It’s far cheaper to fix framing now than to rebuild a failed railing, or worse, deal with the consequences of one letting go.
Test Before You Trust It
The most important quality-control step costs nothing: after everything is bolted and the rails are on, physically test the railing hard. Grab the top rail at each post and at the midpoints between posts and shove in every direction, outward, inward, and along the run. A correctly built outside-mounted railing feels absolutely solid, with no rocking at the post base, no creak, and no flex you can detect by hand. If a post moves even slightly, do not rationalize it; back off and add blocking or a wider-spread second bolt until it’s rigid. A post that gives a little under your hand will loosen steadily with every lean and bump it takes.
Build a recheck into your routine, too. Lumber shrinks and swells with the seasons and bolts can back off as it does, so revisit the railing after the first winter and give every post the same shove test. Snug any nuts that have loosened, watch for rust streaks that reveal a fastener that isn’t the stainless or hot-dip galvanized hardware it should be, and note any gap opening between post and rim. A few minutes of inspection each year keeps the connection tight and catches small problems while they’re still trivial to fix.
The Takeaway
Building a deck railing post outside rim joist style is absolutely the right move for a clean look and full deck space, but only if you honor the load path. Block every post, through-bolt with widely spaced 1/2-in. hardware, tie corners into the frame, and shove-test before you trust the rail. The IRC’s 200-lb load isn’t a suggestion; it’s what keeps someone from going over the edge. Nail the blocking and bolting, and an outside-mounted railing will stay tight and safe for the life of the deck.