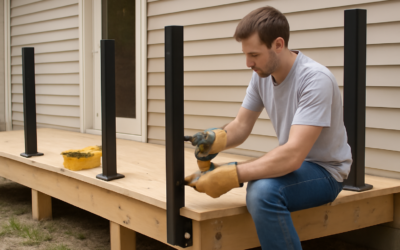
Learning how to install deck railing posts correctly is the single most important skill in building a safe deck, because the posts carry every ounce of load a railing will ever see. A rail that feels rock solid when you lean on it and one that flexes and creaks are built from the same lumber — the only difference is how the posts are anchored to the frame. Get this wrong and you have a guard that can pop loose under a falling adult, which is exactly the scenario the code is written to prevent.
Part of our Decks & Outdoor guide — explore the full guide →
This is the method I use on every deck to pass inspection the first time and to keep the rail tight for decades.
- Why Post Attachment Is a Life-Safety Issue
- Notch or No-Notch? Choose No-Notch
- Blocking: The Step Everyone Skips
- The Hardware and Bolt Pattern That Passes
- Step-by-Step Installation
- Testing Your Work
- Surface-Mount Post Bases: When Bolts Aren't an Option
- How Far Below the Deck the Post Runs
- Posts at Stairs and Corners
- Sizing and Cutting Posts to the Right Length
- Corner Posts and Long Runs
- Common Mistakes to Avoid
Why Post Attachment Is a Life-Safety Issue
The IRC requires a deck guard to resist a 200-pound concentrated force applied in any direction at the top of the rail. That force doesn’t push straight down — it levers outward, trying to pry the base of the post away from the deck. A 36-inch-tall post multiplies that leverage, so 200 pounds at the top becomes a much larger prying force at the connection. That’s why you can’t just screw a post to the outside of the rim and call it done. The math is working against you, and the fix is spreading the load into the framing instead of a single board.
Any deck surface more than 30 inches above grade legally needs this guard, so on all but the lowest decks, post installation is a code-inspected step, not a detail you can improvise.
Notch or No-Notch? Choose No-Notch
Old-school framing notched the 4×4 post so it hooked over the rim joist. Skip it. Notching removes material at the exact point of maximum stress and cuts the post’s bending strength roughly in half. Modern practice mounts the full, uncut face of the post flat against the framing and relies on tested hardware to carry the load. Your post stays at full strength and the connection does the work.
Use 4×4 posts for standard residential rail; step up to 6×6 for tall guards, wide top caps people sit on, or long unsupported runs. Whatever size, keep posts no more than 6 feet apart on center, and tighten to 4 or 5 feet where you want a stiffer feel.
Blocking: The Step Everyone Skips
Blocking is the secret to a post that doesn’t move, and it’s the step DIYers most often leave out. Before the post goes on, install solid blocking between the joists directly behind the post location. Use the same lumber as your joists — usually 2×8 or 2×10 — and fit two blocks snug, one behind the rim and one a joist bay deep, fastened with structural screws or nails. This turns three or four joists into one connected unit, so when the post levers outward it fights the whole floor system, not one flexible rim board.
Without blocking, even perfect hardware just pries the rim joist loose over time. With it, the connection has something solid to pull against. Never skip this.
The Hardware and Bolt Pattern That Passes
Here’s the connection I trust. It’s tested, it’s fast, and inspectors recognize it on sight:
- Install a Simpson DTT2Z tension tie (or equivalent) low on the inside of the post, screwed to the post and bolted through to the blocking. It’s specifically rated for the 200-pound guard load.
- Add two 1/2-inch hot-dipped galvanized carriage or through-bolts with washers and nuts through the post and the blocked rim. Stagger them vertically, not side by side, to resist the prying moment.
- Use through-bolts, not lag screws, wherever you can reach behind the framing — bolts clamp both faces and won’t pull out.
- Where a bolt is impossible, use structural screws rated for deck ledger and guard connections, following the hardware maker’s pattern.
Every fastener touching pressure-treated lumber must be hot-dipped galvanized or stainless. Modern PT chemistry corrodes plain and electro-galvanized steel within a few years, and a rusted-through bolt is a failed connection waiting to happen.
Step-by-Step Installation
With framing and blocking ready, here’s the sequence:
- Mark each post location, spacing them evenly and no more than 6 feet apart, with a post at every corner and both sides of stairs.
- Install solid blocking between the joists behind each marked location.
- Cut posts to length: deck surface height plus 36 inches for the guard, plus the depth below the deck to the bolt zone.
- Clamp the first post in place, plumb it in both directions with a level, and hold it there.
- Drill and set the tension tie, then drill and install both through-bolts, checking plumb again before final tightening.
- Repeat for every post, then sight down the row to confirm they’re all in line before rails go on.
Plumb is everything. The posts are the reference for the entire railing, so a post leaning even a couple degrees throws off every rail and baluster that follows. Take your time here and the rest of the build goes fast.
Testing Your Work
Before you hang a single rail, test each post. Grab it at the top and push and pull hard in every direction, putting real weight into it. A properly anchored post should feel like it’s part of the deck — firm, with no give at the base and no creaking. If it flexes or you hear the framing move, your blocking or bolts aren’t tight enough. Fix it now, while the post is accessible, not after the balusters are on.
This hands-on test mimics what the code load does in the real world. If a post passes your full-body lean, it will pass the inspector and it will hold a person who trips into it.
Surface-Mount Post Bases: When Bolts Aren’t an Option
Sometimes you cannot get behind the framing to run through-bolts, or you are setting a post on top of a solid surface like a concrete balcony or a composite deck over a slab. In those cases a tested surface-mount post base is the answer. These are heavy steel bases that anchor to the structure with multiple lag screws or wedge anchors and clamp the base of the post. Not every surface base is rated to carry the full 200-pound guard load, so read the hardware maker’s rating before you buy. On a concrete deck, use expansion anchors or epoxy-set anchors rated for the pullout the guard load creates, and never rely on plastic anchors or short tapcons for a guardrail. Surface mounting is legitimate and inspector-approved when you use a base specifically rated as a guard-post connection.
How Far Below the Deck the Post Runs
For a bolted post, the length that hangs below the deck surface is what makes the connection work. Run the post down past the rim joist far enough to place your bolts in solid framing, typically leaving 8 to 10 inches of post below the decking to catch both the tension tie and two staggered bolts. Too short and the bolts crowd together, which weakens their grip on the prying load. When you cut posts, account for this hidden length: the total is your 36-inch guard height above the deck plus the thickness of the decking plus the drop below to the bolt zone. Cut a test post first and dry-fit it before you cut the whole batch.
Posts at Stairs and Corners
Stairs and corners take extra attention because they see concentrated traffic and hand loads. Set a post at both the top and bottom of every stair run and at each corner of the deck, because those are the points people grab hardest and where the rail changes direction. A stair guard measured along the slope has its own height rule, generally 34 to 38 inches above the stair nosing, so cut stair posts to a different height than the level-run posts. Block behind stair posts the same way you block the deck posts, tying them into the stringers or framing rather than a single board.
Sizing and Cutting Posts to the Right Length
Getting the post length right the first time saves a lot of grief, because a post cut short can’t be salvaged. Add up three measurements: the depth of framing the post extends down alongside (usually the joist height, 8 to 10 inches for a 2×8 or 2×10 rim), the thickness of the deck boards, and the required guard height of 36 inches above the finished deck surface. For a deck with 2×8 joists and 5/4 decking, that’s roughly 7.25 inches of framing overlap plus 1 inch of decking plus 36 inches of guard, so a post around 44 to 46 inches finished, plus whatever you want for a decorative top. Cut them a hair long and trim to a chalk line once they’re set — trimming down is easy, adding length is impossible.
Set the posts before the decking goes down whenever you can. Bolting a post to the framing with the deck boards already installed forces you to notch boards around each post, which is fussy and leaves gaps that trap water. Post-first, board-second is faster and cleaner, and it lets you tuck the decking neatly against each post.
Corner Posts and Long Runs
Corners and long spans need extra thought. A corner post takes load from two directions, so give it the same blocked, double-bolted connection you’d give any post, and consider a 6×6 there for the added stiffness where two rail sections meet. On a long straight run, don’t let the spacing creep past 6 feet just to save a post — a rail that spans too far between posts feels springy and can bounce enough to fail the 200-pound test at midspan. Tighten to 5 feet on center wherever people are likely to lean, such as along a seating area or above a view.
Where stairs meet the deck, plan a post at the top and bottom of the stringers so both the deck guard and the stair rail have solid anchorage. These transition posts carry the handrail load and the guard load at once, so they earn the strongest connection on the whole deck.
Common Mistakes to Avoid
The recurring failures I get called to repair are almost always the same: no blocking behind the post, notched posts that snapped, lag screws where bolts belonged, and plain-steel fasteners that rusted out in treated lumber. Any one of these produces a rail that feels fine on day one and works loose within a few seasons.
Do the opposite of that list and your railing will outlast the decking. Now that you know how to install deck railing posts with blocking, tension ties, and staggered through-bolts, you have the one skill that separates a deck that passes inspection and protects your family from one that only looks the part. Anchor the posts right and everything above them is just carpentry.