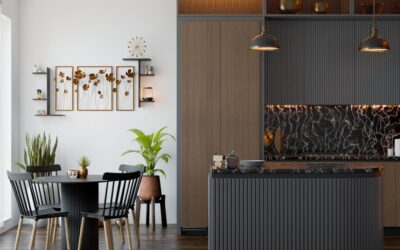
Nothing transforms a kitchen faster than the right fixtures over the island, and getting there is more science than luck. Elegant kitchen island lighting balances beauty and function, casting enough task light for prep and homework while serving as the jewelry that defines the whole room’s style. The difference between a kitchen that looks builder-basic and one that looks designed often comes down to the size, height, and spacing of the pendants, so let this guide to elegant kitchen island lighting help you choose fixtures that look intentional and light the island properly.
Part of our Kitchen Remodeling guide — explore the full guide →
- Start with the Purpose of the Light
- How Many Pendants Do You Need?
- Sizing Fixtures to the Island
- The Critical Hanging Height
- Spacing Multiple Pendants Evenly
- Choosing a Style That Elevates the Room
- Layering with Other Light Sources
- Bulbs, Dimming, and Finishing Touches
- Pendants vs. a Linear Fixture
- Wiring and Installation Considerations
- Common Lighting Mistakes to Avoid
Start with the Purpose of the Light
Island lighting does two jobs at once. It provides task lighting for chopping, mixing, and reading recipes, and it delivers ambiance and style as a visual anchor. The best setups do not force you to choose. A pendant that looks stunning but leaves the counter dim fails at task lighting, while a bank of harsh recessed cans lights the surface but adds no character. Aim for fixtures that are beautiful and bright enough to work under, ideally on a dimmer so you can shift from bright prep light to soft dinner-party glow.
How Many Pendants Do You Need?
Pendant count follows island length, and the goal is balanced, even spacing. Use the size of your island to guide the number.
- Islands up to 4 feet: one larger statement pendant or two small ones
- Islands 4 to 7 feet: two pendants, the most common and versatile arrangement
- Islands 7 to 9 feet: three pendants for even coverage
- Islands over 9 feet: three or more, or a single linear fixture
A reliable design rule for multiple pendants is odd numbers when using small fixtures and pairs when using larger ones, because the eye reads balanced spacing more than the count itself.
Sizing Fixtures to the Island
Scale is where most people go wrong, usually by choosing pendants that are too small. Undersized fixtures look lost over a big island. A helpful guideline is that the combined width of your pendants should equal roughly one-third to one-half the length of the island, leaving generous space between each fixture and the island ends.
For individual pendant diameter, a common approach is to add the room’s dimensions in feet and use a similar number in inches as a rough scale reference, then adjust for how many fixtures share the span. When in doubt over a large island, go slightly bigger; substantial pendants read as elegant, while tiny ones read as an afterthought.
The Critical Hanging Height
Hang the fixtures too high and the light spreads thin; too low and they block sightlines and bump heads. The standard is to hang pendants so the bottom sits 30 to 36 inches above the countertop. In a kitchen with 8-foot ceilings, aim for the lower end of that range; with 9- or 10-foot ceilings, you can go a touch higher and add a few inches of drop for every foot of ceiling above eight.
Also consider sightlines. If the island faces a dining area or a view, make sure the pendants clear the eye level of someone seated across from a standing person, so the fixtures frame the space rather than obstruct it.
Spacing Multiple Pendants Evenly
With two or more pendants, even spacing is everything. Divide the island length into equal segments so the fixtures are balanced from the ends and from each other. A quick method for two pendants is to divide the island into thirds and center a fixture in each of the two outer thirds, leaving the middle open and the ends balanced.
For three pendants, divide the length into equal quarters and place fixtures at the three interior dividing points, or simply space them so the gaps between fixtures and between the end fixtures and the island edges all match. Measure carefully, because uneven spacing is the most noticeable lighting mistake in a finished kitchen.
Choosing a Style That Elevates the Room
The fixture style sets the tone, so coordinate it with your cabinetry, hardware, and overall aesthetic.
- Glass globe or seeded-glass pendants: airy and timeless, they suit transitional and modern kitchens
- Metal dome or barn pendants: farmhouse and industrial looks, often in matte black, brass, or bronze
- Linear suspension fixtures: one long, sleek fixture for a clean, contemporary island
- Woven rattan or natural-material shades: organic warmth for coastal and boho kitchens
- Crystal or mixed-metal pendants: a touch of glamour for formal, elegant spaces
Match the metal finish to your faucet and cabinet hardware for a cohesive look, or deliberately mix metals in a controlled way, such as brass pendants against black hardware, for a curated feel.
Layering with Other Light Sources
Even beautiful pendants should not be the only light in the room. Elegant lighting is layered. Combine the island pendants, which serve as accent and task light, with recessed cans for general ambient light and under-cabinet strips for additional counter task lighting. Put the pendants on their own dimmer so you can dial them down for atmosphere while keeping the recessed lights available for full brightness.
This layering is what separates a professionally designed kitchen from a flatly lit one. The pendants provide the sparkle and focal point, while the ambient and task layers fill in shadows and let you tune the mood throughout the day.
Bulbs, Dimming, and Finishing Touches
Choose LED bulbs in a warm-to-neutral color temperature, around 2700K to 3000K, for an inviting glow that flatters both food and finishes. Confirm the fixtures and bulbs are dimmable and pair them with a compatible dimmer switch, since dimming is the single feature that makes island lighting feel truly elegant rather than merely bright.
Finally, mind the details that read as custom: matching cords or rods cut to consistent lengths, clean canopies at the ceiling, and pendants hung dead level with one another. Nail the size, height, spacing, and dimming, and your elegant kitchen island lighting will do exactly what great lighting should, making the island the confident centerpiece of the whole room.
Pendants vs. a Linear Fixture
For longer islands, you face a choice between multiple pendants and a single linear suspension fixture, and each has strengths. Individual pendants create rhythm and let you mix in decorative shapes, which suits farmhouse, transitional, and eclectic kitchens. A linear fixture, one continuous bar of light, delivers a clean, uninterrupted look that reads modern and minimal, and it often provides more even task lighting across the whole surface.
Linear fixtures also simplify installation because they connect to a single electrical box, whereas multiple pendants may require several boxes or careful spacing from one box. If your island runs 8 feet or longer and your style is contemporary, a linear fixture is worth strong consideration; for a warmer, more traditional room, a trio of pendants usually wins.
Wiring and Installation Considerations
Plan the electrical early, ideally during a remodel when the ceiling is open. Each pendant needs a supported junction box rated for the fixture weight, and the boxes must be positioned to match your final spacing, not centered by accident. Retrofitting new boxes into a finished ceiling is possible but adds labor and patching.
Put the island lights on their own switch and, critically, their own dimmer. If you are running new circuits, coordinate with the recessed lighting layout so the ceiling looks planned rather than cluttered. For anything beyond swapping a fixture on an existing box, hiring a licensed electrician is money well spent, typically $100 to $300 depending on how much wiring and boxing the job requires.
Common Lighting Mistakes to Avoid
Even good fixtures fail when the fundamentals are off. The most frequent error is choosing pendants that are too small for the island, leaving them looking lost and providing weak light. Hanging fixtures too high spreads the light thin, while hanging them too low blocks views and heads. Uneven spacing, where gaps between fixtures do not match, is instantly noticeable in a finished kitchen.
Other pitfalls include forgetting a dimmer, choosing a harsh cool-white bulb that makes food and finishes look clinical, and mismatching the fixture finish with the rest of the kitchen’s hardware. Avoid these by measuring carefully, buying appropriately scaled fixtures, and treating the lighting as an integral part of the design rather than a last-minute add-on. Handle the details and the island lighting elevates the entire room.