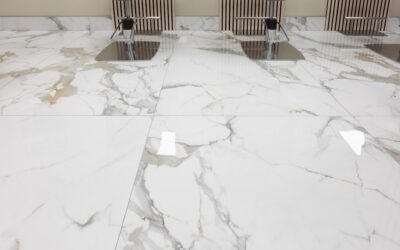
A pour-in-place metallic epoxy floor delivers the look of polished Calacatta marble for about a third of the cost of real stone, and the seamless surface beats anything tile installers can achieve. Epoxy marble flooring uses metallic pigments suspended in clear epoxy that flow and pool during cure to mimic the veining of natural marble. The technique started in commercial showrooms and luxury hotels and has moved into high-end residential foyers, kitchens, and great rooms over the past few years. Done right, the result is breathtaking. Done wrong, it looks like a swirly garage floor.
Part of our Epoxy, Concrete & Garage Floors guide — explore the full guide →
How Metallic Epoxy Marble Floors Work
The system uses a three-coat process. First, a 100 percent solids epoxy primer bonds to the prepared concrete. Second, a pigmented base coat establishes the dominant color. Third, a metallic pigment dispersed in clear epoxy is poured and manipulated to create veining and depth.
The metallic pigments are mica or aluminum-based particles that catch light differently across the surface, creating the depth that makes the floor look three-dimensional. Solvents and torches push the metallic pigment into vein patterns that emulate Carrara, Calacatta, or Statuario marble. The final clear topcoat is a UV-stable polyaspartic or polyurethane that adds wear protection.
Pros of This Floor System
The first benefit is cost. Real polished marble installed runs $20 to $50 per square foot depending on stone selection and complexity. The poured metallic version runs $7 to $15 per square foot installed, with DIY kits starting around $3 per square foot in materials.
The second benefit is the seamless finish. Stone has grout lines or mitered seams. Epoxy pours as a continuous skin with no joints, no grout, and no thresholds across rooms. The third benefit is durability. A properly installed metallic epoxy system handles vehicle traffic in commercial settings and easily takes residential foot traffic for 15 to 25 years.
Cons and Real Limitations
A metallic epoxy system requires perfect concrete preparation. Any oil residue, sealer remnant, or curing compound on the slab causes adhesion failure. Most professional installers diamond-grind to a CSP-3 or CSP-4 surface profile before priming, which costs $1.50 to $3 per square foot for the prep alone.
The floor is hard. Drop a glass and it shatters in a way that natural stone might forgive. The surface also feels colder underfoot than wood or LVP, though radiant heat solves that issue if planned during install. Repairs are difficult. Spot-fixing a damaged area requires grinding and re-pouring a section, and the new material rarely matches the existing pattern perfectly.
Concrete Substrate Requirements
The slab must be sound, dry, and structurally adequate. Test moisture content with calcium chloride per ASTM F1869 or relative humidity per ASTM F2170. Most epoxy systems need readings below 4 lbs per 1,000 sq ft per 24 hours, or 75 percent RH. Slabs above those numbers need a moisture mitigation primer like MAPEI Planiseal MRB applied first.
Repair cracks with epoxy crack injection products before priming. Hairline cracks under 1/16 inch can be bridged with a fiberglass mesh embedded in primer, but anything wider needs filling. Skipping crack repair guarantees the cracks will telegraph through the finished floor within 12 to 24 months.
DIY Versus Professional Installation
DIY metallic epoxy kits from companies like Leggari and Stone Coat Countertops include all the materials for a 200 to 300 square foot project at $600 to $1,500. The kits are well-engineered and the manufacturers offer good video tutorials. First-time DIY results vary wildly based on prep work and pour technique.
Professional installers charge $7 to $15 per square foot for a complete system. The premium pays for proper concrete grinding, experienced pour technique, and a warranty. For visible main floors and foyers, hire a pro. For garages, basements, and hidden mechanical rooms, DIY is reasonable.
Color and Pattern Selection
Calacatta whites with grey veining dominate residential metallic epoxy sales. Other popular looks include Statuario gold-veined white, Carrara grey-veined white, Nero Marquina black-veined, and Emperador rich brown. Custom blends mix multiple metallic pigments for unique looks.
Order a 2 by 2 foot sample board before committing to a color scheme. The way pigments flow on small samples differs slightly from full floors, but the color palette and vein density translate directly. Confirm the color in the actual room lighting before approving the production pour.
Best Applications in the Home
A metallic marble pour works beautifully in foyers, formal entries, large open kitchens, great rooms, sunrooms, and finished basements. The seamless surface emphasizes large open areas, which is why it dominates restaurant and showroom installations.
Avoid in bathrooms with a high risk of standing water, because matte finishes can show water spotting and require frequent re-coating. Stairs are tricky because the seamless pour does not naturally indicate tread edges, and falls become a real risk. Use contrasting nosing strips if you do epoxy stairs.
Cost Breakdown for a Real Project
For a 500 square foot great room and entry, expect total costs between $3,500 (DIY kit, basic prep) and $9,000 (professional install with full grinding, multiple pigment colors, premium polyaspartic topcoat). Most professionally installed jobs land between $5,500 and $7,500 for that size.
Add $500 to $1,500 for any moisture mitigation primer if slab readings demand it, plus $300 to $800 for transition trims and edge details. The final price is still 50 to 70 percent below comparable real marble installation.
Long-Term Care
Sweep or dust-mop daily and damp-mop weekly with a pH-neutral cleaner. Avoid acidic cleaners, vinegar, and abrasive scrub pads, all of which dull the topcoat. Most installers recommend a re-coat of polyaspartic topcoat every 5 to 8 years to refresh the gloss and add wear protection.
Walk-off mats at entries dramatically extend topcoat life by capturing grit before it reaches the floor. Felt pads on furniture prevent micro-scratches in the topcoat. With proper care, a metallic epoxy floor stays glossy and intact for 20 to 30 years before requiring full sand and re-pour.
Frequently Asked Questions
How long does a metallic epoxy pour take to install?
A 500 square foot project typically takes 4 to 6 days. Day 1 is concrete prep, day 2 is primer, day 3 is base coat, day 4 is metallic pour, days 5 and 6 are topcoat and full cure. Plan for 7 days of no foot traffic.
Will it yellow over time?
Standard epoxy yellows under UV exposure within 1 to 3 years. Polyaspartic and aliphatic urethane topcoats are UV-stable and prevent yellowing for 10 to 20 years. Always specify a UV-stable topcoat in sun-exposed rooms.
Can I install epoxy marble over existing tile?
Only with a self-leveling underlayment poured over the tile first. Direct application to tile rarely works because the grout lines telegraph through and the glazed tile surface lacks adequate bond.
How does it compare to real marble?
Real marble offers natural depth and authenticity that no epoxy can perfectly replicate, but it costs 2 to 4 times as much, requires sealing, and stains easily. Epoxy marble flooring delivers 90 percent of the visual impact at a fraction of the cost and far less maintenance.
Prefer to explore on your own?
See how new flooring looks in your actual room in seconds — free, no signup.
Try the free Floor Studio →