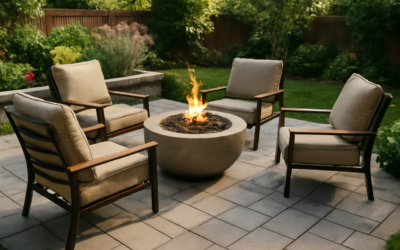
The most common mistake with a backyard fire pit is not the build itself; it is where it goes. A well-assembled kit placed too close to a fence, under a tree limb or on a wooden deck is a fire waiting to happen. Good fire pit installation starts with checking local burn rules, measuring clearances, and preparing a stable, noncombustible base. Only after that do you set the ring or kit, and if you want gas, plan the fuel line with a licensed professional.
Most homeowners can handle a wood-burning kit installation in a weekend: pick a legal, safe spot, dig and compact a gravel base, set a steel ring insert and surround it with blocks or pavers. Gas fire pits are different. The burner and pan are simple, but running a natural gas or permanent propane line is regulated work that needs a permit and a licensed installer in most places.
This guide covers site selection and clearances, the base, the setup process for a kit, gas line fundamentals, safety habits, troubleshooting and typical costs. If you want to build a pit block by block with mortar, that is a masonry project of its own; here the focus is installing a kit or gas unit correctly.
Fire Pit Installation Starts With Rules and Clearances
Before you buy anything, call your city or county and check three things: whether open burning is allowed, whether there are seasonal burn bans, and whether a permit is required. Many areas allow gas fire pits during burn bans that prohibit wood fires. HOAs often have their own rules on placement and type, and some prohibit wood-burning pits altogether.
Clearances vary by jurisdiction and manufacturer, so treat the following as common starting points and follow whichever rule is stricter:
- At least 10 feet from the house, garage, sheds, fences and property lines; many codes and insurers prefer 20 to 25 feet for wood fires.
- Well clear of overhanging branches, with open sky above; no pergolas, covered patios or low eaves.
- Not on a wooden deck or near dry grass, unless the unit is a gas model specifically listed for that use with the required heat shield.
- Upwind of seating areas based on your prevailing wind, so smoke drifts away from the house and guests.
- On level ground with good drainage, so rainwater does not pool in the pit.
Leave a clear zone of at least 7 to 10 feet around the pit for seating and movement. A typical 36- to 44-inch pit with chairs around it needs an area roughly 12 to 16 feet across.
Call 811 Before You Dig
Every fire pit base involves digging, and even a few inches can reach shallow utility lines, irrigation pipes or low-voltage cables. Call 811 or submit an online request a few business days before you dig. The service is free, and local utilities will mark their buried lines. Private lines, such as a gas line to a grill or power to a shed, are not marked by the utility, so locate those separately before you start.
Tools and Materials
- Fire pit kit or steel fire pit ring insert and surround blocks or pavers
- Tape measure, stakes, string and a can of marking paint
- Flat shovel, spade and wheelbarrow
- Hand tamper or rented plate compactor
- Crushed gravel base (3/4-inch minus or similar) and coarse sand or stone dust
- Pea gravel or lava rock for the pit floor (for wood-burning, avoid river rock, which can crack or pop when heated)
- 4-foot level and rubber mallet
- Masonry adhesive rated for high heat, if the kit calls for it
- Work gloves, safety glasses and a dust mask for cutting stone
Step-by-Step: Installing a Wood-Burning Fire Pit Kit
- Mark the location. Drive a stake at the center, tie a string to it, and use marking paint to outline a circle about 12 inches wider than the outside of the kit. If you want a paver patio around the pit, mark that larger area too.
- Excavate. Remove sod and dig down roughly 6 to 8 inches across the marked area. Keep the bottom as flat as possible.
- Add and compact the gravel base. Spread crushed gravel in 2-inch lifts, dampen lightly, and compact each lift until firm. Aim for a 4- to 6-inch compacted base. Check level across the circle in several directions.
- Screed a leveling layer. Spread about 1 inch of coarse sand or stone dust and smooth it level. This makes it easier to seat the first course of blocks.
- Set the first course. Place the ring insert in the center and arrange the first course of blocks tightly around it. Level each block front to back and side to side, tapping with a rubber mallet.
- Stack the remaining courses. Stagger joints like brickwork. If the kit calls for adhesive, apply high-heat masonry adhesive between courses, not on the inner face touching the ring.
- Fill the pit floor. Add 2 to 4 inches of pea gravel or lava rock inside the ring for drainage. Never use a solid concrete floor without drainage, since trapped water can cause cracking.
- Finish the surround. Lay pavers or spread decorative gravel around the pit to create a noncombustible zone at least 3 feet wide. Remove any mulch or bark within that zone.
- Cure and test. Let adhesive cure per the label, then start with a small fire to check for drafts and smoke direction before hosting a crowd.
A steel ring insert is worth the modest extra cost. It shields concrete retaining blocks from direct flame, which reduces cracking and spalling and keeps the pit looking clean for many more seasons.
Gas Fire Pit Installation Basics
A gas fire pit uses a burner pan, burner ring, ignition system and a fuel supply. The fuel options determine how complicated the job is:
- Portable propane tank: the simplest option. The tank sits in a ventilated enclosure or beside the pit on a listed hose and regulator. Always follow the manufacturer’s rules for enclosure venting and hose length, and leak-test connections with soapy water, never a flame.
- Natural gas line: requires running a buried gas pipe from the house meter or an existing line to the pit, sized for the burner’s BTU rating and the distance. This work generally requires a permit and a licensed gas fitter or plumber, along with pressure testing and inspection.
- Buried propane line from a large tank: also licensed work, typically done by the propane supplier or a licensed installer.
Homeowners should not run or connect permanent gas piping themselves. The installer will select the pipe material, set the trench depth, install a shutoff valve near the pit and ensure the line is sized correctly. Your part is planning: decide the location early, leave a path for the trench, and budget for the permit and inspection. If you ever smell gas near the pit or anywhere on the line, shut off the supply if you can do so safely, leave the area, and call the gas utility or 911 from a safe distance.
Gas fire pits also need adequate air around the burner. Fully enclosed tanks and burner cavities without vents can let propane collect and ignite unexpectedly. Choose a unit with the correct listing for outdoor use and follow its venting requirements exactly.
Fire Safety Habits
- Keep a garden hose, fire extinguisher or bucket of sand within reach every time you burn.
- Burn only dry, seasoned firewood. Never use gasoline, lighter fluid on a lit fire, trash, pressure-treated lumber or painted wood.
- Use a spark screen on windy days, and skip the fire entirely when winds are strong or a burn ban is active.
- Never leave a fire unattended, and keep children and pets at least 3 feet from the edge.
- Drown the fire with water, stir the ashes and drown again until everything is cool to the touch. Store cooled ashes in a metal container with a lid, away from the house.
- Keep the lithium batteries of electronic igniters and remote controls dry and follow the maker’s charging and storage instructions.
Troubleshooting
- Smoke blows toward the house: the pit is downwind of seating or the wood is wet. Burn drier wood and consider relocating if the problem persists.
- Blocks cracking or flaking: direct flame on standard concrete block. Add a steel ring insert or replace with fire-rated block.
- Water pooling in the pit: inadequate drainage. Deepen the gravel base or add a drain layer beneath the pit floor.
- Gas burner flame is weak or yellow and sooty: possible low pressure, a clogged burner or incorrect air mixture. Turn off the gas and have a qualified technician inspect it.
- Igniter clicks but no flame: check the propane tank level and valve, then call a technician if the issue continues.
Cost Ranges
A basic wood-burning kit with base materials is often a few hundred dollars for a DIY install, while premium stone kits cost more. Adding a steel ring insert and a paver surround raises material costs moderately. Professionally installed wood-burning pits commonly land in the low thousands. Gas fire pits range widely: a portable propane unit can be a few hundred dollars, while a custom natural gas pit with a trenched line, permit and inspection often runs into the several-thousand-dollar range or more, mostly driven by the distance of the gas run.
When to Call a Licensed Professional
Call a licensed gas fitter or plumber for any natural gas line or buried propane line, and expect a permit and inspection. Hire a licensed electrician if your gas unit needs a hardwired electronic ignition or you want new outdoor outlets, which must be GFCI protected and weather-rated. Consult a landscaper or hardscape contractor when the site is sloped, requires retaining walls, or sits on poorly draining soil. If local rules require a permit or setback inspection for wood-burning pits, get it before you build.
Frequently Asked Questions
How far should a fire pit be from the house?
A common minimum is 10 feet from any structure, fence or property line, with many codes and insurers recommending 20 to 25 feet for wood fires. Always follow your local rules.
Can I install a fire pit on grass?
Not directly. Remove the sod and build a compacted gravel base with a noncombustible surround at least 3 feet wide to prevent scorching and grass fires.
Do I need a permit for fire pit installation?
It depends on your area. Many places require a permit for gas lines and some regulate wood-burning pits. Check with your local building or fire department and your HOA.
Can I run a natural gas line to my fire pit myself?
No. Permanent gas piping generally requires a permit, pressure testing and a licensed gas fitter or plumber. Plan the location and let the licensed pro handle the line.
What should go in the bottom of a fire pit?
Two to four inches of pea gravel or lava rock over a compacted base provides drainage. Avoid river rock, which can trap moisture and crack or pop when heated.