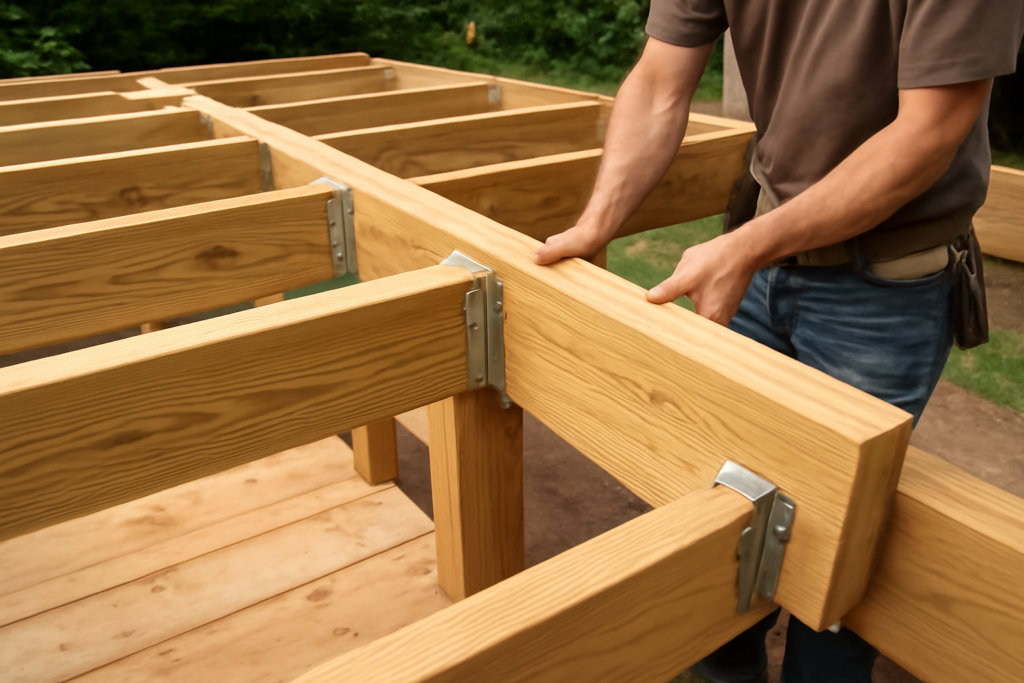
Floor joist hangers are the galvanized metal connectors that hold floor joists in place where they meet a beam, ledger board, or rim joist. They carry serious structural load, transferring the weight of the floor above into the supporting member, so using the right hanger and the right fasteners is not optional. Getting this connection wrong can lead to a bouncy, sagging, or unsafe floor. This guide covers the main hanger types, fasteners, and installation basics, but always verify your design against local building code and consult a structural engineer for spans and loads.
What a Joist Hanger Does
A joist hanger forms a U-shaped pocket that cradles the end of a joist and fastens to the face of a supporting beam or ledger. It replaces older methods like toe-nailing or resting joists on a ledger strip, providing a far stronger, code-recognized connection. The hanger’s job is to resist the downward gravity load and, in many applications, uplift and lateral forces too. Because these connectors are load-rated by the manufacturer, you cannot substitute one type for another without confirming the rating.
Common Types of Joist Hangers
Hangers come in many configurations to match different framing situations.
- Face-mount hangers: The most common type, nailed to the face of the supporting member. They are easy to install and suit most standard floor framing.
- Top-flange hangers: Have a flange that hooks over the top of the beam, transferring load directly onto the supporting member. Often used with engineered lumber and heavier loads.
- Concealed-flange hangers: The flanges fold inside so no metal shows from the face, useful where appearance matters.
- Adjustable and skewed hangers: Designed for joists that meet a beam at an angle or on a slope, such as in stairs or angled framing.
- Double and heavy-duty hangers: Sized for double joists, LVL, and other multi-ply or engineered members.
Matching the Hanger to the Joist
Hangers are sized to specific lumber dimensions. A hanger for a 2×10 will not properly support a 2×8, and vice versa. The hanger should match both the width and the depth of the joist so the member fully seats in the pocket with the top flush. For engineered products like LVL, I-joists, or glulam, use hangers specifically rated for that material; standard dimensional-lumber hangers are not always appropriate. Always check the manufacturer’s catalog for the exact part number that matches your joist and load.
The Right Nails Matter
This is where many DIY installations fail. Joist hangers must be filled with the specific fasteners the manufacturer specifies to achieve their rated capacity. Key rules:
- Fill every hole. Each nail hole in the hanger is part of the load rating. Leaving holes empty reduces the connection’s strength.
- Use the correct nail. Manufacturers call out specific nails, often 10d or 16d common or special structural-connector nails. Do not substitute drywall screws, deck screws, or roofing nails.
- Match the coating to the environment. Use hot-dip galvanized or stainless hangers and fasteners for exterior, treated lumber, or damp locations to prevent corrosion.
- Use structural screws only where listed. Some connectors are rated for specific structural screws, but only use screws the manufacturer explicitly approves.
Installation Basics
Proper installation ensures the hanger performs as rated.
- Mark the joist locations on the beam or ledger, accounting for correct on-center spacing.
- Cut joists to length so the end seats fully in the hanger pocket with no gap at the bottom.
- Position the hanger at the correct height so the joist top sits flush with the top of the supporting member, then nail one side flange.
- Set the joist into the pocket, square it, and nail the second flange.
- Drive fasteners into every required hole, including the angled holes through the hanger into the end of the joist where specified.
Common Mistakes to Avoid
Watch for the errors that compromise strength. Leaving nail holes empty, using the wrong fasteners, or mixing incompatible hanger and connector brands all reduce capacity. A gap between the bottom of the joist and the hanger pocket means the joist is not fully bearing, which is a frequent and serious mistake. Mounting a hanger too high or too low throws off the floor plane. And using interior-rated hangers outdoors or with treated lumber invites corrosion that can fail years later.
Code, Spans, and When to Get Help
Floor joist hangers are a structural element, and their selection ties directly to joist span, spacing, and the loads the floor must carry. Local building codes dictate minimum requirements, and permits often require inspection of these connections. For anything beyond a simple like-for-like replacement, especially new construction, additions, or longer spans, have a structural engineer or your building department confirm the joist size, spacing, and hanger rating. The cost of professional guidance is trivial next to the risk of an under-built floor.
Interior Floors vs. Outdoor Decks
While the principles are the same, the requirements differ between interior floor framing and exterior deck framing. Indoor floor joists live in a dry, conditioned environment, so standard galvanized hangers and fasteners are usually adequate. Outdoor deck joists face moisture, rain, and pressure-treated lumber, all of which accelerate corrosion. For decks, building codes typically require hot-dip galvanized or stainless steel hangers and fasteners, because modern pressure-treated wood contains chemicals that corrode lesser metals quickly. Mixing metals, such as using aluminum fasteners with treated lumber, can cause galvanic corrosion and premature failure. Always match the hanger and fastener coating to the lumber and exposure, and treat deck connections as the safety-critical structural elements they are.
Tools and Time for the Job
Installing joist hangers does not require exotic tools, but the right ones make the work faster and more accurate. A framing hammer or a positive-placement nail gun designed for metal connectors speeds up filling all those holes; a standard nail gun is not suited to connector nailing. You will also want a speed square to keep joists square, a tape measure for layout, and a chalk line for marking. Special connector nails come in collated strips for the positive-placement gun, which dramatically reduces the labor of hand-nailing dozens of hangers. For a typical room, an experienced framer can hang a floor’s worth of joists in a few hours, but take your time on each connection, since the load rating depends on every nail being driven correctly.
Double 2×8 Joist Hangers
Double 2×8 joist hangers are built to carry two 2×8 joists fastened side by side as a single member. Doubled joists show up wherever a floor needs extra strength, and a standard single-width hanger simply cannot hold them. Using the correct double hanger, assembling the doubled joist properly and fastening it to the hanger maker’s schedule are what keep these heavier connections working as designed.
Where Doubled 2×8 Joists Are Used
Doubled joists are common around floor openings, where the joists that frame a stairwell, attic hatch or chimney chase carry extra load from the cut joists. They also appear under parallel load-bearing or partition walls, beneath heavy items like a cast iron tub or a large aquarium, and along the edges of deck stairs or framed openings in a deck. Builders sometimes double a joist to stiffen a floor that feels bouncy, but adding a second joist to an existing floor changes how loads travel and should be checked by a professional first.
Sizing the Hanger for Two Plies
Two 2x8s laid together measure about 3 inches wide and 7 1/4 inches deep, so a double 2×8 hanger has a seat a little over 3 inches wide to allow a snug but workable fit. The hanger height is designed for 2×8 depth and usually covers most of the joist face. Do not try to wedge a doubled joist into a hanger meant for a 4x material, which is wider than two dimensional boards, or into a single hanger with one ply sitting on top of the flange. Doubled members built from engineered lumber or an LVL beside a 2×8 need a hanger rated for that exact combination. Check the hanger’s label or the maker’s catalog for the model rated for two 2×8 plies, and confirm whether it is face mount or top flange, since the right style depends on what the joist ties into.
Assembling and Seating the Doubled Joist
Fasten the two plies together before setting them in the hanger, following the nailing or screw pattern your plans or the local code call for, so they act as one member. Keep the crowns facing up and the top edges flush; a ply that sits higher than its partner will create a hump in the subfloor. Cut both ends square so the full width bears on the hanger seat with no gap at the bottom. Then set the hanger so the top of the doubled joist sits flush with the beam or ledger.
Fasteners and the Structural Side
Double hangers usually have more nail holes and, on many models, holes that call for specific nail lengths into the header and the joist. Drive the exact nail or listed structural screw the hanger maker’s schedule names in every required hole, and use hot-dip galvanized or stainless hardware for decks and treated lumber. Doubled joists usually mark a spot where loads concentrate, so this is not a place to improvise. Pull a permit when your area requires one for framing work, and bring in a structural engineer before cutting, removing, sistering or rerouting existing joists, or adding a new opening in a floor.
Final Thoughts
Floor joist hangers are small connectors with a big structural job. Choose the correct type for your framing, match the hanger to the exact joist size, fill every hole with the manufacturer-specified fasteners, and use corrosion-resistant products in damp or exterior locations like decks. Above all, respect that this is load-bearing work: follow code and bring in a structural engineer for spans and loads. Done right, joist hangers give you a solid, safe, long-lasting floor.
Prefer to explore on your own?
See how new flooring looks in your actual room in seconds — free, no signup.
Try the free Floor Studio →