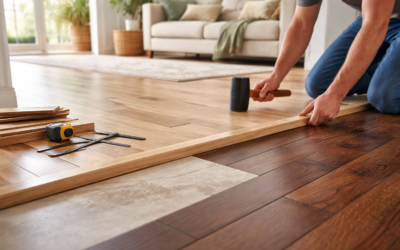
That small strip of wood, metal, or stone sitting in a doorway between two rooms has a name most people never learn until they need one, and it is called a floor saddle. Also known as a threshold or transition strip, a saddle bridges the gap where two different floors meet, covering the seam, managing any height difference, and giving a clean, finished transition from one room to the next. It seems like a minor detail, but a poorly chosen or badly installed saddle ruins the look of an otherwise perfect flooring job. This guide covers the types, materials, sizing, and installation of floor saddles.
What a Floor Saddle Does
A floor saddle serves several practical purposes at once. First, it covers the expansion gap that flooring like hardwood, laminate, and vinyl requires at doorways and where it meets other surfaces, hiding the raw cut edges. Second, it bridges any difference in height between two adjacent floors so you do not trip and so the transition looks intentional. Third, it provides a visual break between two different flooring materials or colors, giving each room a clean stopping point.
Without a saddle, the seam between two floors looks unfinished and the exposed edges are vulnerable to chipping, curling, and moisture intrusion. The saddle is the finishing piece that makes a multi-room flooring installation look professionally done, which is why every doorway transition deserves the right one.
Types of Floor Saddles
Different situations call for different saddle profiles, and choosing the correct type is largely about the relationship between the two floors:
- T-molding: A T-shaped profile for joining two floors of the same or nearly the same height, such as hardwood meeting hardwood in a doorway.
- Reducer strip: Slopes down from a taller floor to a shorter one, used where, say, tile meets vinyl or laminate meets a lower surface.
- Threshold saddle: A flat or gently domed strip commonly used at exterior doors and where flooring meets carpet.
- Carpet transition (Z-bar or tack strip): Grips the edge of carpet where it meets a hard floor.
- Seam binder: A flat metal or wood strip covering a seam between two floors of equal height.
Matching the profile to the height difference is the key decision. Two equal floors use a T-molding or seam binder, a step down uses a reducer, and carpet-to-hard-floor transitions need a saddle designed to grip the carpet edge.
Materials to Choose From
Floor saddles come in a range of materials to match your floors and durability needs:
- Wood: Solid or engineered wood saddles that match hardwood floors, stainable and paintable to blend in.
- Metal (aluminum, brass, stainless): Durable and modern, common in commercial settings and contemporary homes, and excellent for high-traffic doorways.
- Marble and natural stone: Classic in bathroom and entry doorways, especially between tile and another surface, and highly durable.
- Vinyl and laminate: Color-matched strips designed to coordinate with LVP and laminate floors, affordable and easy to install.
Marble saddles are a traditional and popular choice at bathroom doorways because stone shrugs off moisture and coordinates with tile. Wood saddles suit hardwood transitions, while color-matched vinyl and laminate strips come with the flooring system and blend in seamlessly.
Sizing a Floor Saddle
Getting the size right is essential for both function and appearance. Measure the width of the doorway or opening precisely, and account for the door jambs, since the saddle usually runs the full width between the finished jamb legs. Standard interior doorways are around 30 to 36 inches wide, and saddles are sold in common lengths you cut to fit.
Just as important is matching the saddle profile to the height difference between the two floors. Measure the finished height of each floor at the transition. If they are equal, a T-molding or flat saddle works. If one is higher, measure the difference and choose a reducer that spans that specific gap so the slope is gentle and safe. A saddle that does not match the height difference either leaves a lip you catch your toe on or fails to cover the seam.
How to Install a Floor Saddle
Installing most floor saddles is a straightforward job with basic tools. The general steps are:
- Measure the opening and cut the saddle to length with a saw appropriate to the material, testing the fit before fastening.
- Confirm the profile sits correctly over both floors and covers the expansion gap on floating floors.
- Secure it using the method suited to the material and floor, which may be a track and clip system for T-moldings, construction adhesive for stone and vinyl, or finish nails and screws for wood.
- For floating floors, never fasten the saddle down through the flooring itself, since the floor must be free to expand; use the accompanying track that anchors to the subfloor instead.
- Fill any nail holes, and caulk the edges on stone saddles in wet areas to seal against moisture.
The most common mistake is pinning a floating laminate or vinyl floor in place with a nailed-down saddle, which prevents the floor from expanding and leads to buckling. Always use the manufacturer’s track system for floating floors so the flooring can move underneath.
Choosing a Saddle That Looks Intentional
Beyond the technical fit, a floor saddle is a visible design element, so its color and material should look deliberate rather than accidental. You generally have two approaches. You can match the saddle to one of the two floors, most often the more prominent or more expensive one, so the transition reads as a natural extension of that room. Or you can choose a contrasting material, such as a marble threshold between two different tile floors or a metal strip in a modern space, treating the saddle as an intentional accent line between rooms.
Whichever direction you take, consistency across the home helps. Using the same saddle material and finish at every doorway gives a cohesive, planned feel as you move through the house, while a random mix of mismatched thresholds looks pieced together. If your interior doors and hardware lean toward a particular metal tone, echoing it in metal saddles is an easy way to tie the details together.
When to Replace an Old Saddle
Existing saddles do not last forever, and there are clear signs it is time for a new one. A wood threshold that has split, worn thin, or loosened underfoot has lost both its looks and its function. A metal strip that has bent, lifted at the edges, or become a trip hazard should be swapped promptly for safety. And any saddle that no longer covers the seam or bridges the height difference, perhaps after a new floor was installed on one side, needs replacing with a profile matched to the new conditions.
Replacing a saddle is usually a quick project and a cheap way to freshen up a doorway, especially when you have upgraded the flooring in an adjoining room. Done correctly, a floor saddle is the small finishing touch that ties your rooms together and makes the whole installation look complete and professional.
Prefer to explore on your own?
See how new flooring looks in your actual room in seconds — free, no signup.
Try the free Floor Studio →