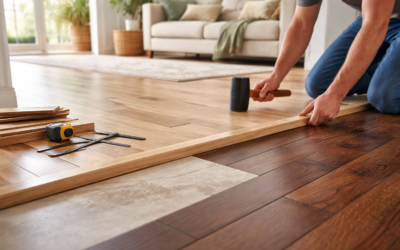
Open-concept homes and room-by-room remodels both run into the same question eventually: what happens where one wood floor ends and another begins? Handling two tone two different wood floors meeting well is the difference between a deliberate design choice and a sloppy seam that screams “we ran out of the first floor.” Whether the two floors differ in species, plank width, or stain color, the transition needs a plan. Done right, it can become a feature rather than a flaw.
- Why the Meeting Point Matters
- Pick the Right Spot for the Transition
- Transition Option 1: T-Molding
- Transition Option 2: Threshold or Saddle
- Transition Option 3: An Intentional Border or Feature Strip
- Transition Option 4: A Direct Seam at the Doorway
- Handling a Height Difference
- Making Two Tones Look Intentional
- Installation Pointers
- Common Mistakes to Avoid
- Final Thoughts
Why the Meeting Point Matters
Two different wood floors rarely share the same thickness, expansion behavior, or grain direction. If you butt them together with no strategy, you get height mismatches, gaps that open in winter, and a visual line that wanders. The meeting point also has to handle wood movement: solid hardwood expands and contracts seasonally, and engineered planks move differently again. A good transition absorbs that movement while looking intentional from every angle.
Pick the Right Spot for the Transition
Location is half the battle. The cleanest transitions land at natural breaks where the eye already expects a change.
- Doorways: Center the transition directly under the closed door so each room reads as its own space.
- Wall lines and cased openings: Aligning the seam with a wall edge hides it in the architecture.
- Changes in ceiling or flooring level: Steps and soffits give you a logical break.
Avoid placing a transition in the middle of a wide sightline with nothing around it. A seam floating in open floor space draws the eye straight to it.
Transition Option 1: T-Molding
T-molding is the workhorse when two floors meet at roughly the same height. Shaped like a capital T, it sits in the gap with its top covering both edges and its stem dropping into the expansion space between them. It allows both floors to move independently, which makes it ideal where solid hardwood meets engineered or floating floors. Choose a molding that matches one of the two species, or a neutral tone that bridges both. T-molding works best in doorways and openings up to a few feet wide.
Transition Option 2: Threshold or Saddle
A threshold, sometimes called a saddle, is a slightly raised strip that spans the gap, traditional in doorways. It is a great pick when the two floors sit at the same level and you want a clean, classic break between rooms. Thresholds come in profiles that taper gently on each side, easing the foot over the seam. They read as a finished architectural detail rather than a patch, which is why they suit formal spaces and older homes especially well.
Transition Option 3: An Intentional Border or Feature Strip
If you want the two-tone look to feel designed, frame the junction with a contrasting border. A strip of darker or lighter wood, a band of the same species turned 90 degrees, or even a thin inlay creates a deliberate seam that celebrates the change instead of hiding it. Borders shine in large openings between rooms, around the perimeter of a feature area, or where a herringbone section meets straight-laid plank. The key is symmetry: the border should look like part of the original floor plan, with clean miters at the corners.
Transition Option 4: A Direct Seam at the Doorway
When both floors are the same thickness, run flush, and you want the most minimal look, you can butt them edge to edge at a doorway with a tight seam, leaving a hairline expansion gap concealed under the door slab. This takes precise carpentry and only works when heights match perfectly. It is the most modern, seamless approach, but it offers the least room for wood movement, so it is best reserved for stable subfloors and similar flooring types.
Handling a Height Difference
Two floors at different heights need a reducer rather than a T-molding. A reducer ramps gently from the taller floor down to the shorter one, eliminating the trip hazard and giving a smooth, finished edge. Match the reducer to the higher floor for the cleanest visual line. Never try to force two mismatched heights flat with a flat molding; the lip will catch toes and chip over time.
Making Two Tones Look Intentional
Color pairing carries the whole effect. To make two different wood floors meeting look planned rather than accidental, keep the undertones in the same family. Two warm tones or two cool tones read as a designed contrast; mixing a warm honey oak against a cool gray can feel jarring unless you bridge them with a neutral transition piece. Greater contrast between the floors actually helps here, because an obvious intentional difference looks more confident than two similar shades that almost match but not quite.
Quick Pairing Tips
- Repeat one of the floor tones in nearby trim, doors, or furniture to tie the rooms together.
- Use the darker floor in the higher-traffic or smaller space to ground it.
- Keep plank direction consistent across the transition when possible for visual flow.
Installation Pointers
Whatever transition you choose, leave the proper expansion gap on both sides per the flooring manufacturer’s spec, typically around a quarter to a half inch at walls and seams. Fasten transition tracks to the subfloor, not to the flooring itself, so the planks can move freely beneath. Acclimate both floors in the home for several days before installation so they reach equilibrium moisture content. Dry-fit the transition before committing to glue or fasteners.
Common Mistakes to Avoid
A few errors show up again and again where two floors meet. The first is placing the transition somewhere arbitrary, mid-room, rather than at a doorway or wall line, which leaves the seam exposed in an open sightline. The second is fastening the transition strip into the flooring instead of the subfloor, which traps the planks and causes buckling when they expand. The third is ignoring acclimation: installing wood straight off the truck means it shrinks or swells after the fact, opening gaps at the very seam you worked hard to perfect. The fourth is choosing a molding color that matches neither floor, so it reads as a strip of “other” running through the room. Plan the location, fasten correctly, acclimate both products, and pick a transition tone that belongs to one of the two floors or splits the difference cleanly.
Final Thoughts
Where two tone two different wood floors meeting happens, the transition is your chance to control the story. Choose the spot, match the method to the height and movement of your floors, and pick a profile that reads as a design decision. With the right molding, threshold, or border, the junction becomes a clean, confident line that makes both floors look better than they would alone.
Prefer to explore on your own?
See how new flooring looks in your actual room in seconds — free, no signup.
Try the free Floor Studio →