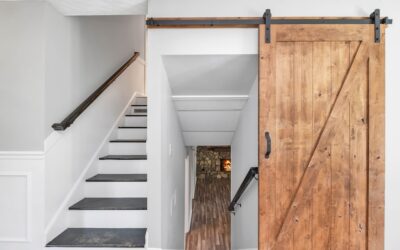
Learning how to make a barn door is one of the most satisfying weekend woodworking projects a homeowner can tackle, and it costs a fraction of the $300 to $600 you would pay for a pre-built one. With a stack of pine boards, wood glue, a few screws, and a circular saw, you can build a solid, custom-sized sliding door in an afternoon and hang it the next day. The real secret is not fancy joinery; it is building the panel flat and square so the door glides smoothly and does not sag over time. Follow the steps below and you will end up with a door that looks like it came from a custom shop.
Part of our Windows & Doors guide — explore the full guide →
- Sizing the Door Before You Buy Wood
- Tools and Materials You Will Need
- Step 1: Cut the Boards to Length
- Step 2: Glue and Clamp the Panel Flat
- Step 3: Add the Frame and Z-Brace
- Step 4: Sand Everything Smooth
- Step 5: Stain or Paint
- Step 6: Hang the Door
- Pro Tips and Common Mistakes
- Design Variations to Consider
- Troubleshooting a Door That Won't Slide Right
- Final Thoughts
Sizing the Door Before You Buy Wood
A barn door has to be larger than the opening it covers, and getting this measurement right up front saves headaches later. Measure the width and height of the doorway or the opening you want to conceal, then plan the door to overlap the opening by about 2 to 3 inches on each side and 1 inch at the top and bottom. That overlap blocks light gaps and gives the door something to close against.
For a standard 32-inch interior opening, a finished door around 36 to 38 inches wide and 84 inches tall is typical. Confirm you have enough clear wall space beside the opening for the door to slide fully open, since a barn door needs a run of blank wall at least as wide as the door itself.
Tools and Materials You Will Need
You do not need a full shop for this. Here is the realistic list.
- Lumber: Common 1×6 pine boards for the panel face, plus 1×4 boards for the frame and Z-brace. Select straight, flat boards and reject any that are cupped or twisted.
- Wood glue and 1-1/4 inch and 2-1/2 inch wood screws.
- Circular saw or miter saw for clean crosscuts.
- Drill/driver and a countersink bit.
- Clamps (bar clamps or pipe clamps), a framing square, a tape measure, and a level.
- Sander and sandpaper in 80, 120, and 220 grit.
- Stain or paint, plus a barn door hardware kit with a rail, rollers, and floor guide.
Budget roughly $60 to $120 for lumber and finish, plus $70 to $180 for a hardware kit depending on quality and rail length.
Step 1: Cut the Boards to Length
Decide your door dimensions, then cut your 1×6 face boards all to the same finished height. Accuracy matters here; cut them one at a time from the same reference mark, or clamp them together and cut across in a single pass so every board is identical. Lay them side by side on a flat surface, good face down, and check the total width. Trim the last board to width if needed to hit your target dimension.
Step 2: Glue and Clamp the Panel Flat
This is the most important step for a door that will not warp. Run a bead of wood glue along the mating edges of the face boards, press them together, and clamp them tight across the width. Use a flat surface, and alternate clamps above and below the panel to keep it from bowing. Check with a straightedge that the whole panel sits flat before the glue sets.
Wipe away squeezed-out glue with a damp rag, since dried glue blocks stain and shows as pale streaks later. Let the panel cure for the full time on the glue bottle, usually 30 minutes to clamp and several hours to reach real strength. Rushing this step is the top cause of a wavy door.
Step 3: Add the Frame and Z-Brace
The frame and diagonal brace are what give a barn door its classic look and, more importantly, its rigidity. Once the panel is dry, lay your 1×4 boards on the face to form a perimeter frame: two vertical stiles down the sides and two horizontal rails across the top and bottom, cut to fit inside or flush with the edges depending on your design.
Then add the Z-brace, one or two diagonal boards running corner to corner between the rails. This diagonal is not just decorative; it resists sagging and keeps the door square over the years. Measure and cut the diagonals to fit snugly between the horizontal rails, marking the angle by laying the board in place and scribing it rather than trying to calculate it.
Attach the frame and brace with glue and screws driven from the back of the panel into the frame boards, so no screw heads show on the front face. Countersink every screw and stagger them so they grip well without splitting the pine.
Step 4: Sand Everything Smooth
Knock down every sharp edge and smooth the whole door, starting with 80 grit to level any misaligned boards, then 120 to refine, and finishing with 220 for a surface that takes stain evenly. Pay special attention to the seams between boards and the edges of the frame. Ease the corners slightly so the finished door feels good to the hand and resists chipping.
Wipe the door clean with a tack cloth before finishing, because leftover dust turns into a gritty finish that ruins all your sanding work.
Step 5: Stain or Paint
Now the door earns its character. For a rustic, weathered look, apply a wood conditioner first on pine to prevent blotching, then a stain like a warm walnut or a gray weathered finish, wiping off the excess after a few minutes. Two coats of a protective polyurethane or a matte sealer will keep it looking good for years.
If your style leans modern, a coat of primer followed by two coats of a durable enamel in black, white, or a bold color turns the same door into a completely different piece. Let each coat dry fully and lightly scuff-sand between coats for a smooth, professional finish.
Step 6: Hang the Door
Mount the barn door hardware rail above the opening, and this is where a level and a stud finder earn their keep. The rail must be dead level and anchored into solid framing, either the wall studs or a mounting board screwed across the studs. A mounting board, usually a stained 1×6 run horizontally above the door, spreads the load and guarantees you hit solid wood at every bracket.
- Find and mark the studs above the opening.
- Mount the backer board level and screw it firmly into the studs.
- Attach the rail to the backer board, checking level again.
- Bolt the roller hangers to the top of the door.
- Lift the door and set the rollers onto the rail.
- Install the floor guide at the bottom to keep the door from swinging.
Slide the door back and forth and confirm it glides smoothly and clears the floor by about a half inch. Adjust the roller height if the door drags or hangs crooked.
Pro Tips and Common Mistakes
A few lessons save a lot of frustration. Always let the lumber acclimate in your home for a few days before building, since boards that adjust to indoor humidity are far less likely to warp after assembly. Never skip the diagonal brace; a door without it will eventually sag and rack out of square. And confirm your wall can carry the weight, because a solid wood door plus hardware can top 60 pounds and must hang from studs, never drywall alone.
Design Variations to Consider
The basic Z-brace door is only a starting point, and small changes give it a completely different personality. For a more modern look, skip the diagonal brace and run the frame boards in a clean rectangle, or use a single horizontal divider for a two-panel look. A chevron or double-Z pattern, with diagonals meeting in the middle, reads as more decorative and works well on wider doors. For a lighter, airier feel, you can inset frosted glass or metal mesh into a framed opening rather than filling the whole door with solid boards.
You can also change the wood itself. Reclaimed barn wood or fence boards give instant rustic character with weathered gray tones already baked in, while smooth poplar or maple takes paint cleanly for a crisp, contemporary finish. Matching the wood and pattern to your room’s style turns a generic project into a door that looks designed for the space.
Troubleshooting a Door That Won’t Slide Right
If your finished door drags, sticks, or hangs crooked, a few quick adjustments usually fix it. A door that scrapes the floor means the rollers need raising; most hardware kits have adjustment nuts on the roller hangers that let you lift the door a few millimeters. A door that will not stay put and drifts open sits on a rail that is not level, so recheck the rail with a level and shim the mounting board if needed. If the door sways and bangs the wall, the floor guide at the bottom is missing or too loose; a snug guide keeps the door tracking straight without touching the floor. Work through these one at a time and the door will glide smoothly and hang square.
Final Thoughts
Knowing how to make a barn door gives you a custom, solid-wood feature at a builder-grade price, and the skills carry over to shelves, tables, and other projects. Focus your care on a flat glue-up, a proper Z-brace, and a dead-level rail anchored into studs, and the door will slide cleanly and look sharp for decades. Take your time on the panel, and the rest of the build falls into place.