Right out of the can, most paint is formulated for brush and roller application at about 100 KU (Krebs Units) viscosity. That is too thick for spraying, sometimes too thick for hot-weather rolling, and always too thick for fine finishes on cabinets and trim. Knowing how to thin paint correctly is the difference between a glass-smooth cabinet door and a lumpy, orange-peeled mess. The rules differ by paint type, application method, and temperature, so a single “just add 10 percent water” answer does not cut it.
Part of our Paint & Walls guide — explore the full guide →
- Know Your Paint Type Before Adding Anything
- Thinning Ratios by Application Method
- Paint Conditioners Beat Plain Water
- How to Mix Thinned Paint Correctly
- Temperature Changes Everything
- Signs You Thinned Too Much
- Common Paint-Specific Adjustments
- Cleanup Matters as Much as Mixing
- Final Tips From the Field
Know Your Paint Type Before Adding Anything
The thinner you use must match the paint chemistry. Mixing the wrong thinner with the wrong paint wastes a gallon instantly:
- Latex and acrylic paints: Thin with water only. Never mineral spirits.
- Oil-based paints and stains: Thin with mineral spirits, paint thinner, or naphtha for faster dry.
- Alkyd and hybrid paints: Thin with mineral spirits.
- Shellac: Thin with denatured alcohol.
- Lacquer: Thin with lacquer thinner — not mineral spirits.
- Milk paint: Thin with water after mixing powder.
- Chalk paint: Thin with a small amount of water for smoother brush work.
The label on the paint can always tells you the correct thinner. Trust the label over any internet chart.
Thinning Ratios by Application Method
How much to thin depends on how you are applying the paint. General starting points for latex paint:
- Brush or roller on a warm day: Usually no thinning. If the paint is dragging, add up to 4 ounces of water per gallon.
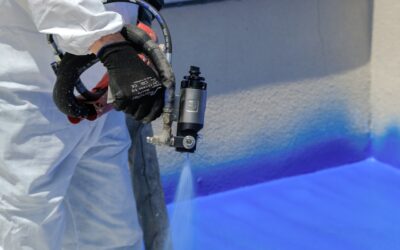
- Airless sprayer (Graco Magnum, Wagner Control Pro): 4 to 8 ounces water per gallon (about 3 to 6 percent). Many modern airless units spray unthinned paint with the right tip.
- HVLP sprayer (Wagner FLEXiO, Earlex): 10 to 20 percent water. HVLP needs significantly thinner material than airless.
- Conventional sprayer / detail spray gun: 10 to 25 percent thinning, sometimes more. Follow spray gun manufacturer specs.
- Fine cabinet finishing: Start at 10 percent water or with a paint conditioner instead of water (see next section).
For oil-based paint, similar percentages apply with mineral spirits. Never thin beyond 25 percent on any paint — you will compromise coverage, durability, and color.
Paint Conditioners Beat Plain Water
Plain water thins paint but also weakens the binder. For better results, use a paint conditioner that thins without sacrificing coverage. Floetrol for latex at $15 per quart and Penetrol for oil at $15 per quart are the two most common. Add up to 8 ounces per gallon.
Conditioners extend the “wet edge” time — the window during which freshly applied paint blends into adjacent wet paint. That reduces lap marks on walls, roller marks on trim, and spray stipple on cabinets. They also help self-leveling, which makes brush and roller strokes disappear as the paint dries.
How to Mix Thinned Paint Correctly
Proper mixing makes the difference between uniform thinning and inconsistent patches. Follow these steps:
- Stir the paint thoroughly in the can. Five minutes of stirring with a paint mixer on a cordless drill is not overkill.
- Pour a measured amount of paint into a separate mixing bucket. Do not thin the whole gallon at once unless you will use it all that day.
- Add thinner in small increments — no more than 2 ounces at a time per gallon.
- Stir for at least 2 minutes between additions. Check consistency by lifting the stick and watching how paint sheets off.
- Test on a piece of cardboard or scrap before loading into the sprayer or applying to the work surface.
A paint viscosity cup (Ford #4 cup at $12 online) gives you objective measurement for sprayer work. Most airless sprayers run well with paint that empties a Ford #4 cup in 25 to 35 seconds.
Temperature Changes Everything
Paint viscosity changes significantly with temperature. A can that was too thick yesterday at 55°F may be perfect at 75°F with no thinning. A can that sprayed fine at 70°F may clog at 85°F because the solvent evaporates faster on the tip.
Rules of thumb: in cold conditions below 60°F, warm the paint can in a sink of warm water for 30 minutes before starting. In hot conditions above 80°F, add a paint conditioner to extend wet edge time and prevent tip buildup.
Signs You Thinned Too Much
Over-thinned paint creates visible problems. Watch for these warnings:
- Drips and runs on vertical surfaces during application.
- Poor coverage — two or three coats still showing primer or previous color.
- Flashing, where certain areas dry with a different sheen than others.
- Transparent edges where paint fails to cover the substrate.
- Long dry times or tacky finish days after application.
If you see any of these signs, stop and recalibrate. Either start over with unthinned paint, or mix the over-thinned portion with fresh paint to restore the binder.
Common Paint-Specific Adjustments
Some paints demand different handling:
- Deck and porch paints: Usually do not thin. They are formulated for foot traffic durability and self-leveling is not a priority.
- Ceiling paints: Pre-thinned for minimal drip. Additional thinning risks splatter and poor coverage.
- Cabinet paints (Benjamin Moore Advance, Sherwin-Williams Emerald Urethane): Thin with a compatible extender rather than plain water. Emerald Urethane uses Sherwin-Williams M1 extender at the 1 to 5 percent level for spray.
- Primers: Most bonding primers do not want thinning. Shellac-based primers like Zinsser BIN can be cut 5 to 10 percent with denatured alcohol for spray.
Cleanup Matters as Much as Mixing
After thinning, clean tools before the paint sets. Latex paint: warm soapy water within 30 minutes of finishing. Oil-based paint: mineral spirits first, then soapy water if brushes have synthetic bristles that can handle it. Dispose of solvent-laden rags properly — never bunch them in a pile, where oxidation can cause spontaneous combustion. Spread rags flat on concrete until dry.
Thinned paint also changes cleanup. The wetter paint in your sprayer cup dries more slowly, giving you a bigger cleanup window. But leftover thinned paint stored more than a few weeks often separates and becomes unusable — plan to use it within a few days.
Final Tips From the Field
Thin small amounts at a time, not whole gallons. Keep unthinned paint in reserve to rebalance if you over-thin. Always test on scrap before committing to a project surface. When in doubt, use a paint conditioner rather than plain water. These four habits turn thinning from a gamble into a repeatable part of your painting workflow.