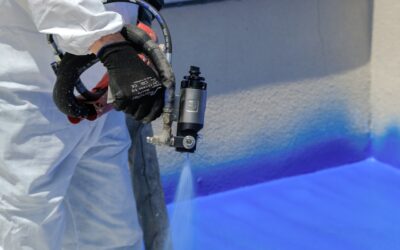
Most paint cans on the shelf today are formulated to roll straight onto the wall without modification, yet roughly half the time DIYers spray, brush, or stipple them, the paint goes on too thick. Thinning latex paint with the right additive at the right ratio fixes brush drag, sprayer clogs, and the dreaded orange-peel texture that ruins cabinet refinishing jobs. Use too little thinner and the paint refuses to atomize. Use too much and you get runs, sags, and inadequate hide that needs three coats instead of two. The acceptable range is narrower than the internet suggests.
Part of our Paint & Walls guide — explore the full guide →
- When You Actually Need to Thin Latex Paint
- Water Ratios by Application Method
- Floetrol vs Water: When to Use Each
- Testing Viscosity Like a Pro
- Step-by-Step Process for Thinning
- Common Mistakes to Avoid
- Adjusting for Temperature and Humidity
- How Thinning Affects Coverage
- Specialty Products That Skip Thinning Entirely
When You Actually Need to Thin Latex Paint
Stop and ask whether thinning is really necessary before reaching for the water. A premium brand like Sherwin-Williams Emerald, Benjamin Moore Aura, or Behr Marquee at room temperature flows fine through a 9-inch nap roller without a drop of water. Thinning is genuinely needed only in three scenarios: spraying through an HVLP or airless gun, working in temperatures above 85°F where paint flashes too fast, or using a paint that has thickened from age or partial evaporation in a half-full can.
Brushing rarely benefits from thinning except in hot weather. If your brush drags, it usually means the paint dried too quickly between dips, not that the paint itself is too thick.
Water Ratios by Application Method
The right amount of water depends on how you are applying the paint. Each method tolerates a different range, and exceeding the maximum compromises hide and durability.
- Roller: Up to 4 oz water per gallon (about 3 percent), only if needed
- Brush: Up to 4 oz water per gallon, plus 8 oz Floetrol for flow control
- HVLP sprayer: 8 to 16 oz water per gallon (6 to 12 percent), test viscosity first
- Airless sprayer: 0 to 8 oz water per gallon, most airless units handle paint as-is
- Cabinet spraying with HVLP: 8 to 12 oz water per gallon for pigmented paints
Always start at the low end and add more water in 2-ounce increments until the paint flows correctly. You cannot un-thin paint once you have over-thinned it.
Floetrol vs Water: When to Use Each
Plain water dilutes the binder along with thinning the viscosity, which weakens hide and adhesion. Floetrol (a paint conditioner from Flood) thins the paint without diluting the resin, preserving full coverage and durability. Use water when you need a small viscosity adjustment for spraying. Use Floetrol when brush marks or roller stipple are the problem.
Floetrol costs about $14 per quart at Home Depot and adds at 8 ounces per gallon for most brushing applications. Mix thoroughly for 60 seconds with a paint stirrer before testing.
Testing Viscosity Like a Pro
Professional painters use a Ford #4 viscosity cup or Zahn cup to measure flow time. For DIY work, the funnel test works almost as well. Pour 8 ounces of paint through a standard kitchen funnel; a properly thinned paint for HVLP spraying drains in 30 to 45 seconds. Slower than 60 seconds and you need more water. Faster than 25 seconds and you have over-thinned and need to add fresh paint back to thicken it.
For airless sprayers, the funnel test is irrelevant; the pump generates enough pressure to atomize most paints undiluted. Trust the spray fan pattern, not the cup test.
Step-by-Step Process for Thinning
The mixing process matters more than people assume. Sloppy mixing creates inconsistent paint that lays down differently across one wall.
- Stir the paint thoroughly for 2 minutes before measuring anything; settled paint reads thicker than mixed paint
- Pour the paint into a clean 5-gallon bucket if working with multiple cans for color consistency
- Measure water or Floetrol in a graduated cup, never eyeball it
- Add the thinner in two halves, mixing 60 seconds between additions
- Strain the thinned paint through a 200-mesh paint strainer into your sprayer cup
- Test on cardboard before committing to the project surface
Common Mistakes to Avoid
Three errors account for most thinning disasters. Adding water to cold paint produces lumps and incomplete mixing; warm the paint to 65 to 75°F before thinning. Using mineral spirits or paint thinner instead of water destroys latex paint immediately, since latex is water-based and oil thinners cause the resin to separate. Skipping the strainer step lets dried paint chips and lint clog spray tips and leave streaks.
One more: never thin and store. Thinned latex paint develops mold faster than full-strength paint and degrades within 4 to 6 weeks even in sealed containers.
Adjusting for Temperature and Humidity
Hot, dry conditions accelerate flash-off and demand more thinning. Cold, humid conditions slow drying and demand less. As a rough guide, add 1 ounce of additional water per gallon for every 10°F above 75°F when spraying. Below 60°F, skip the thinner entirely and warm the paint instead. Outdoor work in direct sun on light-colored siding can hit 110°F surface temperature easily; check temperature with an infrared thermometer before applying.
How Thinning Affects Coverage
Manufacturer-stated coverage of 350 sq ft per gallon assumes unthinned application. Thinning at 4 percent water reduces coverage to roughly 320 sq ft per gallon. At 12 percent water for spraying, coverage drops to around 280 sq ft per gallon. Plan your paint quantity accordingly. A 200 sq ft accent wall sprayed with thinned paint might need 1.5 gallons instead of the 1 gallon a roller would consume.
Specialty Products That Skip Thinning Entirely
Several modern paints are formulated for direct spraying with no thinning required. Sherwin-Williams ProClassic Acrylic, Benjamin Moore Advance Waterborne Alkyd, and Behr Cabinet & Trim Enamel all spray straight from the can through most HVLP guns at proper tip sizes. They cost roughly 30 percent more per gallon than standard wall paint but eliminate the thinning learning curve for cabinet projects. For a kitchen with 25 cabinet doors, the upgrade pays for itself in time saved and finish quality.