A wet basement can ruin flooring, breed mold, and destroy stored belongings, but a properly working sump pump quietly protects your home from flooding day and night. Installing a sump pump is a project many handy homeowners can tackle, though it involves digging, plumbing, and electrical work. This guide walks you through the types, costs, and step-by-step process so you can decide whether to DIY or hire a pro.
- How a Sump Pump Works
- Types of Sump Pumps
- What It Costs
- Tools and Materials You Will Need
- Step-by-Step Installation Overview
- Code and Safety Considerations
- Choosing the Right Discharge Route
- The Value of a Backup System
- Primary Pump Sizing and Placement
- Common Mistakes to Avoid
- Maintenance for Long-Term Protection
- Making the Right Call
How a Sump Pump Works
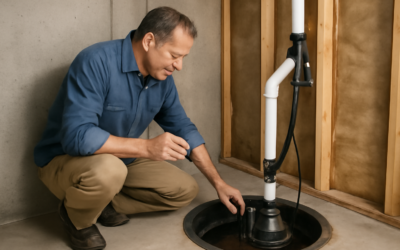
A sump pump sits in a pit, called a sump basin, dug at the lowest point of your basement or crawl space. As groundwater rises, it flows into the basin. When the water reaches a set level, a float switch activates the pump, which sends the water out through a discharge pipe away from your foundation. When the water drops, the pump shuts off automatically.
This simple cycle keeps water from pooling under your home. In areas with high water tables, heavy rainfall, or spring snowmelt, a sump pump is essential insurance against a flooded basement and the expensive damage that follows.
Types of Sump Pumps
Choosing the right pump is the first decision:
- Submersible: Sits inside the basin underwater, quieter and better for finished basements, priced around $100 to $400.
- Pedestal: The motor sits above the basin on a shaft, easier to service and longer-lasting but louder, around $60 to $200.
- Battery backup: A secondary pump that runs during power outages, when floods often occur, adding $150 to $400.
- Water-powered backup: Runs on municipal water pressure with no battery to maintain, for homes on city water.
Many homeowners install a primary submersible pump plus a battery backup, since storms that cause flooding frequently knock out power at the same time.
What It Costs
The total cost depends on whether a basin already exists. If you have an existing sump pit and just need to replace the pump, the pump itself runs $60 to $400 and installation is quick. Installing a brand-new sump system, including digging the pit, running discharge lines, and adding electrical, is a bigger job.
Professional installation of a complete new sump system typically costs $1,000 to $4,000, with the average around $1,500 to $2,500. DIY installation can cut this to the cost of materials, roughly $300 to $700, but it requires breaking through concrete, which is labor-intensive. A dedicated GFCI outlet may need an electrician, adding $150 to $400.
Tools and Materials You Will Need
For a DIY installation, gather these essentials:
- Sump pump and sump basin (liner)
- PVC discharge pipe, fittings, and a check valve
- Gravel for the basin base
- A jackhammer or rotary hammer to break the concrete floor
- PVC primer and cement, plumber’s tape, and a hacksaw
- A dedicated GFCI outlet nearby
The check valve is critical because it prevents discharged water from flowing back into the basin, which would make the pump cycle needlessly and wear out prematurely.
Step-by-Step Installation Overview
While details vary, installing a sump pump generally follows these steps:
- Choose the location: Find the lowest point of the basement, near a wall for easy discharge routing.
- Dig the pit: Break through the concrete and excavate a hole a few inches larger than the basin, then add gravel to the bottom.
- Set the basin: Place the liner in the hole, level it, and backfill around it with gravel.
- Install the pump: Set the pump in the basin and adjust the float switch height.
- Run the discharge line: Attach PVC pipe with a check valve, route it through the rim joist or wall, and direct water at least 10 feet from the foundation.
- Connect power: Plug into a dedicated GFCI outlet, never an extension cord.
- Test: Pour water into the basin and confirm the pump activates and discharges properly.
Patching the concrete around the new basin completes the job. Take your time leveling the basin and setting the float, since these details determine reliable operation.
Code and Safety Considerations
Local codes govern sump pump discharge and electrical connections. Many municipalities prohibit discharging into the sanitary sewer, requiring the water go to a storm drain, dry well, or onto your yard away from the foundation and your neighbor’s property. Check with your building department before you begin.
Electrically, the pump must plug into a GFCI-protected outlet on a dedicated circuit. Never run a sump pump on an extension cord or a shared circuit that could trip. If your basement lacks a nearby outlet, hire a licensed electrician to add one. Some areas also require a permit for the plumbing and electrical work involved.
Choosing the Right Discharge Route
Where the water goes after the pump moves it is just as important as the pump itself. The discharge line should carry water at least 10 feet away from the foundation, ideally to a spot where the ground slopes away from the house so it cannot flow back. Common destinations include a bubbler pot in the yard, a dry well, a storm drain, or simply a graded area of the lawn. Discharging too close to the foundation is a frequent mistake that undermines the entire system.
In cold climates, the discharge line can freeze at the outlet, backing water up and causing the pump to fail during a winter thaw. Solutions include sloping the line for full drainage, using a larger-diameter outlet, or installing a freeze-relief fitting that lets water escape if the end freezes. Planning the discharge route thoughtfully, and confirming it complies with local codes that may prohibit tying into the sanitary sewer, is essential for reliable operation.
The Value of a Backup System
The cruel irony of sump pumps is that the storms most likely to flood your basement are also the ones most likely to knock out your power, disabling the very pump you are counting on. That is why a backup system is one of the smartest additions you can make. A battery backup pump automatically takes over when the primary loses power or cannot keep up, running for hours on a deep-cycle battery.
For homes on municipal water, a water-powered backup offers an alternative that never needs a battery, using household water pressure to move water out, though it consumes city water while running. Some homeowners also add a water alarm or a smart sensor that texts an alert when water rises too high, giving early warning of a problem. In flood-prone areas, spending a few hundred dollars on backup protection is cheap insurance against thousands in water damage.
Primary Pump Sizing and Placement
Getting the pump size right ensures it keeps ahead of incoming water without short-cycling. Most homes are well served by a 1/3 or 1/2 horsepower pump, but properties with high water tables, frequent heavy inflow, or long or high discharge runs benefit from 3/4 to 1 horsepower. The pump must move enough gallons per hour at your specific lift height to outpace the worst inflow you expect during a heavy storm.
Placement within the basement matters too. The basin belongs at the lowest point where water naturally collects, ideally near an exterior wall to shorten the discharge run. Keep the pump and its float clear of the basin walls so nothing obstructs the switch. A properly sized and well-placed pump runs efficiently, lasts longer, and protects your basement reliably through years of seasonal water.
Common Mistakes to Avoid
- Discharging water too close to the foundation, letting it flow right back in.
- Omitting the check valve, causing the pump to short-cycle.
- Setting the float switch where it can stick against the basin wall.
- Using an extension cord instead of a proper dedicated outlet.
- Skipping a backup pump in flood-prone areas with unreliable power.
- Forgetting to test the system after installation.
Maintenance for Long-Term Protection
Once installed, a sump pump needs periodic checks to stay reliable. Test it every few months by pouring water into the basin and confirming it activates. Clean debris from the basin and inlet screen once or twice a year, check that the discharge line is clear and not frozen in winter, and replace the backup battery every three to five years. A pump typically lasts 7 to 10 years, so plan to replace it before it fails during a storm.
Making the Right Call
Installing a sump pump is one of the best defenses against basement flooding and the costly damage it brings. Replacing an existing pump is well within reach for a confident DIYer, while installing a brand-new system with concrete work may be worth hiring out. Whatever route you choose, size the pump for your water conditions, add a backup for peace of mind, follow local discharge codes, and test the system regularly. A properly installed sump pump keeps your basement dry and your belongings safe for years to come.