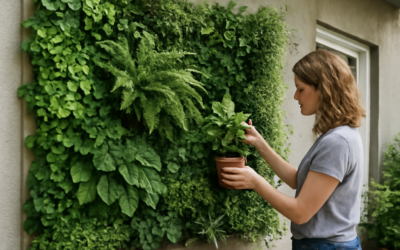
A wall of greenery does something a painting never can: it cleans the air, softens sound, and changes the whole feel of a room. An interior plant wall, also called a living wall or green wall, packs dozens of plants into a vertical space barely a few inches deep, which makes it perfect for apartments and homes where floor space is precious. Done right, it becomes the focal point of a living room or entryway; done wrong, it becomes a leaky, dying mess.
The good news is that today’s modular systems take most of the guesswork out. Whether you want a small 2-by-3-foot panel of pothos or a floor-to-ceiling statement wall, the principles of light, water, and plant selection stay the same.
Choosing a Living Wall System
You have three main routes, ranging from weekend DIY to professional install:
- Pocket panels: Felt or fabric pockets that mount to the wall, each holding one plant in soil. The cheapest option, around $30 to $80 per panel.
- Modular tray systems: Rigid plastic grids with built-in reservoirs, like the GroVert or Florafelt systems, $100 to $300 per section.
- Hydroponic or self-watering walls: Premium systems with pumps and timers that circulate water automatically, $500 and up.
For most homeowners, a modular tray system hits the sweet spot of looks, durability, and manageable watering. Whatever you choose, the most important detail is a waterproof backing between the plants and your drywall.
Protect the Wall Behind It
Water and drywall do not mix. Before mounting anything, install a moisture barrier. A sheet of PVC board, a marine-grade plywood panel sealed with polyurethane, or a commercial waterproof backer protects the wall from rot and mold. Add a slim drip tray or gutter at the bottom to catch runoff.
Mount the frame into studs with appropriate anchors. A fully planted and watered wall is heavy, often 5 to 8 pounds per square foot, so toggle bolts or stud screws are non-negotiable for anything larger than a single panel.
Best Plants for an Indoor Living Wall
Pick plants with similar light and water needs so the whole wall thrives on one routine. Reliable performers include:
- Pothos and philodendron: Trailing, forgiving, tolerate low light
- Ferns (Boston, button): Love humidity, lush texture
- Peace lily: Adds white blooms, signals when thirsty by drooping
- Fittonia (nerve plant): Vivid veined leaves, stays compact
- Spider plant: Nearly indestructible, sends out baby plantlets
Place trailing plants near the top so they cascade down, and put upright, bushy plants toward the bottom. Avoid mixing cactus or succulents with ferns, since their water needs are opposite.
Lighting Your Plant Wall
Most interior walls do not get enough natural light to keep dozens of plants healthy. If your wall sits more than 6 feet from a bright window, plan on supplemental grow lights. Full-spectrum LED bar lights or adjustable track grow lights mounted above or in front of the wall deliver the 12 to 14 hours of light most foliage plants want.
Aim for at least 1,000 to 2,000 lux at the leaf surface for low-light species. A simple plug-in timer keeps the schedule consistent so you are not relying on memory.
Watering and Maintenance
Watering frequency depends on your system, light, and home humidity, but expect to water a soil-based wall every 5 to 7 days. Hydroponic systems with reservoirs may run two to three weeks between refills. Always water from the top and let gravity distribute moisture down through the panels.
Check the bottom rows; they often stay wettest and are the first to develop root rot if overwatered. Trim yellowing leaves promptly, rotate or replace any plant that struggles, and feed monthly with a diluted liquid fertilizer during the growing season.
A living wall also raises the humidity in its immediate area, which the plants love but which can invite mold if airflow is poor. Keep a small fan circulating air near the wall, watch for a musty smell or white fuzz on soil, and improve ventilation or cut back watering at the first sign of a moisture problem. Good airflow dries leaf surfaces, discourages fungus gnats, and keeps the moisture barrier behind the wall from staying damp.
Faux and Preserved Walls: The Low-Maintenance Route
Not everyone wants the watering routine of a living wall. Preserved moss walls use real moss treated with a glycerin solution that keeps it soft and green for years with zero water, light, or maintenance. They need a stable indoor environment around 40 to 60 percent humidity and out of direct sun, and they cost $30 to $100 per square foot installed.
Artificial plant walls made of UV-stable synthetic foliage are another option, ideal for dark corners, rentals, or high walls you cannot reach to maintain. They will not purify the air, but they deliver the look with no upkeep and no risk of water damage. For many homeowners, a preserved or faux wall in a tricky spot makes more sense than fighting to keep live plants alive there.
Step-by-Step Installation Overview
Building a modular wall follows a clear sequence. First, locate and mark the wall studs. Mount your waterproof backing board, sealing all edges and screw holes. Attach the frame or tray system into the studs with proper anchors. Install the bottom drip tray or gutter to catch runoff.
Next, plant each module or pocket before hanging it where possible, since planting at eye level on a workbench is far easier than reaching up a ladder. Hang the planted modules, connect any irrigation line, and run a test watering to confirm the drip tray catches everything. Finally, position your grow lights and set the timer. Working in this order keeps soil and water off your finished floor.
What It Costs and Whether It Is Worth It
A small DIY pocket wall can come together for under $150 including plants. A 4-by-6-foot modular wall with grow lights and a watering setup runs $400 to $900. Professionally installed self-watering walls can top $2,000. The payoff is a dramatic, air-purifying feature that few decor upgrades can match.
Build your interior plant wall on a waterproof base, light it properly, and group plants by need, and you will have a thriving green centerpiece rather than a maintenance headache. Start small with one panel, learn your watering rhythm, then expand once you have the routine down.