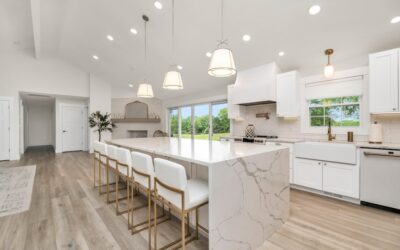
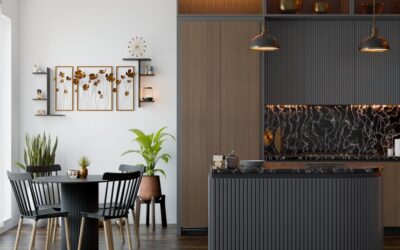
Few upgrades transform how a kitchen functions like a well-designed kitchen island with breakfast bar. It adds prep space, storage, and a casual gathering spot where family can eat, kids can do homework, and guests can perch while you cook. But getting the proportions right, seat height, overhang, clearances, and counter material, is what separates an island that feels effortless from one that is cramped and awkward. This guide covers everything you need to plan one that works.
Part of our Kitchen Remodeling guide — explore the full guide →
- Why Add a Breakfast Bar to Your Island
- Standard Island and Bar Dimensions
- Getting the Overhang Right
- How Many Stools Will Fit
- Clearances Around the Island
- Choosing a Countertop Material
- Adding Function: Storage, Power, and Appliances
- Lighting the Breakfast Bar
- Cost Expectations
- Single-Level vs. Two-Tier Designs
- Traffic Flow and the Work Triangle
- Stool Styles and Comfort
- Bringing It All Together
Why Add a Breakfast Bar to Your Island
A breakfast bar built into the island creates a multi-purpose zone without the cost of adding a separate table. It keeps conversation flowing between the cook and seated family members, provides quick everyday dining that saves setting the formal table, and defines the boundary between the kitchen and an adjoining living space in open-concept homes. For smaller households, it can even replace a dining table entirely, freeing up square footage.
Standard Island and Bar Dimensions
Comfort begins with correct heights and depths. There are three common counter heights to choose from:
- Standard (36 inches): Matches the main counter, seats people on 24-inch counter stools, and keeps a seamless single-level look.
- Bar height (42 inches): Creates a raised ledge that hides kitchen clutter from view and uses 30-inch bar stools.
- Two-tier: A 36-inch work surface with a raised 42-inch bar behind it, the traditional way to separate prep from dining.
A typical island footprint runs at least 40 inches deep and 4 feet long, though 7-plus feet is ideal if you want both a work zone and seating for three or more.
Getting the Overhang Right
The single most overlooked detail is knee clearance. For comfortable seating, the countertop must overhang the cabinet base so legs have somewhere to go:
- Standard 36-inch counter: A 12-inch overhang is recommended.
- Bar-height 42-inch counter: A 12-15 inch overhang.
Any overhang beyond 12 inches on stone counters usually needs steel support brackets or corbels to prevent cracking, since unsupported granite or quartz can fail under weight. Plan this before the slab is fabricated.
How Many Stools Will Fit
Allow 24 inches of linear counter width per stool so elbows do not collide. That means:
- A 4-foot bar seats 2 comfortably.
- A 6-foot bar seats 3.
- An 8-foot bar seats 4.
Corner and wrap-around seating can add stools, but leave at least 6 inches between the outer stools and the island edge so people are not perched at the very corner.
Clearances Around the Island
An island is only as good as the walkways around it. The National Kitchen and Bath Association recommends a minimum of 36-42 inches of clear floor space around all sides, and at least 42-48 inches on the seating side so people can slide chairs out and others can pass behind them. In a working kitchen with two cooks, aim for 48 inches on the primary aisles. If you cannot maintain these clearances, the room is likely too small for a seated island, and a slimmer prep island or peninsula may serve better.
Choosing a Countertop Material
Because the breakfast bar sees food, drinks, and daily wear, the surface matters:
- Quartz: Nonporous, stain-resistant, and low-maintenance, the most popular choice for busy families.
- Granite: Heat-tolerant natural stone that needs periodic sealing.
- Butcher block: Warm and inviting for a bar edge, though it needs oiling and is prone to water rings.
- Waterfall edge: Where the counter material runs down the sides to the floor, a dramatic modern look that adds cost.
Many designs pair a durable quartz work surface with a butcher-block bar overhang to combine practicality with warmth.
Adding Function: Storage, Power, and Appliances
The base cabinet under an island is prime real estate. Consider building in deep drawers for pots, a wine or beverage fridge on the seating side, open shelving for cookbooks, or a microwave drawer to free up counter space. Electrical outlets are required by code on most island counters, and pop-up or under-counter receptacles keep the surface clean while letting people charge devices at the bar. If you add a sink or cooktop to the island, remember it needs plumbing or a gas/electric line and its own clearances, which reduces the seating you can fit.
Lighting the Breakfast Bar
Pendant lights are the finishing touch. Hang two or three pendants centered over the bar, spaced evenly, with the bottom of each fixture 30-36 inches above the countertop so they illuminate the surface without blocking sightlines. As a rule, use one pendant per 24 inches of counter, and keep them at least 6 inches in from each end. Dimmable LED pendants let you shift from bright task light for homework to a soft glow for evening gatherings.
Cost Expectations
A kitchen island with a breakfast bar varies widely in price. A prefabricated or stock-cabinet island with a laminate top might run $600-$1,500, while a custom island with quartz counters, integrated storage, electrical, and pendant lighting commonly lands between $3,000 and $7,000. Adding a sink, cooktop, or waterfall stone edge can push a high-end project past $10,000. Getting an accurate quote depends on size, materials, and whether you need new plumbing or electrical runs.
Single-Level vs. Two-Tier Designs
One of the first choices you will make is whether to build a flat single-level island or a raised two-tier design, and each has clear trade-offs. A single-level island at 36 inches keeps the entire surface at counter height, creating a clean, contemporary look and a larger continuous work area, but it also means anyone seated sees your prep mess and any dirty dishes. A two-tier island raises the bar section to 42 inches, hiding clutter behind a small backsplash-like ledge and creating a natural separation between the cook’s workspace and the diners. Single-level islands photograph beautifully and suit modern kitchens, while two-tier designs are more forgiving for families who entertain often. Consider how you actually use the space before deciding.
Traffic Flow and the Work Triangle
An island should improve how you move through the kitchen, not obstruct it. The classic work triangle connects the sink, stove, and refrigerator, and your island should sit inside or beside that triangle without forcing you to walk around it constantly. If the island blocks the natural path between the sink and the range, cooking becomes a frustrating obstacle course. Plan the island so the seating side faces away from the primary work zone, keeping diners out of the cook’s way. In galley-style or smaller kitchens, even a well-intentioned island can choke the flow, which is why the 36-48 inch clearance rule around every side is non-negotiable before you commit to the footprint.
Stool Styles and Comfort
The stools you choose shape both comfort and the look of the bar. Backless stools tuck fully under the overhang and keep sightlines open, ideal for smaller kitchens, while stools with backs and footrests are more comfortable for long sits during meals and homework. Confirm the seat height matches your counter: 24-26 inch counter stools for a 36-inch top, and 28-30 inch bar stools for a 42-inch top, leaving roughly 10-12 inches between the seat and the underside of the counter for legroom. Swivel seats make it easy to get in and out, and upholstered or cushioned seats add comfort for daily dining. Choose durable, wipeable materials since the bar sees spills and heavy use.
Bringing It All Together
A successful kitchen island with breakfast bar starts with honest measurements: confirm you have room for 36-48 inch walkways, plan a 12-inch overhang with proper support, and allow 24 inches of width per stool. From there, layer in the choices that fit your life, deep drawer storage, a beverage fridge, warm pendant lighting, and a countertop that shrugs off spills. When those elements line up, the island becomes the true center of the home: a place to cook, eat, work, and gather that earns its footprint every single day. Take the time to plan the dimensions carefully before construction begins, because a few inches in the wrong place are far harder to fix once the cabinets and stone are installed.