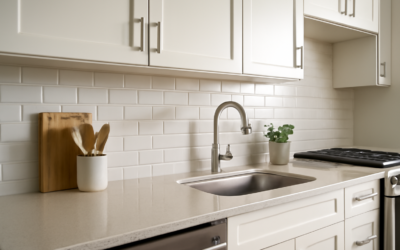
The gap where a counter meets the wall is where water sneaks in and grime collects, and a well-built backsplash closes that gap for good. A laminate countertop with backsplash gives budget-minded kitchens a clean, waterproof transition at a fraction of the cost of stone, and modern laminate looks nothing like the dated surfaces of decades past. Whether you choose an integrated coved backsplash or a separate applied one, this guide covers the options, real-world pricing, and the installation know-how to get a tight, professional result.
Part of our Countertops guide — explore the full guide →
- Integrated vs. Separate Backsplash
- Standard Backsplash Dimensions
- Cost of a Laminate Countertop With Backsplash
- Choosing a Style and Edge
- Installation Basics
- Post-Formed vs. Custom Laminate
- Design Ideas That Elevate Laminate
- Sealing and Maintenance
- Pros and Cons at a Glance
- Common Installation Mistakes to Avoid
- Is a Laminate Countertop With Backsplash Right for You
Integrated vs. Separate Backsplash
There are two ways laminate handles the backsplash, and the difference matters for both looks and water resistance. An integrated (or coved) backsplash is molded as part of a post-formed countertop, so the horizontal surface curves seamlessly up the wall with no joint at the base. Because there is no seam, water cannot seep behind the counter, making this the most spill-proof option and the easiest to wipe down.
A separate backsplash is a flat laminate piece installed against the wall after the counter is set, with a caulked joint where the two meet. This approach suits custom heights, square-edge (European-style) countertops, and situations where you want the backsplash to run taller than a standard 4 inches. It gives you more design flexibility but adds a caulk line you will need to maintain.
Standard Backsplash Dimensions
Most post-formed laminate backsplashes stand about 4 inches tall, matching the classic short splash you see in older kitchens. If you want more wall coverage, a separate laminate backsplash can run 6, 8, or even a full 18 inches up to the underside of the wall cabinets. Full-height laminate backsplashes have become popular because they cover the whole exposed wall in a continuous, easy-clean surface without the grout lines of tile.
Cost of a Laminate Countertop With Backsplash
Laminate remains the most affordable countertop category by a wide margin. Expect these ranges:
- Pre-formed (post-formed) tops: $10 to $30 per linear foot at home centers, backsplash included in the molded profile.
- Custom-fabricated laminate: $25 to $50 per square foot installed, depending on edge style and pattern.
- Separate laminate backsplash: add roughly $5 to $15 per linear foot for material.
- Professional installation: $10 to $30 per linear foot on top of materials.
A typical 25-linear-foot kitchen can be re-topped for $600 to $1,500 in materials, or less if you tackle a DIY install with pre-formed sections. Compared with $2,500 to $5,000 for quartz or granite in the same kitchen, the savings are substantial.
Choosing a Style and Edge
Today’s laminate comes in hundreds of patterns, including convincing stone, marble, and wood-grain looks with matte, textured, or gloss finishes. Pairing a stone-look surface with a matching integrated backsplash gives you the appearance of a slab counter for a tenth of the price. For edges, post-formed tops feature a rolled bullnose front, while custom laminate can get square, beveled, or wood-trimmed edges. If you want a high-end look, choose a pattern with a matching decorative edge so the brown core line does not show.
Installation Basics
Installing a pre-formed laminate top with an integrated backsplash is one of the more achievable countertop projects for a confident DIYer. The general sequence looks like this:
- Measure and cut: Cut sections to length with a fine-tooth blade, cutting from the underside to avoid chipping the laminate face.
- Join corners: Use miter bolts (draw bolts) in the pre-routed slots to pull mitered corners tight, applying seam adhesive first.
- Scribe the backsplash: Walls are rarely straight, so scribe and sand the top of the integrated backsplash to follow the wall for a gap-free fit.
- Fasten the top: Secure the countertop to the cabinets with screws driven up through the corner blocks, being careful not to over-penetrate the surface.
- Caulk the joint: Run a bead of color-matched silicone where the backsplash meets the wall to seal against water.
For a separate backsplash, apply construction adhesive to the back, press it to the wall above the counter, then caulk both the top and bottom edges.
Post-Formed vs. Custom Laminate
Understanding the two manufacturing methods helps you set expectations before you shop. Post-formed tops are mass-produced in standard 25.25-inch depths with the laminate wrapped continuously over a rolled front edge and up into an integrated backsplash. They are the least expensive route, ship in stock lengths from home centers, and are the friendliest to DIY installation because so much of the work is already done. The trade-off is limited color and edge choices and fixed dimensions.
Custom laminate, by contrast, is fabricated to your exact measurements with square (self) edges, decorative wood or metal edging, and any pattern the manufacturer offers. This is the route for an island, an unusual layout, or a European square-edge look with a separate backsplash. It costs more and usually calls for a professional fabricator, but the finished product looks noticeably more upscale than a rolled post-formed edge.
Design Ideas That Elevate Laminate
A few choices push laminate well past its budget-material reputation. Pairing a matte stone-look surface with a matching full-height backsplash mimics a continuous slab. Choosing a pattern with a color-through or matching decorative edge hides the telltale dark core line at the front. Running a separate backsplash up to 18 inches gives you the clean, grout-free wall of a modern kitchen without tile. And coordinating the laminate pattern with your cabinet color and hardware ties the whole room together so the surface reads as an intentional design choice rather than a compromise.
Sealing and Maintenance
Laminate needs no sealing, which is part of its appeal, but the seams and caulk lines do need attention. The most vulnerable spot in any laminate countertop with backsplash is the joint at the base of a separate splash and around the sink, where standing water can swell the particleboard core. Keep those caulk lines intact and re-caulk at the first sign of a gap or discoloration. Wipe spills promptly, avoid setting hot pans directly on the surface, and clean with mild soap and water rather than abrasive scrubbers that dull the finish.
Pros and Cons at a Glance
Before you commit, weigh the trade-offs. Laminate is inexpensive, comes in endless patterns, installs quickly, and requires no sealing. On the downside, it is not heat-resistant, so trivets are a must, and deep scratches or chips cannot be repaired the way stone can. The particleboard core is vulnerable to water if seams open up, which is exactly why a well-sealed backsplash matters so much.
Common Installation Mistakes to Avoid
A few missteps account for most laminate failures. The biggest is skipping the scribe on the backsplash; walls are never perfectly straight, and forcing an unscribed splash against a wavy wall leaves gaps that let water reach the core. Another is cutting from the wrong side, which chips the decorative surface, so always cut face-up with a hand saw or face-down with a circular saw and use a fine-tooth blade. Over-tightening the miter bolts can crush the seam, while under-tightening leaves a visible gap, so snug them evenly in stages. Finally, do not forget to seal every cut edge and cutout perimeter around the sink with silicone; those raw particleboard edges are where water damage almost always begins.
Is a Laminate Countertop With Backsplash Right for You
For rental units, starter homes, laundry rooms, and any kitchen on a tight budget, a laminate countertop with backsplash delivers a clean, waterproof, attractive surface at an unbeatable price. Choose an integrated coved splash for the most spill-proof result, or a taller separate splash when you want more coverage and design freedom. Keep the caulk lines maintained and use trivets, and this affordable surface will serve a busy kitchen well for many years.