Metal epoxy putty is a hand-moldable, two-part repair compound that hardens into a tough, metal-filled material strong enough to patch pipes, fill holes, rebuild worn parts, and bond metal where welding is impractical. For homeowners, it is one of the most useful items in a repair kit: no torch, no special skills, just knead, apply, and let it cure. When you have a leaky joint, a stripped thread, or a cracked casting, this putty can save a costly replacement.
Part of our Epoxy, Concrete & Garage Floors guide — explore the full guide →
This guide explains how metal epoxy putty works, the common types, step-by-step application, safety precautions, and where it excels, plus its limits so you know when to reach for something else.
How Metal Epoxy Putty Works
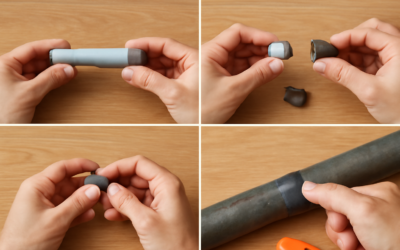
Most metal epoxy putties are two-part epoxy systems combined with metal powders such as steel or aluminum for added strength and a metallic finish. The two parts, a resin and a hardener, are usually packaged together as a stick with an outer layer wrapped around an inner core. When you cut off a piece and knead it until the color is uniform, a chemical reaction begins that cures the soft putty into a rigid, machinable solid. Once cured, many products can be drilled, sanded, tapped, filed, and painted, behaving much like metal.
Common Types and Forms
- Putty sticks: The most common form, a roll you slice and knead by hand, ideal for filling, patching, and shaping.
- Two-tube liquids and gels: Mixed in equal parts for thinner applications and bonding flat surfaces.
- Steel-reinforced putty: Contains steel powder for maximum strength on heavy repairs.
- Aluminum and specialty putties: Color-matched or formulated for specific metals and conditions.
- Water-area and high-temperature grades: Some are rated to cure underwater or withstand heat; always pick the grade matched to your job.
What It Can Fix
Metal epoxy putty is remarkably versatile around the house and garage.
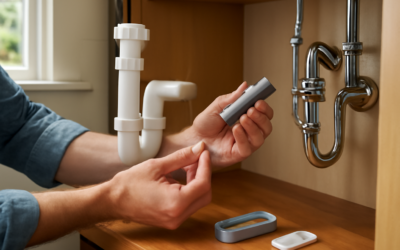
- Sealing small leaks and pinholes in pipes, gutters, and tanks (after depressurizing).
- Filling cracks, dents, and rust holes in metal surfaces.
- Rebuilding stripped threads or worn fittings so a bolt can be re-tapped.
- Bonding metal brackets, trim, and parts where welding is impractical.
- Repairing tools, machinery housings, and automotive components.
- Filling gaps before painting metal furniture or railings.
Safety First
Epoxies are chemicals, so handle them responsibly and always read and follow the manufacturer’s instructions for the specific product.
- Ventilation: Work in a well-ventilated area to avoid breathing fumes during mixing and curing.
- Gloves: Wear disposable gloves; uncured epoxy can irritate or sensitize skin, and repeated contact can cause allergic reactions.
- Eye protection: Wear safety glasses, especially when sanding or drilling cured putty, which creates dust.
- Avoid skin contact and ingestion: Keep it off your skin, wash hands after use, and keep it away from children and pets.
- Potable water: If the repair will contact drinking water, use only a product specifically rated and certified as safe for potable-water contact; not all putties qualify.
- Heat and pressure: Confirm the product’s temperature and pressure ratings match your application before relying on the repair.
How to Apply Metal Epoxy Putty
Surface prep is the difference between a repair that holds and one that fails. Follow these steps.
- Prepare the surface: Clean off grease, rust, paint, and loose debris. Roughen the area with sandpaper or a wire brush so the putty grips, then wipe it clean and dry. For pipes, shut off water and relieve pressure first.
- Cut the right amount: Slice off only what you can apply within the working time, since it sets quickly once mixed.
- Knead thoroughly: Mix the piece with gloved hands until the color is completely uniform with no streaks, which ensures full curing.
- Apply and shape: Press the putty firmly onto the prepared surface, working it into cracks and around the repair. Wet fingers or a tool slightly to smooth it before it stiffens.
- Let it cure: Follow the product’s cure schedule. Many become firm within minutes and reach full strength after several hours to a day. Do not stress or pressurize the repair until fully cured.
- Finish if needed: Once hard, you can sand, drill, tap, file, or paint many cured putties.
Working Time and Cure Times
Pay attention to two numbers the manufacturer provides. Working time (or pot life) is how long the putty stays soft enough to shape after mixing, often just a few minutes for fast products. Cure time is how long until it reaches functional and then full strength, which can range from minutes to harden initially up to 24 hours for maximum strength. Temperature affects both: warmer conditions speed curing, while cold slows it. Plan your application so you finish shaping before the working time runs out.
Limits and When to Choose Another Solution
Metal epoxy putty is a strong repair, but it is not a universal substitute for welding or proper part replacement. For high-pressure plumbing, critical structural parts, or anything safety-related like brake or fuel components, treat putty as a temporary fix at best and consult a professional. Very large gaps, surfaces under constant flex, or extreme heat beyond the product’s rating can defeat it. When the failure point is load-bearing or could cause harm, replacement or professional repair is the right call.
What It Costs
As a general estimate, a standard tube or stick of metal epoxy putty runs roughly $5 to $20, with larger quantities and specialty potable-water or high-temperature grades costing more. A single stick handles many small household repairs. These are ballpark figures that vary by brand and retailer, so compare options for the grade your job requires.
Tips for a Stronger, Longer-Lasting Repair
A few habits dramatically improve how well a putty repair holds. The single most important is surface preparation: oil, rust, paint, or moisture left on the metal will weaken the bond no matter how good the product is, so clean and roughen the surface thoroughly. On a leaking pipe, dry the area completely unless you are using a putty specifically formulated to cure on damp or wet surfaces. For a crack, drilling a small hole at each end can stop it from spreading before you fill it.
Build up the repair in a slightly oversized mound rather than a thin smear, since extra material adds strength and you can sand it flush once cured. Overlap the putty well onto sound metal around the damage so it grips a broad area. Let it reach full cure before putting the part back into service, and resist the urge to test a pressurized repair early. For repairs that will see vibration or temperature swings, choose a steel-reinforced grade rated for those conditions.
Final Thoughts
Metal epoxy putty is an inexpensive, versatile fix that lets you repair cracks, leaks, and worn metal parts without a welder. Prep the surface well, knead until uniform, choose a grade rated for your conditions, and respect the safety basics of ventilation, gloves, and eye protection. Match the product to the job, including a potable-water-rated putty for anything touching drinking water, and know its limits. For load-bearing or safety-critical failures, call a professional, but for everyday metal repairs, this putty earns its place in your toolbox.