Metal tile edging, also called tile trim or edge profile, is the finishing strip that covers the exposed edges of tile to give a clean, durable, professional-looking border. It replaces older bullnose tiles and protects vulnerable corners from chipping. Whether you are tiling a shower niche, a backsplash, or a floor transition, the right edge profile is the difference between a project that looks DIY and one that looks like a pro did it.
Part of our Tile & Grout guide — explore the full guide →
Why Use Metal Edging Instead of Bullnose
For decades, the standard way to finish a tile edge was a matching bullnose tile with a rounded, glazed edge. The problem is that many modern tiles, especially large-format porcelain and natural stone, do not come with a bullnose option. Metal edging solves that. It caps the raw cut edge, protects it from impact, and creates a crisp straight line. It also lets you carry the same tile from one surface to another without hunting for matching trim pieces.
Common Profile Types
Edge profiles come in several shapes, each suited to a different job.
- Square edge: A clean, modern 90-degree look that sits flush with the tile face. The most popular choice today.
- Round edge (bullnose profile): A gently curved cap that softens the corner, easier on hands and ideal for thresholds and seating areas.
- Quarter-round: A small rounded bead, often used where tile meets a wall or at base transitions.
- Outside corner trim: Pre-formed L-shaped pieces that wrap an exposed outside corner, such as the edge of a tiled island or shower curb.
- Transition and reducer profiles: Used where tile meets a different floor height, like carpet or hardwood.
Metals and Finishes
The metal you choose affects both look and longevity, particularly in wet areas.
- Anodized aluminum: The most common and affordable. Lightweight, rust-proof, and available in brushed, polished, and color finishes. Great for backsplashes and dry walls.
- Stainless steel: The most durable and corrosion-resistant, ideal for showers, floors, and high-traffic edges. Costs more but holds up indefinitely.
- Brass and bronze: Warm-toned options for a high-end, designer look. Some develop a living patina over time.
- Finishes: Choose from polished chrome, brushed nickel, matte black, satin brass, and more to match faucets and hardware.
Choosing the Right Size
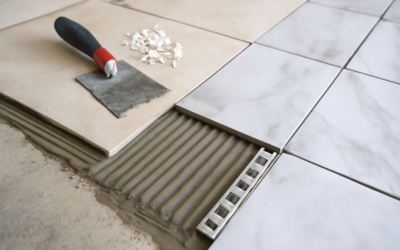
Edging is sold by height to match your tile thickness. Measure your tile plus the thickness of the thinset bed it sits in. Common heights run from 3/8 inch up to 1/2 inch and beyond. If the profile is too short, the tile will sit proud of the trim; too tall, and the metal lip will stand above the tile. When in doubt, size to your tile thickness exactly, since the perforated anchor leg sits in the same thinset layer as the tile.
How to Install Metal Edging
Installing edge trim is straightforward if you set it at the same time as your tile.
- Measure and cut the profile to length with a hacksaw or miter saw with a metal-cutting blade. Use a 45-degree miter where two pieces meet at a corner.
- Apply thinset to the wall or floor where the edge will sit, combing it with a notched trowel.
- Press the perforated anchor leg of the trim into the thinset so it is fully embedded and the visible face sits where you want the finished edge.
- Set your tile up against the trim, pressing it firmly so the tile face aligns flush with the front of the profile. Maintain a consistent grout-line gap between tile and trim.
- Let everything cure, then grout the joint between the tile and the trim just as you would any other grout line.
Pro Tips for a Clean Result
Keep a small grout gap between the tile edge and the trim, usually the same width as your other grout lines, so the joint looks intentional and the grout has something to grab. Wipe thinset off the visible metal face immediately, since cured thinset is hard to remove without scratching the finish. For outside corners, use a pre-mitered corner piece or cut clean 45-degree miters; a sloppy corner is the first thing the eye catches. Match the metal finish to your faucets, drains, and fixtures for a cohesive look.
Cost and Where to Buy
Metal tile edging is inexpensive relative to the rest of a tile job. Aluminum profiles typically run $8 to $20 per 8-foot length, while stainless steel and brass climb to $25 to $60 or more per length. Tile shops, home centers, and online suppliers carry the widest selection. Buy a little extra to cover miter cuts and mistakes, and confirm the height matches your tile before you start setting.
Where Metal Edging Makes the Biggest Difference
Some spots benefit from edge trim far more than others. The exposed edge of a backsplash, where tile ends partway up a wall, is a classic application that turns a raw cut into a deliberate design line. Shower niches and recessed shelves use edging to finish the inside corners cleanly and protect the edges from chipping. The outside corner of a tiled kitchen island or a half-wall is another prime spot, since corners take the most knocks. Edging also shines at thresholds and floor transitions, where a metal reducer bridges tile to wood or carpet at different heights. Identifying these high-impact areas helps you decide where to invest in quality trim.
Color-Matching and Design Trends
Beyond function, metal edging has become a design feature in its own right. Matte black trim has surged in popularity for modern and industrial kitchens, pairing with black fixtures and hardware for a bold, graphic line. Brushed brass and gold profiles add warmth and a touch of luxury, especially against white or marble-look tile. Polished chrome and brushed nickel remain timeless choices that disappear into the background for a clean, understated edge. The current trend leans toward treating the trim as an intentional accent rather than hiding it, so choosing a finish that contrasts or coordinates with your tile and fixtures can elevate the whole design.
Final Thoughts
Metal tile edging is a small detail that has an outsized effect on how finished a tile project looks. Pick a profile shape that fits the application, a metal that suits the moisture level, and a height matched to your tile. Target the high-impact spots like backsplash edges and outside corners, choose a finish that complements your fixtures, set it in the same thinset bed as the tile, and keep your grout lines consistent. Do that and you will get a crisp, protected edge that elevates the whole installation.
Prefer to explore on your own?
See how new flooring looks in your actual room in seconds — free, no signup.
Try the free Floor Studio →