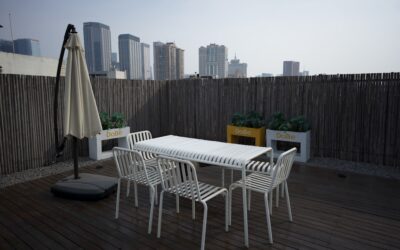
Furniture makes a patio functional; planters make it feel finished. Yet most patio planters are bought one impulse pot at a time, which is how yards end up with nine mismatched containers and no design. Chosen deliberately — right material for your climate, right size for the plant, arranged in odd-numbered groups — planters do the work of walls, borders, and artwork for a fraction of hardscape cost. Here’s how to pick them, place them, and keep what’s in them alive past July.
Part of our Decks & Outdoor guide — explore the full guide →
- Materials: What Survives Your Climate
- Size and Drainage: Why Container Plants Die
- Styles That Match the Patio
- Arrangement: The Designer Formulas
- Planting for Sun, Shade, and Season
- Watering and Upkeep Without the Daily Chore
- Edibles: Herbs and Vegetables in Patio Containers
- Budget Plan for a Finished Look
- Choosing and Caring for a Wrought Iron Planter
Materials: What Survives Your Climate
Planter material is a durability decision first and a style decision second, especially anywhere that freezes.
- Terracotta: the classic warm look, breathable for roots, $10 to $80 — but porous, so it wicks moisture and cracks in freeze-thaw unless emptied and stored dry each winter
- Glazed ceramic: color and shine, $30 to $200; more frost-resistant than raw clay but still winter-vulnerable and heavy
- Fiberglass and fiberstone: the designer workhorse — stone or concrete looks at one-quarter the weight, frost-proof, 10 to 20 years of life, $50 to $400
- Plastic and resin: lightest and cheapest ($5 to $60); quality double-walled resin now mimics everything, while thin nursery-grade plastic goes brittle in 3 to 5 years of UV
- Metal (galvanized, corten, powder-coated steel): crisp modern lines, $40 to $500; cooks roots in full southern sun unless you insulate with a plastic liner
- Concrete: permanent, stable in wind, ages beautifully — and at 50 to 300 pounds planted, it lives where you set it
- Wood (cedar, teak boxes): warm and buildable to any size; line with landscape fabric and expect 7 to 15 years
In freeze climates, fiberstone, resin, concrete, and wood overwinter outside; terracotta and most ceramic don’t.
Size and Drainage: Why Container Plants Die
Undersized pots kill more patio plants than any pest. Small containers hold a day of water in July heat, so scale the vessel to the plant: 14 to 16 inches diameter minimum for perennials and small shrubs, 20 to 24 inches for tomatoes or dwarf trees, 30-plus for anything meant to be an anchor specimen. Bigger pots also mean fewer waterings — a 24-inch planter waters every two to three summer days where an 10-inch pot demands daily attention.
Drainage is non-negotiable: every planter needs holes (drill 1/2-inch holes in sealed pots — masonry bit for ceramic, standard bit for resin), a saucer or pot feet to protect the patio surface, and real potting mix rather than garden soil, which compacts into concrete in a container. Skip the old gravel-in-the-bottom myth; it raises the waterlogged zone instead of draining it. On wood decks and stained concrete, elevate pots on feet ($5 to $15 per set) — a planter sitting flat traps a permanent wet ring that stains pavers and rots deck boards.
Styles That Match the Patio
Let the hardscape pick the planter language. Modern patios — clean concrete, black metal, rectilinear furniture — want tall square or cylinder planters in charcoal, white, or corten rust, few and large. Cottage and traditional spaces suit terracotta, glazed ceramic in deep blues and greens, and window-box wood. Farmhouse patios carry galvanized tubs and whiskey-barrel halves. Mediterranean looks build from large unglazed urns and citrus in terracotta. One reliable rule from staging dozens of these spaces: repeat one material or color across at least three containers, and the collection reads as a decision instead of an accumulation. If the existing collection is already mismatched, paint is the cheat — a $6 can of exterior spray paint in one unifying color rehabilitates a shelf of orphan plastic pots in an afternoon.
Arrangement: The Designer Formulas
Odd numbers, varied heights, repeated finishes — that’s most of container design in six words. Group planters in threes: tall (28 to 36 inches), medium (18 to 24), and low (10 to 14) in the same finish, clustered at a corner or flanking a step. Within each pot, the “thriller, filler, spiller” planting formula still wins — one vertical statement plant, mid mounding fillers, and trailers over the rim.
Beyond clusters, planters do spatial work. A row of matched rectangular troughs creates a privacy hedge or defines the patio edge where a wall would cost thousands — ornamental grasses or arborvitae in 30-inch troughs give you a movable 5-foot screen. A pair of matched planters frames a door or the entry to a pergola, and the symmetry works at any budget — two $25 resin pots frame an entrance as effectively as two $250 fiberstone ones. One oversized pot as a focal point beats five small ones scattered; small pots read as clutter past arm’s length. Leave 36-inch walkways clear, and if the patio layout itself is still in flux, our patio design guide covers zoning planters into the plan from the start.
Planting for Sun, Shade, and Season
Match plants to the patio’s actual light — most patios are hotter than the yard around them, since paving radiates heat. Full-sun standouts in containers: lantana, salvia, ornamental grasses, dwarf citrus in warm zones, and herbs (rosemary and thyme thrive on neglect). Shade patios carry ferns, hostas, caladiums, and impatiens. For structure year-round, evergreen anchors — boxwood, dwarf Alberta spruce, arborvitae — hold the arrangement while seasonal color rotates around them: pansies in spring, heat-proof annuals in summer, mums and kale in fall. In wind-exposed sites, favor low, heavy pots and flexible plants; a top-heavy cypress in a light resin pot is a domino waiting for a gust.
Watering and Upkeep Without the Daily Chore
Container plants dry out fast, and July vacations kill more of them than winter does. Self-watering planters with built-in reservoirs (Lechuza, HC Companies) stretch watering to weekly and cost only $10 to $40 over standard pots. Drip irrigation on a $30 hose-bib timer waters a whole planter collection automatically — a two-hour Saturday install. Otherwise: water until it runs from the drainage holes, feed with slow-release fertilizer each spring, refresh the top 2 inches of mix annually, and fully repot every two to three years when roots circle. Come winter, empty and store frost-vulnerable pots, and group the hardy survivors against the house wall where masonry heat buffers the worst nights. Perennials overwintering in containers effectively lose two hardiness zones versus the ground — a zone-5 shrub in a pot behaves like zone 7 stock, so buy container anchors two zones hardier than your map says.
Edibles: Herbs and Vegetables in Patio Containers
The most-used planter on many patios is the one next to the grill. Herbs are nearly foolproof in a 14- to 16-inch pot by the kitchen door — basil, rosemary, thyme, and chives in one container cover most cooking, and mint gets its own pot or it takes everyone else’s. Vegetables demand more volume than beginners expect: one tomato wants a 20- to 24-inch container (15-plus gallons) with a cage anchored in the pot, peppers manage in 16 inches, and salad greens thrive in shallow 8-inch troughs that can ride a bistro table. Give edibles the sunniest 6-to-8-hour spot on the patio, feed every two weeks in season, and expect daily summer watering unless you run drip — a fully loaded tomato transpires a gallon a day in July heat.
Budget Plan for a Finished Look
A convincing planter scheme for a mid-size patio costs less than one piece of furniture: one 30-inch statement planter ($80 to $200 in fiberstone), a graduated trio in a matching finish ($90 to $180), two trough screens if privacy matters ($120 to $300), plus soil and plants ($60 to $150). Call it $350 to $800 all-in — and unlike most patio purchases, it compounds, because the plants get better every year you don’t have to rebuy the pots. Choose frost-proof materials once, drill the drainage holes, and the containers become permanent infrastructure with a rotating cast.
Choosing and Caring for a Wrought Iron Planter
A wrought iron planter brings scrollwork, curves and a sense of age that other containers struggle to match. Most of these planters are stands, baskets or open frames that hold a pot or liner rather than solid containers, so they need a little different setup and care than resin or ceramic.
Understanding Finishes
Many planters sold as wrought iron are actually made from steel or cast iron shaped to look hand forged, and the finish matters as much as the metal. Powder coated finishes in black, bronze or dark green give the best outdoor protection because the coating is baked on in a thick, even layer. Painted finishes look similar at first but chip more easily. Antique or rust patina finishes are often deliberate, so check whether the surface is sealed or left raw to keep aging. Look closely at welds and joints, where coatings are thinnest and corrosion usually starts first.
Preventing and Treating Rust
Iron rusts wherever water sits on bare metal, so inspect the planter each spring and fall. Brush any rust spots with a wire brush until you reach clean metal, wipe away the dust, then apply a rust inhibiting metal primer followed by exterior metal paint in a matching color. Work in a ventilated area and wear gloves and eye protection when brushing and painting. Keep the feet off soil and grass by setting the stand on pavers or small pads, since constant ground moisture eats away the base. Pads also keep rust stains off stone and concrete.
Using Liners Correctly
Open basket and frame planters need a liner to hold soil. Coco fiber liners look natural and drain freely but dry out fast in sun. Molded plastic or fabric liners hold moisture longer. For the easiest care, set a plain nursery pot or plastic liner with drainage holes inside the frame so you can lift plants out for repotting or winter storage. Keep a small gap between the liner and the iron where possible so water drains away instead of pooling against the metal.
Accounting for Weight
Iron frames are heavy on their own, and wet soil adds a great deal more. Plan the final spot before planting, because a loaded stand is hard to move. Tall stands and urns can become top heavy, so keep them on level, solid ground and out of strong wind, and use lightweight potting mix. Wall mounted iron baskets and hanging planters need hardware anchored into solid framing or masonry rather than siding or trim, and the hooks should be rated for the full wet weight.
Plants That Suit Iron
Trailing plants soften the dark metal, and bright blooms stand out against black finishes. Ivy, trailing petunias, ferns in shade and herbs in sun all pair well with an iron frame.