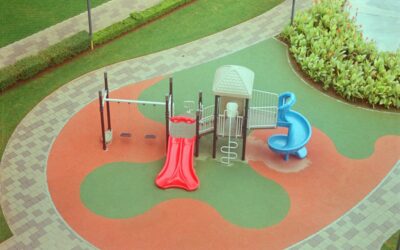
A swing set is only as safe as what’s underneath it, and that’s where the right surfacing earns its keep. Playground tile refers to interlocking or bonded rubber safety tiles designed to cushion falls, the single most common cause of playground injuries. Unlike loose materials such as mulch or pea gravel, these tiles provide a consistent, low-maintenance surface that doesn’t scatter, compact, or wash away. Choosing them correctly comes down to one critical number: how far a child can fall and still land safely.
Part of our Tile & Grout guide — explore the full guide →
Why Fall Height Is Everything
The whole purpose of playground tile is to absorb the energy of a fall. The key spec is the critical fall height (CFH), the maximum height from which a child can fall onto the surface with an acceptably low risk of serious head injury. This rating comes from impact testing and is the number you must match to your equipment.
Measure the highest point a child can reach on your equipment, the top of a slide platform or the highest grip on a climber, and choose tiles rated for at least that height. Buying tiles rated below your equipment’s fall height defeats the entire purpose. When in doubt, round up.
Understanding ASTM Standards
Reputable playground tiles are tested to recognized safety standards, and you should look for them on the spec sheet. ASTM F1292 is the standard for impact attenuation of playground surfacing, the test that establishes a tile’s critical fall height. ASTM F1951 addresses accessibility, important if you want a surface that meets ADA firmness and stability requirements for wheelchairs.
These standards exist because not all rubber surfaces perform equally. A tile that simply looks thick may not actually pass impact testing. Insist on published ASTM F1292 ratings rather than vague marketing claims about safety, and keep the documentation in case a school, HOA, or insurer asks.
Thickness and Fall Rating
Tile thickness directly drives the fall-height rating: thicker tiles cushion bigger falls. While exact ratings vary by manufacturer and must be read from the product’s own data, the general relationship is consistent:
- Thinner tiles (around 1.5 to 2.5 inches): Suited to lower equipment and toddler play areas with modest fall heights.
- Mid-range tiles (around 2.75 to 3.5 inches): Common for typical residential play structures.
- Thick tiles (4.25 inches and up): Needed for tall climbers and elevated platforms with high fall heights.
Always confirm the specific CFH printed for the exact thickness you’re buying, since two tiles of the same depth from different makers can carry different ratings.
Drainage Keeps the Surface Usable
One of the biggest advantages of rubber tile over poured surfaces or loose fill is drainage. Many playground tiles have a textured or channeled underside that lets rainwater pass through to the base below, so the surface dries quickly and doesn’t pool. This means kids can play sooner after a storm and the area stays free of standing water that breeds mosquitoes or grows slick.
For drainage to work, the base underneath has to cooperate. A compacted aggregate base allows water to percolate away, while a sealed concrete slab requires the tiles’ channels and a slight slope to shed water to the edges. Plan your base around how you want water to move.
Installation Basics
Most residential playground tiles interlock with pins, dovetail edges, or hidden connectors, allowing a relatively straightforward installation over a prepared base. The base is the part that determines long-term performance:
- Compacted aggregate: A leveled, well-compacted crushed-stone base provides drainage and a stable foundation for many tiles.
- Concrete or asphalt: Some tiles are designed to bond to a hard slab with adhesive for a permanent, firm result.
Whichever base you use, it must be flat and level, since gaps or dips beneath the tiles create trip hazards and weak spots. Ramped border or edge pieces are available to create a smooth, ADA-friendly transition from the tile surface to the surrounding ground, reducing trips at the perimeter.
Maintenance and Longevity
Compared with loose fill that needs constant raking and topping up, rubber tile is low-maintenance. Sweep off debris, hose it down occasionally, and inspect periodically for tiles that have shifted, lifted, or worn. Quality outdoor tiles are UV-stabilized to resist fading and can last many years, though colors will mellow over time in strong sun.
Inspect the surface on a schedule, especially after heavy use or extreme weather, and re-secure or replace any damaged tiles promptly. A loose or curled tile edge is exactly the kind of trip hazard the surface is meant to prevent.
Is Playground Tile Right for You?
Rubber playground tile costs more upfront than mulch or gravel, but it pays back in consistency, accessibility, and far less ongoing maintenance. It’s an excellent choice for home play areas, daycares, and any space where you want a clean, wheelchair-accessible, all-weather surface that won’t disappear into the grass.
Playground Tile vs. Other Surfacing
It helps to see how rubber tile stacks up against the alternatives, because each has trade-offs. Knowing the field makes the case for tile clearer:
- Engineered wood fiber (EWF) and mulch: Cheap and offers good impact protection when maintained, but it compacts, scatters, decomposes, and must be raked level and topped up regularly to keep its fall rating.
- Pea gravel and sand: Inexpensive loose fill that drains, but it displaces easily, can be thrown or ingested by small children, and isn’t wheelchair accessible.
- Poured-in-place rubber (PIP): A seamless, accessible, attractive surface, but it’s expensive and requires professional installation, and repairs mean patching a bonded surface.
- Rubber tiles: Higher upfront cost than loose fill, but consistent fall protection, drainage, accessibility, low maintenance, and the ability to replace a single damaged tile.
For a homeowner who wants a durable, low-fuss surface they can install in sections and repair piece by piece, tiles hit a sweet spot that loose fill and poured rubber don’t.
Cost and Coverage Planning
Budgeting for playground tile means thinking in square footage plus a safe-zone buffer. Safety guidelines call for a protective surface extending well beyond the equipment, commonly at least six feet in all directions around stationary structures, and even farther in front of and behind swings. Measure your equipment’s footprint, add that use-zone perimeter, and you have the area to cover.
Tiles are priced per square foot, with thicker, higher-fall-rated tiles costing more, so balance the rating you need against the area you’re covering. Order a few extra tiles beyond your calculated area to account for edge cuts and to keep spares on hand for future replacements, matching colors later can be difficult once a product line changes.
Color, Style, and Play Value
Beyond safety, tiles let you build a more inviting space. They come in a range of colors, so you can define play zones, create borders, or simply add visual appeal that plain mulch can’t. Some homeowners use color to mark a softer toddler area versus a zone for older kids. Just remember that aesthetics come second to the fall rating, choose the safe tile first, then pick from the colors available in that product.
The bottom line is simple: pick playground tile rated for your equipment’s fall height, verified by ASTM F1292 testing, and install it over a properly prepared, well-draining base. Do that, and you’ve built a play surface that’s genuinely safer, not just one that looks the part.
Prefer to explore on your own?
See how new flooring looks in your actual room in seconds — free, no signup.
Try the free Floor Studio →