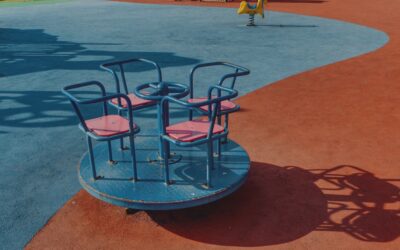
Walk into any modern park, school yard, or daycare and you will likely be standing on it before you notice it. Poured rubber playground flooring, known in the trade as poured-in-place or PIP surfacing, has become the gold standard for play areas because it does one job better than almost anything else: it cushions a falling child. Having specified and inspected these surfaces for years, I want to give you the honest picture before you spend the money.
- Poured Rubber Playground Flooring: What Poured-in-Place Rubber Actually Is
- The Real Advantages
- The Drawbacks You Need to Weigh
- What It Costs
- Poured Rubber Versus the Alternatives
- How to Buy It the Right Way
- Installation: What Actually Happens On Site
- Design Options and Custom Features
- Maintenance and Longevity
Poured Rubber Playground Flooring: What Poured-in-Place Rubber Actually Is
The surface is built in two layers, mixed and troweled on site rather than shipped as tiles or rolls. The bottom cushion layer is made from recycled SBR rubber buffings, usually black, bound with polyurethane and installed anywhere from 1.5 to 4 inches thick depending on how far a child could fall. On top goes a thinner wear course, typically 3/8 to 1/2 inch, made from colorful EPDM rubber granules that give the surface its playful reds, blues, and greens and its UV resistance.
Because it is poured wet and cures in place, PIP forms a single seamless sheet that bonds to the base below. That base is normally compacted stone or, better yet, an asphalt or concrete slab. The seamlessness is the whole point: no seams means no trip edges and nowhere for weeds or bugs to work their way up.
The Real Advantages
Safety is the headline benefit. PIP is engineered to a Critical Fall Height rating, so a surface poured to the right thickness will protect a child falling from an 8-foot platform far better than the wood chips it usually replaces. It meets ASTM F1292 impact standards and stays compliant year after year, unlike loose fill that scatters and thins out.
Accessibility is the second big win. The firm, smooth surface is ADA compliant, which means a wheelchair, a walker, or a stroller rolls right across it. Engineered wood fiber and rubber mulch cannot say that. On top of those, the surface drains well when installed over a proper base, dries quickly after rain, and demands very little day-to-day maintenance. There is no raking, no topping-up, and no replacing that loose fill loses every season.
The Drawbacks You Need to Weigh
Cost is the honest downside. Poured rubber is one of the most expensive playground surfaces available, and the price shocks people used to mulch. It is also not a DIY product. The mixing ratios, trowel technique, and cure conditions are unforgiving, and a poor pour shows up as bubbling, soft spots, or premature cracking. This is professional-only work.
Two more issues deserve mention. In direct summer sun, dark rubber surfaces get hot to the touch, so shade structures matter for comfort and safety. And over a decade or more, the top EPDM layer can crack, fade, or delaminate, especially if the base was not prepared correctly or if tree roots heave from below. Repairs are possible but they rarely match the original color perfectly.
What It Costs
Budget roughly $12 to $20 per square foot installed for standard poured rubber, with the exact figure driven mostly by thickness. A play area under a low toddler structure needs less cushion and sits at the lower end, while a surface under a tall composite structure with an 8-foot fall height needs 3.5 to 4 inches of cushion and pushes toward the top. Custom colors, inlaid designs, logos, and hopscotch patterns add several dollars per square foot.
A modest 1,000-square-foot play area therefore runs $12,000 to $20,000, and larger commercial installations scale from there. It is a big number up front, but spread over a 10 to 15 year service life with almost no annual upkeep, the cost per year often beats loose fill that has to be topped up constantly and fully replaced far sooner.
Poured Rubber Versus the Alternatives
It helps to see where PIP sits against its competitors. Engineered wood fiber is the cheapest safety surface at $1 to $3 per square foot but needs constant maintenance and is not truly wheelchair accessible. Rubber tiles offer similar cushioning to PIP and are easier to spot-repair, but they show seams that can lift over time. Bonded rubber mulch splits the difference on cost and look but has a softer, less durable surface.
Poured-in-place wins when you want a seamless, accessible, low-maintenance, design-flexible surface and you can afford the premium. If budget is tight and the play area is lightly used, one of the alternatives may serve you better. Be clear with yourself about which of those descriptions fits your project.
How to Buy It the Right Way
Start with the fall height. Measure the tallest accessible platform on your equipment, because that number dictates the required cushion thickness and therefore your price. A reputable installer will pull the manufacturer’s fall-height chart and pour to spec, not eyeball it. Never let anyone thin the cushion layer to save money; that is the one corner that endangers children and voids compliance.
Insist on a proper base. Over bare soil or poorly compacted stone, even a perfect pour will fail as the ground settles. A concrete or asphalt sub-base costs more but roughly doubles the realistic lifespan. Ask to see the installer’s ASTM F1292 test results, request references for jobs that are at least five years old, and get a written warranty covering both material and installation.
Installation: What Actually Happens On Site
Understanding the process helps you judge whether a crew is doing it right. After the base is prepared and cured, the crew mixes the black SBR cushion rubber with polyurethane binder in a paddle mixer, then hand-trowels it across the area to the specified depth, screeding it level as they go. This bottom layer typically needs 24 to 48 hours to cure before the color coat can go down. The weather has to cooperate; you cannot pour rubber in the rain or in near-freezing temperatures, which is why northern installs cluster in the warmer months.
The colorful EPDM wear layer is mixed separately, poured on top, and troweled smooth to a consistent 3/8 to 1/2 inch. A skilled crew works quickly and blends batches carefully so you do not see color banding where one mix ended and the next began. Once the top coat cures, usually another day or two, the surface is ready for play. Rushing any of these cure windows is the most common cause of the soft spots and bubbling you sometimes see on poorly installed playgrounds.
Design Options and Custom Features
One reason municipalities love poured rubber is the design freedom. Because the surface is troweled by hand, installers can inlay swirls, animal shapes, planets, hopscotch grids, running tracks, and even sports-field markings directly into the color layer. Some parks spell out the town name or a school mascot right in the rubber. These custom inlays add several dollars per square foot and require careful templating, but they turn a plain safety surface into a play feature in its own right. If a themed design is on your wish list, ask the installer for photos of past custom work before you sign.
Maintenance and Longevity
The upkeep is refreshingly light. Sweep or blow off leaves and debris, hose it down occasionally, and inspect a few times a year for cracks, soft spots, or edges lifting away from curbs. Catching a small delamination early and having it patched keeps a minor issue from spreading into a full section failure.
Done right over a solid base and kept lightly maintained, poured rubber playground flooring will give you 10 to 15 years of safe, accessible, good-looking service. For schools, municipalities, and commercial play spaces where safety and accessibility are non-negotiable, that longevity and peace of mind usually justify the higher price of admission.
Prefer to explore on your own?
See how new flooring looks in your actual room in seconds — free, no signup.
Try the free Floor Studio →