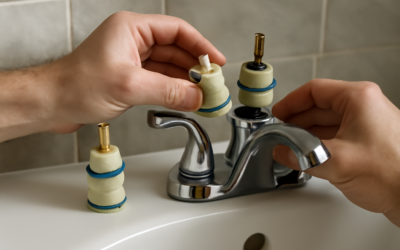
A shower that drips overnight or delivers lukewarm water no matter where you set the handle is almost always telling you the valve cartridge is worn — not that you need a plumber and a wall tear-out. To replace Delta shower cartridge internals yourself takes about 30 to 60 minutes, $20 to $80 in parts, and one non-negotiable first step: shutting off the water supply before you pull anything out of the valve body. Delta has used a handful of cartridge designs across its Monitor series over the decades, so the other key to success is identifying which one is behind your trim before you order parts.
Part of our Bathroom Remodeling & Flooring guide — explore the full guide →
Step Zero: Shut Off the Water
Delta shower valves hold back full house pressure — typically 40 to 80 psi — and removing a cartridge with the water live turns your bathroom into a fountain within one second. Shut off the water first, every time. Look for integral stops: many Delta valves have small screwdriver-operated shutoffs built into the valve body itself, visible at roughly 4 and 8 o’clock once the trim sleeve is off; a flathead turn clockwise closes each side. No integral stops? Close the main house shutoff (basement, crawl space, or at the meter), then open a low faucet to drain pressure. Confirm the shower runs dry before proceeding, and open the shower valve to relieve remaining pressure.
Two more preliminaries: close or towel-cover the drain (small clips and screws love it), and lay out towels — a cup or two of trapped water always exits with the cartridge.
Identify Your Delta Series First
Ordering the right part beats three trips to the store. Delta’s common single-handle shower families:
- Monitor 1300/1400 series: the high-volume standard for decades — single handle, pressure-balanced. Older units used the RP19804 cartridge; Delta’s replacement for most 1300/1400 valves since 2006 is the RP46074, which supersedes earlier versions and includes the pressure-balance function.
- Monitor 1700 series: dual-function — a volume handle plus a separate temperature control. Most use the RP32104 cartridge.
- Monitor 600 series (older homes): pre-1990s valves with the ball-style assembly rather than a modern cartridge; parts still exist, but many owners upgrade the whole valve when these fail.
- MultiChoice Universal (13/14/17/17T built on the R10000 rough valve): current-generation valve body that accepts different series cartridges, so check the trim series, not just the valve.
Count the handles and photograph the valve once the trim is off, then match against Delta’s parts diagrams or take the photo to the plumbing counter. A helpful fact for the budget: Delta backs its faucets with a lifetime limited warranty for original residential purchasers, and the company has a long record of sending replacement cartridges to registered owners — call or use their support site before paying retail.
Removing the Old Cartridge
With water off and pressure relieved, the sequence on a typical Monitor 1300/1400 or MultiChoice valve:
- Pop the small cap on the handle (if present), remove the handle set screw with a hex key or Phillips driver, and pull the handle straight back. Stuck handles respond to gentle rocking or a handle puller — not a hammer.
- Unscrew the trim sleeve and remove the escutcheon plate screws to expose the valve body.
- Note the cartridge orientation — most Delta cartridges have “hot side” markings or a keyed position. Photograph it.
- Remove the bonnet nut (the large threaded collar) by hand or with adjustable pliers, turning counterclockwise.
- Grip the cartridge stem with pliers and pull straight out. Decades of mineral scale can make this stubborn; a slight twist while pulling helps. Expect trapped water.
Inspect the valve body interior with a flashlight. Wipe scale and debris out of the bore with a cloth; do not gouge the brass. If the old O-rings left rubber traces, clean them off so the new cartridge seats fully.
Installing the New Cartridge
Lubricate the new cartridge’s O-rings with silicone-based plumber’s grease — never petroleum jelly, which degrades rubber. Slide the cartridge in with the correct orientation (the keyed tabs on RP46074-style cartridges only seat one way; hot marking to the left on standard installs, and note that reversed plumbing in back-to-back showers is handled by rotating per the instructions that ship with the part). Thread the bonnet nut on hand-tight, then snug it — overtightening distorts seals.
Before reinstalling trim, test: restore water gradually, open the integral stops fully, and cycle the handle from cold to hot several times. Check for weeping around the bonnet with a dry tissue. Only when everything stays dry do the sleeve, escutcheon, and handle go back on.
Set the Scald Guard Before You Finish
Every modern Delta pressure-balanced cartridge includes a rotational limit stop — the plastic toothed ring (often white or gray) on the cartridge stem that limits how far the handle rotates toward hot. Factory position is conservative, and a new cartridge often makes the shower “not as hot as before,” which is the limit stop doing its job, not a defect. To adjust: with water running, pull the ring off its splines, rotate one or two teeth toward hotter, press back on, and test at the showerhead with a thermometer. Consumer safety guidance calls for a maximum of 120°F at the fixture — households with young children or elderly members should stay at or below that number deliberately.
Troubleshooting After the Swap
A few post-replacement issues come up repeatedly. Still dripping: the seats and springs (the two small rubber cups with springs under the cartridge on many series, sold as kits like RP4993 for lavatory/tub applications on relevant series) may need replacing along with the cartridge — cheap and included in some kits. No hot water or reversed hot/cold: the cartridge is rotated 180 degrees or the limit stop is fully restricted; re-seat per the instruction sheet. Reduced flow: debris dislodged during the work is now in the showerhead — unscrew it and rinse the screen. Handle feels stiff: O-rings went in dry; pull it and grease properly. If the valve body itself is cracked or the leak is behind the wall rather than at the trim, that is genuinely plumber territory ($150 to $500 depending on access).
Cost, Time, and When to Call a Pro
The full DIY bill: cartridge $20 to $80 retail (potentially free under Delta’s warranty), plumber’s grease $5, and an hour including the trip for towels. A plumber charges $150 to $350 for the same job. The DIY case is strong here because the failure is contained, the steps are reversible, and the water is off the entire time. Call a pro instead when the shutoffs themselves fail, the cartridge is seized beyond extraction, or you find corrosion or leaks on the valve body. Otherwise, this is one of the most satisfying fixes in home plumbing: one part, one hour, and the 2 a.m. drip is gone.