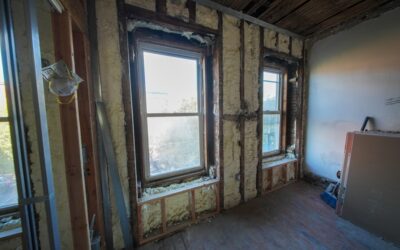
Roughly a third of American homes built before 1980 have little or no insulation in their exterior walls — builders simply weren’t required to install it. If your house was framed before the energy codes of the late 1970s, there’s a good chance you’re heating the outdoors through empty stud bays. Retrofit insulation is the fix: filling those closed wall cavities, and upgrading attics and floors, without gutting the house down to the studs. Done well, it cuts heating and cooling bills 15 to 25 percent and transforms comfort in rooms that never held temperature. Done in the wrong order, it wastes money. Here’s how the retrofit game actually works.
First, Find Out What You Have
Never buy insulation for walls you haven’t looked inside. The cheap diagnostic: kill the power, pull an outlet cover on an exterior wall, and probe beside the electrical box with a plastic crochet hook or borescope camera ($25-$60). You’ll find one of four things — empty cavities, crumbling old rockwool or balsam batts, settled cellulose with a gap at the top, or reasonably intact fiberglass. Repeat on a couple of walls and floors of the house; insulation practices often changed mid-construction or during old remodels.
Better still, spend $300 to $600 on a professional energy audit with a blower door and infrared camera (many utilities subsidize these to under $100, and the federal 25C tax credit covers 30 percent up to $150). The IR scan shows exactly which bays are empty or settled, and the blower door quantifies air leakage — which matters because in leaky old houses, air sealing frequently beats wall insulation dollar-for-dollar and should be bought first. One warning before any drilling: homes insulated between roughly 1920 and 1990 may contain vermiculite, which can carry asbestos. Gray-brown popcorn-like granules mean stop and test before disturbing anything.
Dense-Pack Cellulose: The Retrofit Workhorse
For closed walls, dense-packed cellulose is the industry default and has been for forty years. Crews drill a 2 to 2.5-inch hole into each stud bay — through exterior siding, or from inside through drywall — snake a fill tube to the far end of the cavity, and pack borate-treated recycled cellulose to about 3.5 pounds per cubic foot, a density that cannot settle and that meaningfully chokes airflow through the wall. Holes get plugged and patched; from the lawn, a good crew’s work on vinyl or clapboard siding is nearly invisible.
Performance lands at roughly R-13 in a 2×4 wall (R-3.7 per inch), and the dense pack’s air-flow resistance adds real-world benefit beyond the R number. Cost runs $2.00 to $4.00 per square foot of wall area in 2026 — figure $2,500 to $6,000 for a typical 1,800 square-foot two-story home. Blown fiberglass (dense-packed via the same method) is the main alternative at similar pricing, trading cellulose’s better air resistance for immunity to moisture-holding. Either way, hire crews who dense-pack every day and ask how they verify density; a “drill-and-fill” outfit that just blows until the machine bogs leaves voids around every fire block and window.
Injection Foam: The Premium Closed-Wall Option
Injection foams — RetroFoam, Tripolymer, and similar water-based resins — pump a shaving-cream-consistency foam into closed cavities through similar drilled holes, where it flows around blocking and wires, then cures soft and air-tight. R-value runs about R-4.6 to R-5 per inch (roughly R-16 to R-18 in a 2×4 wall), with genuinely superior air sealing — often the difference customers actually feel. Pricing reflects the upgrade: $4 to $8 per square foot, or $6,000 to $12,000 for a whole house.
Vetting matters more with foam than with cellulose. Ask for the specific product’s evaluation report, confirm the installer’s certification with the manufacturer, and discuss shrinkage and moisture behavior in your climate. Note that this is not the two-part spray polyurethane used in open cavities — spray foam (open or closed cell) remains the tool for exposed framing in gut remodels, rim joists, and crawl spaces, where it air-seals complex geometry at R-3.7 to R-7 per inch but requires open access.
Don’t Forget the Bigger Wins: Attic and Floors
Walls get the attention, but the retrofit hierarchy usually runs: air sealing first, attic second, walls third, floors and rim joist fourth. Attic top-ups are cheap and accessible — blowing an existing R-11 attic to R-49 costs $1.50 to $3.00 per square foot professionally, or roughly half that DIY with a rental blower, and pays back in 2 to 4 heating seasons in cold climates. The rim joist — that band of framing atop the foundation — leaks heat and air shamelessly in pre-1990 homes and takes a day to treat with cut foam board or two-part spray foam kits ($400-$800 in materials).
Floors over crawl spaces present a fork in the road: either insulate the floor itself with batts or foam, or — increasingly the pro recommendation in humid and mixed climates — encapsulate the crawl space (seal the ground with 12-mil poly, insulate the short walls with foam board, condition the air). Encapsulation runs $3,000 to $8,000 but solves moisture, odor, and pipe-freezing problems the floor-batt approach leaves behind.
The Residing Opportunity: Exterior Foam
One retrofit path deserves its own flag because the window for it opens rarely: whenever old siding comes off, you can wrap the house in continuous exterior foam before the new cladding goes on. One inch of polyiso or graphite EPS (R-5 to R-6.5) over the sheathing blankets every stud and rim, breaking the thermal bridges that cavity insulation can’t touch, and adding it during a residing job costs only $1.50 to $3.00 per square foot more. Combined with dense-packed cavities, it takes a 1950s 2×4 wall to near-modern performance without losing an inch of interior space. If your siding has a decade or less of life left, it can be worth deferring the wall-fill and doing both projects together — sequencing the retrofit around the siding calendar is the kind of planning an energy auditor can price out for you in an afternoon.
Costs, Savings, and Incentives
Whole-house retrofit budgets stack up like this in 2026: air sealing $300-$1,500; attic to R-49 $1,500-$3,500; dense-pack walls $2,500-$6,000 (foam injection roughly double); rim joist $400-$1,200; crawl space work $1,500-$8,000. A comprehensive job on a leaky 1960s house commonly totals $6,000 to $15,000 and cuts total energy use 15 to 30 percent — worth $400 to $900 a year at current utility rates, plus resale value and comfort you can’t put on a spreadsheet.
Stack the incentives before writing checks. The federal 25C Energy Efficient Home Improvement credit returns 30 percent of insulation and air-sealing material costs up to $1,200 per year — spreading a big project across two tax years doubles the take. Many utilities layer on rebates of $0.15 to $1.00 per square foot for wall and attic work, and some states run income-qualified weatherization programs that cover everything. An hour on your utility’s website routinely knocks four figures off the project.
Pitfalls That Turn Retrofits into Repairs
Three failure modes account for most retrofit horror stories. Moisture is the first: insulating a wall changes its temperature and drying behavior, so fix roof leaks, flashing gaps, and grade/gutter drainage before filling cavities — wet cellulose in a closed wall is a slow-motion disaster. Knob-and-tube wiring is the second: burying active K&T in insulation is a fire hazard and a code violation; budget the rewire first (this is the discovery that reorders many projects). The third is skipping air sealing and ventilation math: a tightened house needs functioning bath fans, a vented kitchen range, and — in very tight results — fresh-air ventilation, while naturally drafted furnaces and water heaters should be checked for backdrafting after major tightening. A $150 combustion-safety test is cheap insurance.
The Bottom Line
Retrofit insulation is one of the highest-return investments an owner of an older home can make, but sequence is strategy: audit, air-seal, attic, then walls via dense-pack cellulose ($2-$4/sq ft) or injection foam ($4-$8/sq ft), then rim joist and crawl space. Verify what’s in the walls before buying anything, clear the moisture and wiring hazards first, and harvest the 30 percent federal credit plus utility rebates on the way through. The house will be quieter within a day, cheaper to run within a month, and the project will typically pay for itself in well under a decade — a claim very few home improvements can honestly make.