Walk into any bathroom with cracked, crumbling grout in the corners and along the tub, and you are looking at the single most common tile mistake homeowners make: using rigid grout where a flexible sealant belongs. Silicone grout caulk is the fix. These color-matched sealants flex with the small, constant movements that happen where two surfaces meet, sealing out water in exactly the spots where hard cement grout is guaranteed to fail. Knowing when to reach for caulk instead of grout is one of the most useful things a DIY tiler can learn.
Part of our Tile & Grout guide — explore the full guide →
- Why Grout Cracks in Corners
- Where These Joints Are Called Changes of Plane
- Silicone Versus Siliconized Acrylic
- Color Matching to Your Grout
- How to Apply a Clean Bead
- Sanded Versus Smooth Texture
- Silicone Caulk Versus Traditional Grout
- Cost and How Much You Need
- Maintenance and Common Mistakes
- The Bottom Line
Why Grout Cracks in Corners
Cement grout is essentially thin concrete. It is hard, strong in compression, and completely inflexible. That works fine across a flat field of tile where nothing moves. But every building shifts. Framing expands and contracts with humidity, tubs flex slightly when filled with water and a person, and floors and walls settle over the years.
Wherever two planes meet, an inside corner, the joint between wall and floor, or the seam where tile meets a tub, those tiny movements concentrate. Rigid grout cannot absorb them, so it cracks, crumbles, and eventually lets water seep behind the tile. This is where mold, rot, and expensive repairs start. A flexible sealant in those joints moves instead of breaking.
Where These Joints Are Called Changes of Plane
Tile professionals refer to any spot where the tile surface changes direction as a “change of plane,” and the industry standard is to caulk these joints rather than grout them. The list of spots that should get sealant instead of grout includes:
- Inside wall corners where two tiled walls meet.
- The tub-to-tile and shower-pan-to-wall joints.
- Wall-to-floor transitions.
- Around sinks, tub decks, and countertop backsplashes.
- Where tile abuts a different material like a window frame or trim.
Grout everywhere else, caulk at every change of plane. Following that one rule prevents the majority of bathroom water damage.
Silicone Versus Siliconized Acrylic
Not all grout caulk is the same, and the label wording matters. You will find two broad categories, and for wet areas the difference is significant.
- 100% silicone: The most waterproof and flexible option, ideal for showers, tubs, and constant-moisture zones. It resists mold, stays elastic for years, but cannot be painted and needs a mineral-spirit or dedicated remover to clean up.
- Siliconized acrylic (acrylic latex plus silicone): Easier to apply, cleans up with water, and is paintable, but less waterproof and shorter-lived in soaking-wet locations. Fine for lower-moisture spots like a kitchen backsplash edge.
Manufacturers make matching sanded and unsanded versions of grout caulk so the texture blends with your joints. Use sanded caulk next to sanded grout, and smooth caulk next to unsanded grout, for a seamless look.
Color Matching to Your Grout
The whole appeal of silicone grout caulk over plain clear or white silicone is that it comes tinted to match popular grout colors from the same brands. A caulk labeled to match a specific grout shade will blend so well that the change-of-plane joint disappears into the field grout.
Buy your caulk from the same manufacturer and color line as your grout whenever possible. If your grout is a few years old and has faded or been sealed, test the caulk color on a hidden spot first, since cured grout can shift slightly from the fresh sample chip. When in doubt, a hair lighter usually blends better than too dark.
How to Apply a Clean Bead
A tidy caulk line looks professional and lasts longer. Rushing produces a smeared, uneven mess that traps grime. Work methodically:
- Remove all old caulk or cracked grout from the joint and let the area dry completely. Any moisture underneath causes mold.
- Run painter’s tape along both edges of the joint, leaving a gap the width you want the bead.
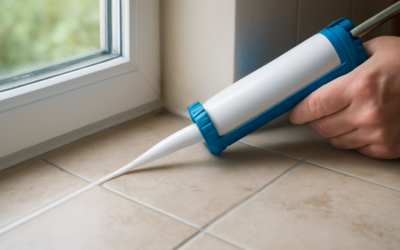
- Cut the tube tip at a 45-degree angle, sized to the joint, and puncture the inner seal.
- Apply steady, even pressure and lay one continuous bead down the joint.
- Tool the bead smooth with a wet fingertip or a caulk tool in a single pass.
- Pull the tape immediately while the caulk is wet for crisp edges.
Let 100% silicone cure fully, typically 24 hours, before exposing it to water. Ventilate the room, because silicone gives off a vinegar-like smell as it cures.
Sanded Versus Smooth Texture
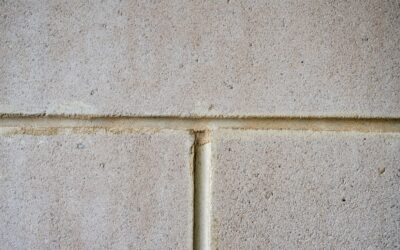
Beyond the silicone-versus-acrylic decision, grout caulk also comes in sanded and smooth (unsanded) finishes, and matching the texture to your grout is what makes the joint truly disappear. Sanded caulk has a slightly gritty, matte surface that blends seamlessly next to sanded floor grout, while smooth caulk mimics the finer finish of unsanded wall grout. Set them side by side in the wrong pairing and the change-of-plane joint stands out, even if the color is a perfect match.
When you buy, check the label for the sanded or unsanded designation and pair it with whatever grout fills the surrounding field. If you are unsure which grout was used, sanded caulk is the safer bet on floors and large-tile installations, and smooth caulk is the better choice on polished wall tile, glass, or mosaic where a gritty texture would look out of place.
Silicone Caulk Versus Traditional Grout
It helps to think of silicone grout caulk and cement grout as partners rather than competitors, because they do different jobs. Grout is rigid and fills the flat field where nothing moves; caulk is flexible and seals the joints that flex. Confusing the two is the root of most tile failures.
- Movement: Grout is inflexible and cracks under movement; caulk stretches and recovers.
- Water resistance: Cement grout is porous and needs sealing; 100% silicone is inherently waterproof.
- Location: Grout goes on the field; caulk goes at every change of plane.
- Lifespan: Field grout can last decades; caulk in a wet joint is a wear item you reapply every few years.
Using each material where it belongs, rather than trying to make one do both jobs, is the whole secret to a tiled surface that stays watertight.
Cost and How Much You Need
Grout caulk is inexpensive relative to the damage it prevents. A standard tube runs $8 to $15, and squeeze tubes for small jobs cost less. One cartridge covers a lot of linear footage, so a single tube usually handles all the change-of-plane joints in an average bathroom with some to spare.
Because a partly used cartridge is hard to store, most homeowners buy one tube for a bathroom-sized job. Compare that to the hundreds or thousands of dollars in repairs from water that got behind the tile through a cracked corner, and color-matched caulk is one of the cheapest insurance policies in home maintenance.
Maintenance and Common Mistakes
Even good silicone eventually ages, discolors, or grows mold in a wet shower. Plan to inspect and reapply the caulk in high-moisture joints every two to five years. When it starts to peel, discolor, or grow black spots that will not scrub away, cut it out and re-caulk rather than layering new caulk over old.
The biggest mistakes are predictable: grouting a change-of-plane joint that should have been caulked, applying caulk over a damp or dirty joint so it never bonds, using non-matching clear or white silicone that stands out, and painting over 100% silicone, which simply will not hold paint. Avoid those, match your caulk to your grout, and seal every change of plane, and your tile work will stay watertight and good-looking for years.
The Bottom Line
Silicone grout caulk is not a luxury upgrade. It is the correct material for every corner, tub joint, and floor transition in a tiled room. Grout belongs on the flat field; flexible, color-matched sealant belongs everywhere the surface changes direction. Spend the extra few dollars on a matching cartridge, prep the joint properly, and tool a clean bead, and you will seal out the water that quietly destroys so many bathrooms while keeping the finished look every bit as polished as the grout around it.