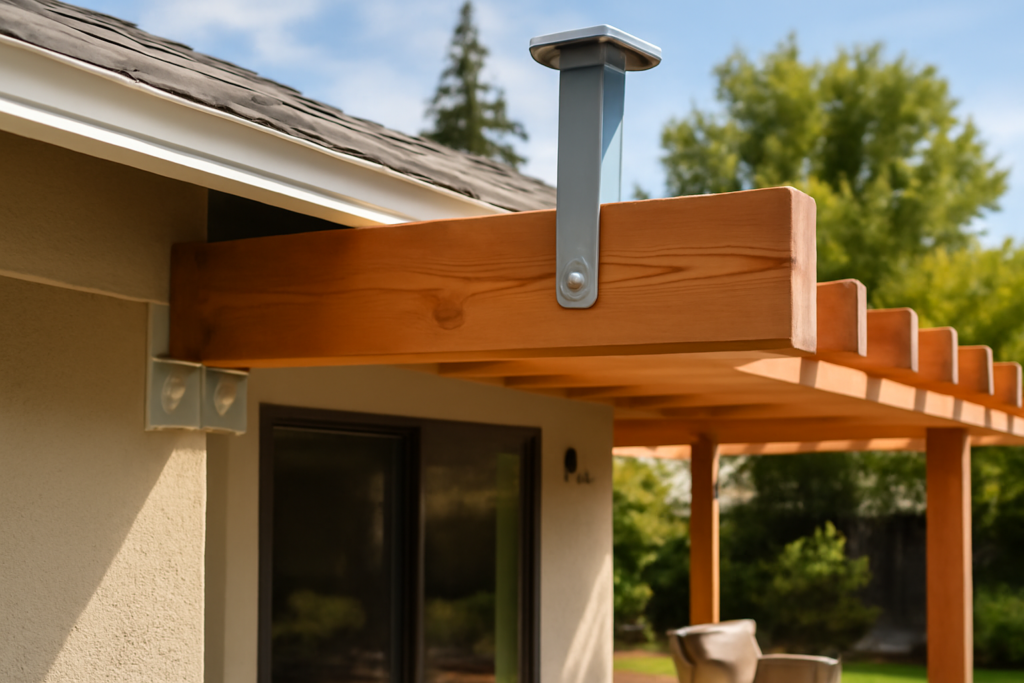
Attach a patio cover to the fascia of a single-story house and you inherit a problem the brochure never mentions: by the time the new roof slopes away from an 8-foot eave, the outer edge hangs somewhere around head height, and the space underneath feels like a tunnel. The Skylift roof riser exists to solve exactly this. It is a heavy-gauge steel bracket that mounts to the roof framing above the wall line — not to the fascia — lifting the patio cover’s attachment point 12 to 40 inches higher and letting the new roof start above your existing eave. The result is real headroom, better light, and room for ceiling fans, all without cutting into the house roof or reframing the wall. Here is how the hardware works, what it costs, and what the installation actually involves.
Part of our Roofing guide — explore the full guide →
The Problem With Fascia Attachment
Traditional patio cover framing bolts a ledger to the fascia board or the wall below the eave. On a typical single-story home with 8-foot walls, that puts your ledger at about 7.5 to 8 feet. Slope a 12-foot-deep cover away at the code-minimum 1/4 inch per foot for drainage — or a more realistic 1 to 2 inches per foot for pitched panels — and the outer beam lands at 6.5 to 7 feet. Tall guests duck. The alternative fixes are all invasive: tying into the roof itself (cutting shingles, flashing a saddle, and creating a leak point), raising a section of wall, or building a freestanding structure with its own posts and footings. Roof riser brackets deliver the height gain of a roof tie-in with the simplicity of a bolted bracket.
How the Bracket Works
A Skylift bracket is a welded steel assembly — an L-shaped or T-shaped riser of 7 to 11 gauge steel — that straddles the roof over the exterior wall. The base plate lags through the roof deck into the top plate of the wall and the rafters or trusses directly above the bearing line, so the load path runs straight down the studs to the foundation. The vertical riser extends above the shingles, and a saddle or header plate at the top receives the patio cover’s ledger beam. Because the bracket bears on the wall line, the house roof structure itself is not asked to carry the patio cover; it simply gets penetrated by a post, and each penetration is flashed and sealed like any roof jack.
Brackets install typically every 4 feet or at each rafter/truss bay per the engineering tables, and the ledger bolts across the tops. From there, the patio cover — Alumawood, wood-framed, insulated panel, or lattice — builds off the elevated ledger exactly as it would off a wall attachment.
Sizes, Models, and Pricing
Skylift Hardware, the California company that popularized the category, sells risers in fixed heights from roughly 12 to 40 inches, in 2 to 4 inch increments, with models for different framing situations — standard risers for rafter-aligned mounting, wider-base versions for trusses, and zero-rise versions used just to jump the eave cleanly. Expect $75 to $150 per bracket at typical retail, so a 20-foot-wide cover needing six brackets carries $450 to $900 in riser hardware. Add flashing boots, structural lags or Simpson-style screws, and sealant, and the attachment system totals $600 to $1,100 — modest against the $4,000 to $15,000 all-in cost of the patio cover it supports. Competing and generic “roof riser brackets” exist at lower prices; whatever the brand, the load tables and gauge of steel are what you are actually buying, so favor products with published engineering.
Choosing the Right Riser Height
Work backward from the finished heights you want. Decide the outer-edge clearance first — 7.5 to 8 feet is comfortable, 8.5 feet feels generous — then add the fall across your cover depth (for a 12-foot projection at 1/2 inch per foot, add 6 inches; for pitched insulated panels at 2 inches per foot, add 24 inches), and compare against your eave height. The gap is your riser height. A common single-story scenario: 8-foot eave, 12-foot cover at 1 inch per foot fall (12 inches), target 8 feet at the outer beam — you need the ledger at 9 feet, so a 12- to 16-inch riser does it, while a homeowner wanting vaulted-feeling 10-foot attachment goes to a 24- to 30-inch model. Also mind second-story windows: risers put the new roofline higher on the house, and a 40-inch model under an upstairs window may not clear sill height.
Installation Overview
This is a competent-DIY or handyman-level job on a walkable roof, typically one long day for a six-bracket run.
- Locate framing. Snap a line over the exterior wall’s top plate and mark rafter or truss centers from inside the attic. Brackets must land on framing, not bare decking.
- Set and fasten brackets. Position each base per the spacing plan, pre-drill, and drive the specified structural screws or 3/8 inch lags through decking into the plate and adjacent framing — commonly 6 to 10 fasteners per bracket. Torque to snug; do not crush shingles.
- Flash every base. Slip metal flashing or a flexible boot under the shingle course above each bracket, over the course below, and seal fastener heads and plate edges with polyurethane roof sealant. This step is the entire difference between a dry install and a service call.
- Hang the ledger. Bolt the patio cover’s header beam into the riser saddles, check level across the run, and shim per the manufacturer’s allowances.
- Build the cover. Frame rafters or set panels from the elevated ledger to the posts as usual.
Engineering, Permits, and Limits
Most jurisdictions treat an attached patio cover as a permitted structure, and the riser bracket becomes part of the plan set. Skylift publishes ICC-referenced engineering data and load tables covering typical spacing, snow loads, and seismic zones, which most building departments accept; some require a local engineer’s letter, particularly for snow country, large spans, or truss-mounted installs where the truss maker’s approval may be requested. Respect the limits: risers are rated for patio cover and lattice loads, not for carrying decks or habitable roof structures; spacing tightens as snow load rises; and on tile roofs, the tile must be cut and the bracket flashed at deck level, a noticeably fussier job than on composition shingles. Wind exposure also deserves attention — a raised cover catches more uplift, so the post bases and footings at the outer edge need the same engineering care as the wall attachment.
Riser Brackets vs. Freestanding: The Cost Math
The main alternative to raising the attachment point is abandoning attachment altogether — a freestanding cover on four posts. Comparing the two clarifies the riser’s value. Freestanding adds two posts and two footings on the house side (roughly $300 to $800 in materials plus digging), requires its own lateral bracing since no wall steadies it, and puts posts exactly where people walk out the back door. The riser route spends $600 to $1,100 on brackets and flashing, keeps the house-side floor plan open, and borrows the home’s structure for rigidity. Where freestanding wins is on homes where the wall framing cannot be verified, on zero-lot-line stucco walls the owner refuses to penetrate, or where the cover sits away from the house anyway. For the common case — a cover directly off the back slider of a wood-framed house — the bracket system is usually both cheaper and cleaner-looking, and it preserves the patio’s walking space.
Is a Roof Riser Worth It?
For single-story homes with standard eaves, the honest answer is that the bracket system is usually the cheapest headroom money can buy. It avoids cutting the house roof open, keeps the patio structure’s loads on the wall where they belong, adds hundreds — not thousands — to the project, and turns a cave-like 6.5-foot cover into an 8-foot-plus outdoor room. The failure stories almost all trace to skipped flashing or brackets lagged into decking instead of framing, and both are preventable with an afternoon of care. If your fascia-height math is coming out under 7 feet at the outer beam, a Skylift roof riser is the fix designed for precisely that problem.