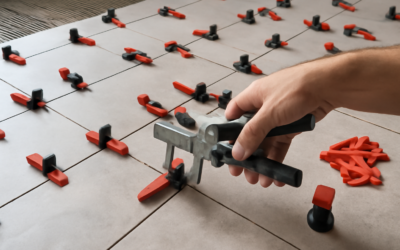
If you have ever caught your toe on a tile edge that sits higher than its neighbor, you have met lippage, and tile leveling clips are the simple system designed to prevent it. These inexpensive plastic clips, paired with reusable wedges or caps, hold adjacent tiles perfectly flush while the mortar cures, eliminating the uneven edges that ruin an otherwise good tile job. For large-format and rectified tile especially, where even a slight height difference is glaring, a leveling system has gone from a pro luxury to a near-essential tool for DIYers and contractors alike.
Part of our Tile & Grout guide — explore the full guide →
Here is exactly how leveling clips work, when to use them, and how to get flat, professional results.
What Tile Leveling Clips Do
A tile leveling system works on a simple principle. You slide a clip’s flat base under the edge of a tile before setting the adjacent tile, then place a wedge or screw cap that presses down on the top of both tiles, pulling their surfaces level with each other. As the mortar cures, the clips hold everything flush so no tile can sink or rise relative to its neighbor. Once the thin-set is set, you snap or kick off the clips and reuse the wedges. The result is a floor or wall with minimal lippage and clean, even joints.
When You Should Use Them
Leveling clips are not mandatory on every job, but they pay off in several situations:
- Large-format tile — Tiles 15 inches and larger are prone to lippage because small mortar inconsistencies show across the bigger surface.
- Rectified tile — Sharp, precise edges with tight grout lines make any height difference obvious.
- Wood-look plank tile — Long planks set in an offset pattern lippage easily at the centers.
- Floors over slightly imperfect substrates — Clips help compensate for minor flatness issues.
- DIY installations — They build in a margin of error for less-experienced installers.
For small mosaic tiles and very small formats, clips are usually unnecessary and can even get in the way.
Choosing the Right Clips
Leveling clips come in different specifications to match your tile and joint:
- Tile thickness range — Each clip system is rated for a span of tile thicknesses; confirm your tile falls within it.
- Joint width — Clips have a built-in spacer dimension, commonly around 1/16 to 1/8 inch, so pick clips that match your planned grout line, or use them alongside separate spacers.
- Wedge versus cap systems — Wedge-and-clip systems are economical, while screw-cap systems offer fine, repeatable tension control.
Buy plenty of clips, since they are single-use, and plan on placing several per tile depending on tile size.
Step-by-Step Installation
Using leveling clips fits naturally into the tiling process:
- Spread thin-set mortar and comb it with the correct notched trowel for your tile size.
- Set the first tile, then slide leveling clips under its edges where it will meet the next tile, spacing them evenly, often near the corners and midpoints.
- Set the adjacent tile so its edge also rests on the clip bases.
- Insert the wedge or screw on the cap and tighten until the two tile surfaces are flush.
- Repeat across the installation, checking the surface with your hand for any catch.
- Once the mortar has cured, snap or kick the clips off parallel to the grout line, then grout.
Common Mistakes to Avoid
A leveling system helps, but it is not magic. Watch for these pitfalls:
- Skipping floor prep. Clips reduce lippage; they cannot fix a badly out-of-flat subfloor, so level the substrate first.
- Using too few clips. Long edges need multiple clips to stay flush along their length.
- Over-tightening. Excess force can lift a tile out of the mortar bed or crack it; snug is enough.
- Removing clips too early. Wait for the mortar to set, or the tiles can shift.
- Snapping clips the wrong direction. Always break them off parallel to the grout line to avoid lifting a tile edge.
What Tile Leveling Clips Cost
Leveling systems are affordable. A bag of a few hundred clips often runs $10 to $30, reusable wedges are sold in their own packs, and screw-cap systems with a tensioning tool typically run $20 to $60 for a starter kit. Since the wedges and tools are reusable, the main ongoing cost is the single-use clips, making this an inexpensive insurance policy against a wavy floor.
How Many Clips You Will Need
Planning the quantity keeps you from running out mid-job. The number depends on tile size and layout, but a rough guide helps. Small floor tiles around 12 inches typically need a clip near each corner and sometimes along longer edges, while large-format tiles 24 inches and up benefit from clips at every corner plus midpoints along each side, often four to eight clips per tile. Plank tiles set in an offset pattern need clips concentrated where one plank’s center meets the next plank’s edge, the spot most prone to lippage. Count your tiles, estimate clips per tile based on size, and buy a comfortable surplus, since they are cheap and single-use.
Do Leveling Clips Replace Spacers?
This is a common point of confusion. Some leveling clips include a built-in spacer dimension that sets your grout joint, in which case they can serve double duty. Others are purely for leveling and assume you are controlling joint width separately. If your clips do not set the joint, use traditional spacers alongside them so your grout lines stay consistent. Either way, dry-lay a small area first to confirm both the joint width and how the clips fit your specific tile before you start spreading mortar across the whole floor.
The Bottom Line
Tile leveling clips are one of the easiest ways to get flat, professional-looking tile, especially with large-format and rectified products. Match the clips to your tile thickness and joint width, level your substrate first, use enough clips per tile, and remove them only after the mortar sets. For a modest investment, you eliminate the lippage that separates an amateur job from a clean, finished floor.
Prefer to explore on your own?
See how new flooring looks in your actual room in seconds — free, no signup.
Try the free Floor Studio →