Nothing gives away a rushed tile job like uneven edges you can feel with your toe. Tile leveling tools exist to solve exactly that problem, holding adjacent tiles flush while the thinset cures so you end up with a flat surface free of lippage. Whether you are tiling a shower wall, a kitchen floor, or a large-format entryway, the right leveling system takes the guesswork out of getting every tile on the same plane. This guide walks through how the systems work, what they cost, and how to pick the right one for your project.
Part of our Tile & Grout guide — explore the full guide →
- What Is Lippage and Why It Matters
- How Tile Leveling Tools Work
- Clip-and-Wedge Systems
- Cap-and-Screw Systems
- Tile Thickness Compatibility
- Spacing and Grout Joints
- What Tile Leveling Tools Cost
- How to Use Tile Leveling Tools
- Reusability and What to Buy
- When You Actually Need Leveling Tools
- Tips for Better Results
- Choosing the Right Tile Leveling Tools
What Is Lippage and Why It Matters
Lippage is the height difference between the edges of two neighboring tiles. Even a difference of 1/16 inch catches light, collects dirt in the offset, and creates a trip point on floors. With large-format tiles (anything with a side longer than 15 inches) lippage gets worse because slight warping in the tile, called crowning, is spread across a longer edge. Leveling tools pull the tiles into the same plane at their shared joint and hold them there until the adhesive sets, so warping and uneven thinset cannot push one edge higher than the other.
How Tile Leveling Tools Work
Every system shares the same idea: a base piece sits under the tile edges within the thinset, and a tightening piece squeezes the tops of the tiles level from above. Once the mortar cures, you knock off or unscrew the reusable top piece and the buried base snaps off below the surface. The result is two tiles locked flat across their joint. The differences come down to how that clamping force is applied and how much of the hardware you can reuse.
Clip-and-Wedge Systems
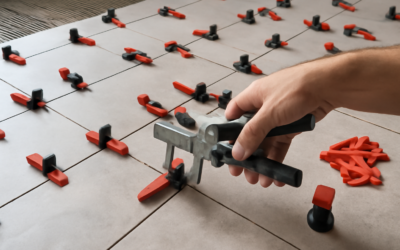
The most common and budget-friendly option is the clip-and-wedge system. You slide a thin plastic clip under two tiles, then drive a reusable wedge into the clip to pinch the tiles level. When the thinset cures, you kick the wedges out sideways to reuse them and snap the buried clips off at the floor line.
Pros and Cons
- Pros: Low cost, fast to install, wedges are fully reusable, works on floors and walls.
- Cons: Clips are single-use and add up on big jobs, and it can be harder to gauge exact clamping pressure.
Clips are sold by joint thickness, commonly 1/16 inch and 1/8 inch, which also help set your grout spacing. Brands like Raimondi RLS and various Tuscan-style leveling systems popularized this design, and countless generic versions now exist.
Cap-and-Screw Systems
Cap-and-screw systems, such as the Spin Doctor style and similar threaded designs, replace the wedge with a reusable cap that spins down a threaded post on the base strap. As you hand-tighten the cap, it presses the tiles flush with fine, repeatable control.
Pros and Cons
- Pros: Excellent, consistent pressure, easy to fine-tune by hand, caps are reusable, great for heavy large-format tile.
- Cons: Slightly higher cost per set, straps are still single-use, and threading each cap takes a moment longer than tapping a wedge.
Many pros prefer cap-and-screw systems for demanding installs like 24-by-48 inch porcelain panels, where consistent, dialed-in pressure across many points prevents a single high corner.
Tile Thickness Compatibility
Most leveling systems work across a wide thickness range, typically about 1/8 inch up to roughly 3/4 inch or more. This covers standard 5/16 inch floor tile, thicker porcelain pavers, and thin wall tile alike. Always check the specific system’s rated range before buying, especially for very thin tile under 3/16 inch or thick outdoor pavers around 3/4 to 4/5 inch. The clips or straps must be able to seat under the tile and still clamp the top edges.
Spacing and Grout Joints
Leveling clips do double duty as spacers. Because the clip stem sits in the joint, its width sets your minimum grout line. Buy clips that match your intended grout width, commonly 1/16 inch for tight modern looks or 1/8 inch for standard floors. If you want a wider joint than your clips provide, add traditional spacers alongside the leveling system so you keep both consistent spacing and level tops.
What Tile Leveling Tools Cost
Pricing is driven mostly by the consumable clips or straps, since the wedges or caps get reused.
- Clips and straps: roughly $8 to $20 per 100 pieces, so a whole floor can run $30 to $80 in consumables.
- Reusable wedges: about $10 to $20 for a bag of 100.
- Reusable caps (cap-and-screw): around $15 to $30 for a set of 50 to 100.
- Pliers or setting tool: $15 to $40 for a floor or wall tensioning plier, which speeds installation and applies even force.
Estimate 1 to 4 clips per tile depending on tile size, more for large-format, and buy extra so you never stall mid-row waiting on hardware.
How to Use Tile Leveling Tools
The workflow is straightforward once you have your system on hand. Here is the basic sequence for a floor.
- Spread and comb your thinset, then set the first tile.
- Slide clips under the edges of the tile, spacing them every 8 to 12 inches along each joint and closer for large tiles.
- Set the neighboring tile so it also rests on the exposed clip bases.
- Insert the wedge or thread the cap and tighten until the tile tops pull flush. A leveling plier makes the final squeeze even and firm.
- Wipe away squeeze-out and let the thinset cure fully, usually 24 hours.
- Knock the wedges or unscrew the caps off sideways, parallel to the joint, and snap the buried bases off below the surface.
Always break the clips sideways along the grout line, not straight up, so you do not chip a tile edge or lift a corner.
Reusability and What to Buy
Wedges and screw caps are the reusable heart of any system and pay for themselves across multiple projects, while the clips and straps are sacrificial and bought by the bag. For a first-time DIY floor, a clip-and-wedge kit plus a tensioning plier is the most affordable entry point. For large-format tile, frequent tiling, or a demand for repeatable pressure, a cap-and-screw system is worth the small premium.
When You Actually Need Leveling Tools
Not every job requires a leveling system, so it helps to know when the investment pays off. Reach for leveling tools whenever you are working with large-format tile, since longer edges magnify any warp or crown. Use them on floors that need to be dead flat, on glossy or polished tile where lippage catches light and shows every flaw, and on wall installations where a proud edge is right at eye level.
You can often skip them on small mosaic sheets, which are mounted on backing that keeps them level, and on tight, well-set standard tile where your thinset coverage is already even. Even then, many installers use a few clips at the trickiest joints as cheap insurance. The bigger and shinier the tile, the more a leveling system is worth it.
Tips for Better Results
A few habits separate a clean install from a frustrating one. Comb your thinset in one direction and use the right notch trowel for your tile size, because leveling tools cannot fix a mortar bed that is too thin. Do not rely on the clips to bridge a badly uneven substrate; a self-leveling underlayment should handle any big dips before you tile. Place clips within 2 to 3 inches of each corner on large tile so the edges cannot lift, and always test-break one clip after curing to confirm the thinset is fully set before you clear the whole floor.
- Match trowel notch size to tile size for full mortar coverage.
- Level the substrate first; clips align edges, not a wavy floor.
- Snap clips off parallel to the grout line, never straight up.
- Keep spare clips and straps on hand so you never stall mid-row.
Choosing the Right Tile Leveling Tools
The best tile leveling tools for you come down to tile size, budget, and how often you tile. Clip-and-wedge kits are the go-to for standard floors and occasional DIYers, while cap-and-screw systems deliver the fine control that big porcelain slabs demand. Match your clip size to your grout width, confirm the thickness range fits your tile, and buy plenty of consumables. Do that, and you will pull off a floor that looks and feels professionally flat, with no toe-catching edges anywhere in the room.
Prefer to explore on your own?
See how new flooring looks in your actual room in seconds — free, no signup.
Try the free Floor Studio →