Run your hand across a poorly tiled floor and you’ll feel it: tiny ridges where one tile sits higher than its neighbor. That’s lippage, and it’s the number-one giveaway of an amateur tile job. Tile leveling spacers, more precisely a clip-and-wedge leveling system, exist to make lippage almost impossible by forcing adjacent tiles flush while the adhesive cures. They’ve turned what used to be a skill that took years to master into something a careful DIYer can nail on the first try, especially with today’s large-format tiles that magnify every imperfection. Here’s how the system works and how to use it for a dead-flat floor.
Part of our Tile & Grout guide — explore the full guide →
What Lippage Is and Why It Happens
Lippage is the height difference between the edges of two adjacent tiles. Even a small amount, a sixteenth of an inch, catches the eye in raking light and feels rough underfoot. It happens because tiles are slightly warped, the thinset bed is uneven, or tiles settle differently as they’re set. Traditional cross-shaped spacers control the gap width between tiles, but they do nothing about height differences. Two tiles can have a perfect grout line and still sit at different heights.
This problem has gotten worse as tiles have gotten bigger. Modern large-format tiles, anything over 15 inches, are more prone to slight warping, and any height difference is exaggerated across their length. That’s exactly the gap leveling systems were designed to fill.
How a Leveling System Works
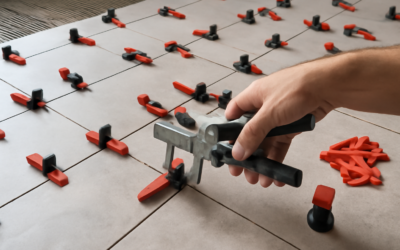
A tile leveling system has two main parts: a clip and a wedge or cap. The clip slides under two adjacent tiles, with a thin base under the tiles and a vertical tab sticking up in the grout joint between them. Then you insert a wedge through the clip, or twist on a cap, which clamps down on the top surfaces of both tiles and pulls them to the same height.
The clamping force holds the tiles flush while the thinset cures. Once the adhesive sets, usually after 24 hours, you snap or kick off the wedges and clips along the grout lines, which break away at the base. The thin base portion stays buried in the thinset, harmlessly below the grout. The result is a surface where adjacent tiles cured perfectly flush, with lippage essentially eliminated.
The Two Main System Types
Clip and Wedge
The most common style. Reusable wedges slide into disposable clips, clamping the tiles flat. You tap the wedges in with a pliers tool or a special spacing tool for consistent pressure. The wedges pop out for reuse on the next job; only the clips are consumed.
Clip and Cap (Twist)
A threaded clip with a reusable cap that you twist down to apply pressure, like a wing nut. Some find this faster and more controllable. The cap unscrews for reuse, and the clip stem breaks off after curing.
Both achieve the same goal. Clips come sized for the gap width you want, so you choose the clip that also sets your grout joint, and some systems combine leveling with built-in spacing so one part does both jobs.
How to Use Them, Step by Step
The system is simple once you’ve done a few tiles. Here’s the workflow:
- Spread thinset and set your first tile as normal, checking coverage and bedding it well
- Slide clips under the tile edges where they’ll meet the next tile, spacing them evenly along each edge, typically a couple per side depending on tile size
- Set the adjacent tile, pressing it into the thinset so the clip bases sit under both tiles
- Insert the wedge or cap and tighten until you feel firm resistance and the tile surfaces pull flush. Don’t overtighten to the point of snapping the clip
- Check the surface with your hand or a straightedge to confirm the tiles are level across the joint
- Let the thinset fully cure, usually 24 hours, before removing anything
- Knock off the clips and wedges by striking them parallel to the grout line, never pulling up, so the stem breaks below the surface
Always strike the removal blow along the direction of the grout line. Hitting across it or pulling upward can chip a tile edge or break the bond.
Clip Quantity and Placement
How many clips you need depends on tile size. Larger and heavier tiles need more clips per edge to control warping. As rough guidance, small tiles might use a clip or two per edge, while large-format tiles need several along each side to keep the whole length flush. The clips work the joint, so they go between tiles, not in the field.
One important limit: leveling systems control lippage, but they cannot fix a badly uneven thinset bed or a wavy subfloor. They pull adjacent tiles to match each other, not to correct a floor that isn’t flat overall. Your substrate still needs to meet the flatness tolerance for your tile, generally within 1/8 inch over 10 feet for standard tile and tighter for large format. The leveling system is the finishing touch on good prep, not a substitute for it.
Pro Tips and Common Mistakes
- Don’t skip coverage. Leveling clips push tiles flat, but you still need full thinset contact underneath, or you’ll get hollow spots and cracks later
- Buy extra clips. They’re consumable and cheap; running out mid-floor stalls the whole job
- Reuse the wedges and caps. Only the clip stem is sacrificial, so the reusable parts pay off over time
- Wait the full cure before removing. Pulling clips early can shift a tile that hasn’t set
- Wear eye protection when knocking off wedges; pieces can fly
Are They Worth It
For a small backsplash of perfectly flat tiles, you might get by without them. For floors, large-format tile, and anyone who hasn’t tiled hundreds of square feet, a leveling system is one of the best small investments you can make. The clips cost cents apiece, the reusable tool and wedges last for years, and the payoff is a flat, lippage-free surface that looks and feels like a pro laid it. Combine a good leveling system with a flat substrate and full thinset coverage, and you’ll get results that genuinely rival professional work.
Prefer to explore on your own?
See how new flooring looks in your actual room in seconds — free, no signup.
Try the free Floor Studio →