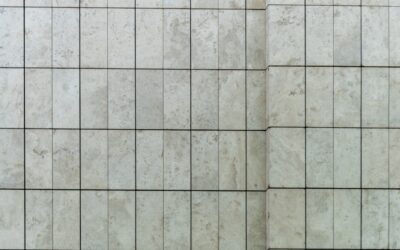
A staggered tile pattern offsets each row of tile so the joints do not line up, creating the familiar brick-like rhythm seen on countless floors, backsplashes, and shower walls. It is the most forgiving and widely used tile layout because the offset breaks up the grid, hides minor size variations, and disguises small imperfections in the wall or floor beneath.
Part of our Tile & Grout guide — explore the full guide →
While it looks simple, the amount of offset dramatically changes both the appearance and the risk of an uneven, lippy installation. This guide covers offset ratios, the critical lippage rule for large tiles, the best tile sizes, and how to lay out a staggered pattern for a clean, professional result.
- What Is a Staggered Pattern?
- Choosing the Right Offset
- The Critical Lippage Rule for Large Tiles
- Best Tile Sizes and Shapes
- Laying Out a Staggered Pattern
- Grout and Finishing
- Pros and Cons
- Where It Works Best
- Staggered Versus Stacked and Herringbone
- Preparing the Substrate
- Choosing Tile Spacers and Leveling Clips
- Maintenance and Longevity
- Estimating Materials and Waste
- DIY Versus Hiring a Professional
- Design Ideas Using the Staggered Look
What Is a Staggered Pattern?
Also called a running bond or offset pattern, a staggered layout shifts each successive row so its joints fall over the body of the tiles below rather than aligning with them. The classic version offsets each row by half a tile, exactly like a brick wall. The result is a comfortable, informal look that feels natural in almost any room.
- The offset breaks the strict grid of a stacked pattern.
- Misaligned joints hide slight differences in tile size and wall flatness.
- It suits nearly every tile shape, from subway rectangles to large planks.
Choosing the Right Offset
How far you shift each row defines the pattern’s character and, importantly, its risk of lippage. Common offsets:
- 50 percent (half offset) — the traditional brick look; bold and rhythmic, best for smaller tiles.
- 33 percent (third offset) — a gentler stagger that reduces lippage on longer tiles while keeping visual interest.
- 25 percent (quarter offset) — a subtle shift that works well for large-format planks.
The bigger the offset toward 50 percent, the more dramatic the look but the greater the chance neighboring tile edges sit at different heights.
The Critical Lippage Rule for Large Tiles
This is the single most important thing to know about staggered layouts. Nearly all rectangular tiles have a slight lengthwise bow or crown in the center. When you offset by 50 percent, the high center of one tile meets the low corner of the tile above it, producing lippage, where one edge stands proud of its neighbor and creates an uneven, trip-prone surface.
The industry guidance is clear:
- For tiles longer than about 15 inches, limit the offset to no more than one-third of the tile length, not half.
- Confirm the manufacturer’s recommendation, as many large-format planks specify a 33 percent maximum offset.
- Use tile leveling clips during installation to force adjacent edges flush as the thinset cures.
Ignoring this rule is the most common cause of disappointing plank-tile floors, so plan a one-third offset for anything long.
Best Tile Sizes and Shapes
The staggered pattern flatters a wide range of tiles:
- Subway tile (3×6, 3×12) — the classic backsplash and shower choice; a 50 percent offset is fine at this small size.
- Wood-look planks (6×24, 8×48) — mimic hardwood flooring; use a 33 percent or smaller offset to avoid lippage.
- Large-format rectangles (12×24) — popular on floors and walls; keep the offset to a third.
- Square tiles — can be staggered by half a tile for a brick-like grid on floors.
Laying Out a Staggered Pattern
A careful layout keeps the offset consistent and cuts balanced:
- Find the center of the room or wall and snap reference lines so the pattern stays square.
- Dry-lay the first two or three rows to confirm your offset and see how cuts fall at the edges.
- Adjust the starting point so you avoid thin slivers at walls and corners; aim for at least a half-tile at the ends.
- Mark the offset consistently, using the tile itself or spacers to measure the shift for each row.
- Spread thinset, set tiles with spacers, and add leveling clips on large tiles to control lippage.
- Check alignment as you go, since a drifting offset becomes obvious across a wall.
Grout and Finishing
Grout choice shapes the final look. A contrasting grout emphasizes the brick rhythm, while a matching grout softens it for a more seamless surface. Keep joints consistent, typically 1/16 to 3/16 inch depending on tile type, and never lay rectified large-format tile with joints thinner than about 1/8 inch, since a small joint gives no room to absorb size variation. Seal cement grout in wet areas to resist stains and mildew.
Pros and Cons
The staggered pattern is popular for good reasons, but it has trade-offs:
- Pros: forgiving of imperfections, timeless look, works with almost any tile, hides minor size differences, familiar and easy to plan.
- Cons: a 50 percent offset risks lippage on long tiles, requires a level substrate for large formats, and the look can feel expected rather than distinctive.
Where It Works Best
A staggered layout suits nearly everything: kitchen backsplashes, bathroom and shower walls, entryways, and wood-look plank floors throughout the home. It is especially valuable over slightly imperfect surfaces where a rigid stacked grid would highlight every flaw.
Staggered Versus Stacked and Herringbone
It helps to see how the staggered layout compares to the other popular patterns:
- Versus stacked (grid) — the stacked pattern aligns every joint for a crisp, modern look but shows every imperfection; the staggered pattern hides flaws and feels more classic.
- Versus herringbone — herringbone angles tiles for a dynamic, high-end look but wastes more material in cuts and takes longer to install; the staggered pattern is faster and more economical.
- Versus vertical stack — a vertical stack draws the eye upward, while a horizontal staggered run feels grounded and traditional.
For most homeowners wanting a timeless, forgiving, budget-friendly layout, the staggered pattern is the sensible default.
Preparing the Substrate
Because large-format staggered tile is unforgiving of an uneven base, substrate prep is critical:
- Floors must be flat and stiff; check with a straightedge and fill low spots with self-leveling compound.
- Walls need flat, sound backer board, especially in showers and behind ranges.
- The flatter the substrate, the less lippage you will fight during setting.
- For large tiles, the industry standard calls for the surface to be flat within tight tolerances over a given span, so do not skip leveling.
Choosing Tile Spacers and Leveling Clips
The right tools keep joints even and edges flush:
- Tile spacers set consistent joint width; choose the size to match your tile and grout plan.
- Leveling clip systems clamp adjacent tiles to the same height as the thinset cures, which is essential on large-format staggered layouts to control lippage.
- Combine both for the flattest, most professional result on plank and large-format tile.
Leveling clips are inexpensive insurance against the number-one complaint with offset layouts, so use them whenever tiles run long.
Maintenance and Longevity
A well-installed staggered tile surface is durable and easy to care for. Sweep and damp-mop floors with a pH-neutral cleaner, and wipe walls and backsplashes as needed. Reseal cement grout once or twice a year in wet areas to keep it stain- and mildew-resistant. Because the offset joints are less visually rigid than a grid, minor grout wear or a slightly uneven line is far less noticeable, which is another reason the pattern stays looking good for years with little fuss.
Estimating Materials and Waste
Buying the right quantity prevents mid-project shortages and dye-lot mismatches:
- Measure the total square footage of the area and add roughly 10 percent for cuts and breakage.
- Add closer to 15 percent for a staggered plank layout, since end cuts create more waste than a straight grid.
- Buy all your tile from the same dye lot so colors match exactly.
- Keep a few extra tiles after the job for future repairs, since matching later can be difficult.
DIY Versus Hiring a Professional
Whether to tackle a staggered layout yourself depends on the tile size and area:
- Good DIY candidates — small backsplashes and accent walls with subway tile, where a 50 percent offset is forgiving.
- Consider a pro — large-format plank floors and full showers, where lippage control and a dead-flat substrate demand experience and leveling systems.
Professional installation typically runs $8 to $20 per square foot depending on tile and complexity, while DIY saves that labor if you have the patience and the right tools.
Design Ideas Using the Staggered Look
The offset pattern adapts to nearly every room with a slightly different effect. On a kitchen backsplash, a half-offset subway run reads as classic and clean. On a bathroom or shower wall, a horizontal stagger widens the space, while wood-look plank floors in a third offset mimic real hardwood convincingly. For a bolder statement, contrast the grout color to emphasize the brick rhythm, or match it for a softer, more seamless surface. The staggered pattern’s flexibility across materials and rooms is exactly why it remains the default choice for so many projects, delivering a familiar, forgiving, and attractive result almost anywhere tile goes.
A staggered tile pattern remains the most versatile and dependable layout in tiling for one simple reason: it looks great and forgives a lot. The key to a flawless result is respecting the offset rule, keeping large tiles to a one-third stagger, using leveling clips, and laying out balanced cuts. Follow those steps and you will get a classic, professional-looking surface that hides imperfections and lasts for years.
Prefer to explore on your own?
See how new flooring looks in your actual room in seconds — free, no signup.
Try the free Floor Studio →