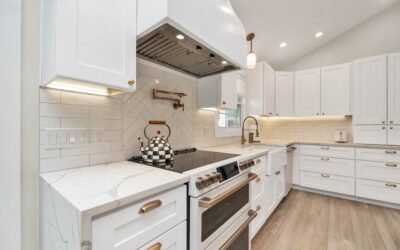
A tiled backsplash is one of the most satisfying weekend projects you can tackle, adding style and protection to your kitchen for a modest cost. The good news is that tiling a backsplash for beginners is very achievable, even if you have never set a single tile. The vertical surface is forgiving, the area is small, and with the right tools and a patient approach, you can get professional-looking results. This step-by-step guide walks you through the entire process from planning to that final satisfying wipe-down.
Part of our Kitchen Remodeling guide — explore the full guide →
- Is Tiling a Backsplash a Good Beginner Project?
- Tools and Materials You Will Need
- Step-by-Step: Tiling Your Backsplash
- Common Beginner Mistakes to Avoid
- Tips for a Professional Finish
- Choosing Beginner-Friendly Tile
- How Much Does a DIY Backsplash Cost?
- Planning Around Outlets and Edges
- Final Thoughts on Tiling a Backsplash for Beginners
Is Tiling a Backsplash a Good Beginner Project?
Absolutely. Unlike floor tiling, a backsplash does not bear weight or foot traffic, and the modest size means fewer tiles and less room for costly mistakes. Because it sits at eye level, small imperfections in a floor’s flatness are not a concern. For many people, tiling a backsplash for beginners becomes the gateway project that builds the confidence to take on bigger tile jobs later. Give yourself a full weekend, since the adhesive and grout each need time to cure between steps.
Tools and Materials You Will Need
- Tile of your choice, plus about 10 percent extra for cuts and breakage
- Tile adhesive or mastic, or premixed thinset
- Notched trowel for spreading adhesive
- Tile spacers to keep joints even
- A tile cutter or wet saw, and nippers for small cuts
- Grout, a grout float, and a large sponge
- Level, tape measure, pencil, and painter’s tape
- Caulk and a caulk gun for edges and corners
Sheet-mounted mosaic tiles are especially beginner-friendly because they come pre-spaced on mesh backing, cutting your work dramatically.
Step-by-Step: Tiling Your Backsplash
1. Prepare the Wall
Clean the wall thoroughly to remove grease, which prevents adhesive from bonding. Turn off power and remove outlet and switch covers, then loosen the outlets slightly so tile can slide behind the plates. Lightly sand glossy paint to give the adhesive something to grip, and fill any large holes.
2. Plan Your Layout
Find the center of your main wall or focal area and measure outward so cut tiles land at the ends rather than the middle. Mark a level starting line, since countertops are rarely perfectly level and you do not want to build crooked. Dry-lay a row on the counter to preview the pattern and spacing before committing.
3. Apply the Adhesive
Using the flat side of the trowel, spread a thin layer of adhesive on a small section of wall, then comb it with the notched side held at an angle to create even ridges. Work in areas you can tile before the adhesive skins over, usually a few square feet at a time.
4. Set the Tiles
Press each tile firmly into the adhesive with a slight twist to seat it, starting from your center line and working outward and up. Insert spacers between tiles to keep gaps consistent. Check with a level frequently and wipe away any adhesive that squeezes onto the tile face before it dries.
5. Cut Tiles to Fit
Measure carefully for edges, outlets, and corners, then cut with a tile cutter or wet saw. Use nippers to nibble curves and notches. Leave a small gap at the countertop and along cabinets for caulk rather than butting tile tightly against them.
6. Let It Cure, Then Grout
Allow the adhesive to cure fully, typically 24 hours. Remove the spacers, mix the grout to a peanut-butter consistency, and spread it across the joints with the float held at a 45-degree angle, packing it in fully. Work diagonally to avoid pulling grout out of the lines.
7. Clean and Seal
After the grout sets for the recommended time, wipe the tile with a damp sponge, rinsing often and being careful not to dig grout out of the joints. Once dry, a light haze may appear; buff it off with a clean cloth. Seal the grout after it fully cures to protect against stains, and caulk the joints where tile meets the counter and cabinets.
Common Beginner Mistakes to Avoid
- Skipping wall prep and tiling over grease or glossy paint
- Starting from a corner instead of a planned center line, leaving awkward cuts
- Spreading too much adhesive at once so it dries before you set the tile
- Forgetting spacers and ending up with crooked, uneven joints
- Grouting before the adhesive has fully cured
- Pressing too hard while cleaning and pulling grout out of the lines
Tips for a Professional Finish
Take your time on layout; it is the single biggest factor in a clean result. Buy quality tools, especially a good tile cutter, since fighting a cheap one leads to broken tiles and frustration. Keep a bucket of clean water and change it often so you are wiping with clean sponges. Step back frequently to check that lines are staying straight, and do not rush the curing steps. Patience between stages is what separates an amateur job from one that looks like a pro installed it.
Choosing Beginner-Friendly Tile
Your choice of tile has a big impact on how easy the project is. Some materials and formats are far more forgiving than others for a first-timer:
- Mesh-mounted mosaics: Come pre-spaced in sheets, so you set several tiles at once with consistent joints. The easiest place to start.
- Ceramic subway tile: Inexpensive, easy to cut, and very forgiving, making it a classic beginner choice.
- Larger field tiles: Cover more area with fewer pieces, though they show wall imperfections more.
- Glass and natural stone: Beautiful but trickier, since glass can chip when cut and stone needs sealing. Save these for after your first project.
For your first backsplash, a mesh-mounted mosaic or standard ceramic subway tile keeps the learning curve gentle while still looking great.
How Much Does a DIY Backsplash Cost?
One of the joys of tackling this project yourself is the savings. Materials for a typical kitchen backsplash of around 30 square feet often run in the range of $150 to $500 depending on the tile you choose, plus adhesive, grout, and any tools you need to buy or rent. Hiring a professional to install the same backsplash can add several hundred to over a thousand dollars in labor. By doing it yourself, you keep that labor cost in your pocket, and the tools you buy pay for themselves and remain useful for future projects. Just budget a little extra tile for mistakes, and consider borrowing or renting a wet saw rather than buying one if this is a one-time job.
Planning Around Outlets and Edges
The trickiest parts of any backsplash for a beginner are the outlets, switches, and the edges where tile meets cabinets or ends on an open wall. Handling them well is what separates a tidy job from a sloppy one. Before you start, turn off the power and remove the cover plates, then loosen the outlet boxes so they can be brought forward flush with the new tile thickness using spacers designed for that purpose. Measure carefully and mark your cuts so tile fits neatly around each box, and plan for the cover plates to hide small gaps.
For finished edges, keep these tips in mind:
- Use bullnose tile, metal edging, or a Schluter-style trim strip to cap exposed edges cleanly.
- Leave a small gap where tile meets the countertop and cabinets, then fill it with color-matched caulk rather than grout so it flexes without cracking.
- Plan your layout so cut tiles land at the ends and full tiles sit at the focal point.
Thinking through these details before you spread any adhesive saves frustration and gives your first backsplash a professional finish.
Final Thoughts on Tiling a Backsplash for Beginners
With basic tools, careful planning, and a willingness to work slowly, tiling a backsplash for beginners is a genuinely doable project that pays off with a beautiful, durable upgrade. Prepare the wall, plan your layout from the center, set your tiles evenly, and respect the curing times before grouting and sealing. Start with an easy sheet-mounted mosaic if you are nervous, celebrate that first finished wall, and you will have both a stunning backsplash and the skills to tackle your next tiling adventure.