Not every kitchen has a spare 15- or 18-inch base cabinet to convert into a pull-out trash drawer. Rentals, galley kitchens, older homes and apartments often leave the garbage can sitting in plain view next to the refrigerator. A freestanding tilt out garbage cabinet solves that without touching your existing cabinetry: it is a small furniture-style cabinet whose front door hinges at the bottom and tips forward, bringing the hidden bin toward you. Close it and the kitchen trash disappears behind a clean panel that can match your cabinets, your trim or a butcher-block top.
Part of our Kitchen Remodeling guide — explore the full guide →
You can buy one ready-made in wood, bamboo or painted MDF, or build one in a weekend from a single sheet of plywood. The decisions that matter are the bin size, the depth of the tilt, the hinge and stop hardware, and whether you want one bin or a side-by-side trash and recycling pair. This guide covers both routes.
- Why a Tilt Out Garbage Cabinet Works
- Buy or Build: Choosing Your Route
- Sizing: Bins, Height and Floor Space
- Hinge and Stop Hardware
- Tools and Materials for a DIY Build
- Step-by-Step: Building a Tilt Out Garbage Cabinet
- Anti-Tip and Everyday Tips
- Troubleshooting
- Buy or Build: Cost Comparison and When to Get Help
- Frequently Asked Questions
Why a Tilt Out Garbage Cabinet Works
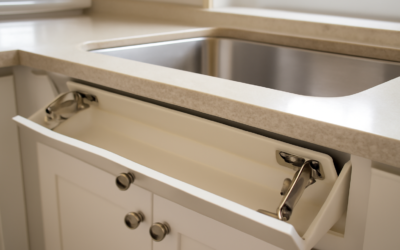
A tilt-out design stores the bin in a shallow, upright bin holder attached to the back of the door. When you pull the knob, the door and holder pivot on hinges at the bottom edge and lean forward roughly 20 to 30 degrees, stopped by a chain, strap or hinge stop. The bin opening tips toward you at about counter-drawer height, so you drop scraps in without bending far or lifting a lid.
Compared with an open step can, the cabinet hides odors and mess, keeps pets out and gives you a countertop surface for a fruit bowl, coffee station or cutting board. Compared with a slide-out insert, it needs no existing cabinet box, no drawer slides screwed into face frames and no measurements tied to your cabinet interior. It is also a good fit for renters, because it moves out with you.
Buy or Build: Choosing Your Route
Buying ready-made
Store-bought tilt out trash cabinets typically cost between about $80 and $300, depending on material and whether they hold one or two bins. Solid wood and bamboo models last longer than particleboard, which can swell if a bag leaks. Look for a moisture-resistant finish inside the bin compartment, a sturdy bottom hinge (continuous piano hinges beat small butt hinges), a stop that holds the door at a comfortable angle, a magnetic or roller catch to keep the door shut and adjustable leveling feet for uneven floors.
Building your own
A DIY build costs roughly $60 to $150 in materials and lets you size the cabinet exactly to your bin, your space and your counter height. It is a good intermediate woodworking project: straight cuts, pocket screws or glue-and-screw joinery, one hinge installation and paint or stain.
Sizing: Bins, Height and Floor Space
Start with the bin, not the cabinet. Buy the trash can first, then build or buy around it.
- Single 13-gallon kitchen bin: a tall rectangular can about 15 to 16 inches wide, 10 to 12 inches deep and 24 to 27 inches tall suits standard kitchen bags.
- Double cabinet: two bins side by side for trash and recycling, typically 30 to 36 inches wide overall.
- Cabinet height: 34 to 36 inches puts the top roughly level with standard counters so it looks built in; shorter 28 to 30 inch versions work under windows.
- Depth: 14 to 16 inches is typical. Deeper cabinets hold bigger bins but stick out further into a walkway.
- Tilt clearance: allow at least 12 to 16 inches in front for the door to swing out, plus room to stand and lift the bag.
Bin shape matters. Rectangular, slightly tapered cans fit best, and cans with a lip or handle let you lift them out of the holder to change the bag. Avoid round cans; they waste space and rattle in the holder.
Hinge and Stop Hardware
Hardware decides whether the door feels solid or floppy.
- Bottom hinge: a continuous piano hinge along the full width of the door spreads the load of a full bin. Two or three heavy butt hinges also work. Tilt-out tray hinges designed for sink fronts are too light for a garbage load.
- Stop: a short chain, cable, strap or folding lid support limits how far the door tips. Set it so the bin opening leans forward without the bin sliding out.
- Catch: a magnetic catch or roller catch holds the door shut; a push-to-open latch gives a handle-free look.
- Pull: a sturdy knob or bar pull mounted near the top of the door gives you leverage.
- Felt or rubber bumpers: stop the door from banging closed.
Tools and Materials for a DIY Build
- One 4 x 8 sheet of 3/4-inch plywood (birch or maple faces paint and stain well)
- 1×2 or 1×3 hardwood for a face frame and trim (optional)
- Continuous hinge sized to the door width, plus a stop chain or lid support
- Magnetic or roller catch, knob or pull, felt bumpers
- Wood glue, 1-1/4 inch pocket screws or 1-5/8 inch wood screws, edge banding
- Circular saw with a straightedge guide or table saw, drill/driver, pocket-hole jig (optional), clamps, sander
- Primer and paint, or stain plus a water-resistant topcoat
- Safety glasses, hearing protection and a dust mask
Step-by-Step: Building a Tilt Out Garbage Cabinet
- Measure the bin. Record height, width and depth at the top lip. Add about 1 inch in width and depth for clearance, and 3 to 4 inches in height so the lid or top clears the bin when it tips.
- Cut the box. Cut two sides, a bottom, a fixed top, and a back. A typical single-bin cabinet is about 18 inches wide, 15 inches deep and 35 inches tall.
- Assemble the carcass. Glue and screw the sides to the bottom and top, then attach the back to square the box. Check diagonals; equal measurements mean the cabinet is square.
- Build the bin holder. Make a shallow tray, a bottom plus two short sides and a low back rail, that attaches to the inside face of the door. The bin sits in it; the rail keeps it from sliding out when tilted.
- Make the door. Cut the door to fit the opening with about a 1/16-inch gap on each side and 1/8 inch at the top. Attach the bin holder to the back of the door with glue and screws.
- Hang the door. Install the continuous hinge along the bottom edge of the door and the front edge of the cabinet bottom. Pre-drill every screw hole to avoid splitting plywood edges.
- Add the stop. Attach a chain or lid support from the inside of a cabinet side to the bin holder. Test with a full bin and adjust until the door holds at a comfortable angle.
- Fit the catch and pull. Mount the catch at the top of the opening and a pull on the door front.
- Finish. Edge band exposed plywood edges, sand to 180 grit, prime and paint or stain. Seal the inside of the bin compartment with a durable, water-resistant topcoat, since bags leak eventually.
- Add feet or a base. Adjustable leveling feet or felt pads protect hardwood, vinyl or tile floors and stop the cabinet from sliding when you open it.
Anti-Tip and Everyday Tips
A tall, shallow cabinet with a heavy door tipping forward can move or tip if it is light and the bin is full. Anchor it to a wall stud with a small L-bracket or furniture anti-tip strap, especially in homes with young kids. Keep the cabinet away from the range and oven, since wood near high heat can scorch. For odor control, choose bins with a snug bag fit, use a charcoal odor absorber inside the compartment, and wipe the interior monthly with a mild soap solution. If you prefer a tilt out drawer style for recycling, a second, shorter compartment above the main bin can hold paper and cans.
Troubleshooting
- Door sags or rubs: hinge screws have loosened in plywood edge grain; move to longer screws or add a hardwood hinge strip.
- Bin slides out when tilted: raise the back rail of the holder or reduce the tilt angle with a shorter stop.
- Door will not stay closed: upgrade to a stronger magnetic catch or a roller catch.
- Cabinet shifts when opened: add rubber feet or anchor it to the wall.
- Swollen or stained interior: sand, reseal with a water-resistant finish and add a removable plastic liner tray.
Buy or Build: Cost Comparison and When to Get Help
Ready-made units generally run about $80 to $300, and a DIY build about $60 to $150 in materials if you already own basic tools. A custom cabinetmaker will build a garbage tilt out cabinet to match existing cabinetry, often in the several-hundred-dollar range and higher for painted or stained finishes matched to your kitchen. If you instead want a pull-out trash drawer inside an existing base cabinet, that is a different project using drawer slides or a pull-out insert kit. This build needs no plumbing or electrical work; a carpenter is only worth calling for a precise match to existing doors or a built-in look with scribed filler strips.
Frequently Asked Questions
What size trash can fits a tilt out garbage cabinet?
Most single cabinets hold a tall rectangular 13-gallon bin about 15 to 16 inches wide and 24 to 27 inches tall. Buy the bin first and size the cabinet around it.
How far should a tilt out trash cabinet open?
About 20 to 30 degrees is enough to drop scraps in and lift the bag out without the bin sliding forward.
What hinge is best for a tilt out trash cabinet?
A continuous piano hinge along the bottom of the door supports the weight of a full bin better than small butt hinges or light sink-tray hinges.
Can I fit two bins in one cabinet?
Yes. A 30 to 36 inch wide double cabinet holds trash and recycling side by side, either on one wide door or on two separate tilt doors.
How do I keep a tilt out garbage cabinet from smelling?
Seal the interior with a water-resistant finish, use bags that fit snugly, add a charcoal odor absorber and wipe the compartment regularly.