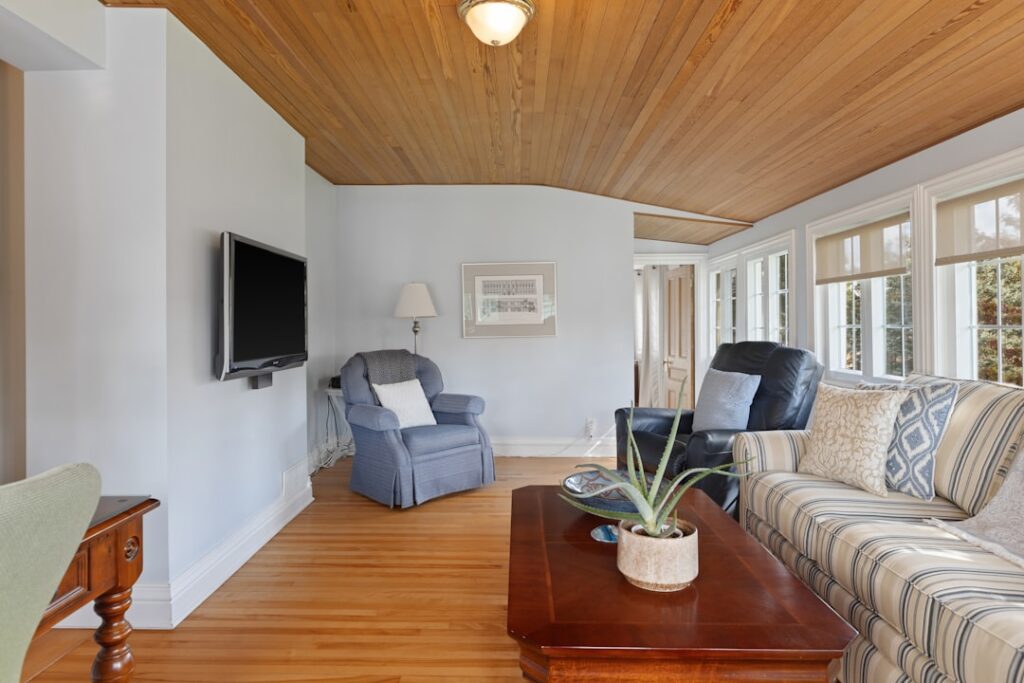
A tongue and groove ceiling transforms any room from ordinary to architectural. Wood plank ceilings add warmth, texture, and visual interest that drywall simply cannot match — and they work in virtually every style from farmhouse to modern coastal. Whether you are covering an entire great room ceiling or creating a feature in a bedroom, this guide covers everything you need to know.
- What Is a Tongue and Groove Ceiling?
- Materials: Pine, Cedar, Poplar, and MDF
- Width Options and Visual Impact
- Installation: Joists vs. Furring Strips
- Shiplap vs. Tongue and Groove
- Cost Breakdown
- Painting vs. Staining
- Room Suitability Guide
- Coffered Ceiling Alternative
- Frequently Asked Questions
- How much does a tongue and groove ceiling cost?
- Can I install tongue and groove ceiling over drywall?
- What is the best wood for a tongue and groove ceiling?
- Should I paint tongue and groove before or after installation?
- What direction should tongue and groove ceiling boards run?
- Is shiplap or tongue and groove better for ceilings?
- How long does it take to install a tongue and groove ceiling?
We break down material options (pine, cedar, poplar, and MDF), width choices, installation methods (nailing to joists vs. furring strips), the shiplap vs. tongue-and-groove debate, cost expectations, finishing options, and which rooms benefit most from a wood plank ceiling.
What Is a Tongue and Groove Ceiling?
A tongue and groove ceiling is made of interlocking wood planks installed across or along the ceiling. Each plank has a protruding ridge (tongue) on one edge and a matching channel (groove) on the opposite edge. The tongue of one plank fits into the groove of the next, creating a tight, seamless connection that hides fasteners and produces clean, uniform lines.
This interlocking system originated in flooring (see our tongue and groove flooring guide) but has become equally popular for ceilings. The system ensures planks stay aligned, prevents gaps from forming as wood expands and contracts with seasonal humidity changes, and creates a finished surface that looks professional even when installed by DIYers.
Tongue and groove ceilings have surged in popularity alongside the farmhouse, coastal, and modern rustic design movements. They add architectural character, improve acoustics by reducing echo in rooms with hard floors, and can even increase perceived ceiling height when installed in a direction that draws the eye.
Materials: Pine, Cedar, Poplar, and MDF
Pine
Pine is the most popular and affordable material for tongue and groove ceilings. Knotty pine creates a rustic, cabin-like aesthetic with visible knots that add character. Clear pine (knot-free) provides a cleaner, more refined look suitable for modern interiors. Pine accepts paint and stain well and is lightweight, making overhead installation easier.
Pine costs $1.50 to $4 per square foot for T&G boards. It is available at every lumber yard and home center in multiple widths. For painted ceilings, pine is the go-to choice because its soft wood takes paint beautifully and the cost cannot be beaten.
Cedar
Cedar is naturally rot-resistant, insect-resistant, and aromatic. These properties make cedar ideal for covered porches, screened-in sunrooms, and areas with higher humidity exposure. Cedar’s warm reddish-brown color and straight grain look stunning with a clear finish, allowing the natural beauty to speak for itself.
Cedar costs $3 to $7 per square foot for T&G boards — roughly double the price of pine. The premium is justified in outdoor or semi-outdoor applications where cedar’s natural resistance provides functional benefits. For interior-only installations, cedar is a luxury choice that delivers on beauty but may exceed budget for large ceilings.
Poplar
Poplar is a hardwood with a tight, uniform grain and minimal knots. It paints exceptionally well — better than pine — because its smooth surface requires less preparation. Poplar is an excellent choice for painted tongue and groove ceilings where you want a premium, furniture-quality finish.
Poplar costs $2.50 to $5 per square foot for T&G boards. It is harder and more dimensionally stable than pine, meaning it expands and contracts less with humidity changes. For white or colored painted ceilings in formal living spaces, poplar is worth the premium over pine.
MDF (Medium-Density Fiberboard)
MDF tongue and groove panels come pre-primed and ready to paint. They have no knots, no grain variation, and produce an extremely smooth painted surface. MDF is the most affordable option at $1 to $2.50 per square foot and the easiest to cut cleanly.
The drawbacks of MDF are its weight (heavier than pine), its vulnerability to moisture (MDF swells irreversibly when wet), and its inability to accept stain (no natural wood grain to show). MDF is strictly a paint-grade material for dry interior ceilings. Do not use MDF in bathrooms, kitchens, or any room with humidity concerns.
| Material | Cost (per sq ft) | Best For | Stainable | Moisture Resistant |
|---|---|---|---|---|
| Knotty pine | $1.50 – $3.00 | Rustic, farmhouse, budget | Yes | No |
| Clear pine | $2.50 – $4.00 | Clean stained or painted look | Yes | No |
| Cedar | $3.00 – $7.00 | Porches, sunrooms, natural beauty | Yes | Yes (naturally) |
| Poplar | $2.50 – $5.00 | Premium painted finish | No (poor stain uptake) | No |
| MDF | $1.00 – $2.50 | Budget painted ceiling | No | No |
Width Options and Visual Impact
Tongue and groove boards for ceilings come in widths ranging from 3.5 inches to 8 inches. Width affects both the visual character and the installation time.
Narrow boards (3.5 to 4 inches): Create a finer, more detailed texture with more visible seam lines. This traditional width suits classic and colonial homes and makes ceilings feel more intricate. However, narrow boards require more pieces (and more fasteners) to cover the same area, increasing installation time by 30% to 50% compared to wide boards.
Medium boards (5 to 6 inches): The most popular width for residential ceilings. Medium boards balance visual detail with efficient installation and are the most widely available at retail lumber yards. This is the default recommendation for most projects.
Wide boards (7 to 8 inches): Create a bold, contemporary look with fewer seam lines. Wide boards suit modern, coastal, and farmhouse aesthetics. They install faster but can look disproportionate on ceilings in smaller rooms. Wide boards work best on ceilings in rooms that are at least 12 feet in one dimension.
Installation: Joists vs. Furring Strips
Direct to Joists
If your ceiling joists are exposed (new construction, open ceiling, or after drywall removal), you can nail T&G boards directly to the joists. This is the simplest and fastest installation method. Use a pneumatic finish nailer with 2-inch nails, driving nails through the tongue at a 45-degree angle (blind nailing) so fasteners are hidden by the next board’s groove.
Direct-to-joist installation requires joists spaced at 16 inches on center or less. If joists are 24 inches on center, use 3/4-inch-thick T&G boards to prevent sagging between joists, or add furring strips.
Over Existing Drywall with Furring Strips
The most common method for retrofitting a T&G ceiling is installing 1×3 or 1×4 furring strips over existing drywall, then nailing T&G boards to the furring strips. This avoids the mess and expense of drywall removal.
Step 1: Locate ceiling joists with a stud finder and mark their positions on the walls.
Step 2: Screw 1×3 furring strips perpendicular to the direction your T&G boards will run. Space furring strips 16 inches on center, screwing through the drywall into joists with 2.5-inch screws.
Step 3: Shim furring strips as needed to create a flat, level plane. Check with a long straightedge.
Step 4: Nail T&G boards perpendicular to the furring strips using a pneumatic finish nailer. Start along one wall, tongue side out, and face-nail the first board near the wall (the molding will cover the nail holes). Blind-nail through the tongue for all subsequent boards.
Step 5: Stagger end joints by at least 12 inches between adjacent rows. Cut the last board to fit, leaving a 1/4-inch expansion gap along all walls (covered by crown molding or trim).
Installation over furring strips adds approximately 1.5 inches to the ceiling thickness. In rooms with 8-foot ceilings, this reduction is noticeable. In rooms with 9-foot or taller ceilings, the drop is minimal. Factor this into your planning.
Shiplap vs. Tongue and Groove
Shiplap and tongue and groove are often used interchangeably, but they are structurally different.
| Feature | Tongue and Groove | Shiplap |
|---|---|---|
| Joint type | Interlocking tongue and groove | Overlapping rabbet joint |
| Gap between boards | Minimal to none | Visible reveal (shadow line) |
| Connection tightness | Very tight, no movement | Slightly loose, allows expansion |
| Appearance | Seamless, refined | Defined lines, casual/rustic |
| Best for ceilings | Yes — tight joints prevent debris falling through | Yes — shadow lines add character |
| Typical cost | $1.50 – $7/sq ft | $1.50 – $6/sq ft |
For ceilings, tongue and groove has a functional advantage: the tight-fitting joints prevent dust, insulation particles, and debris from sifting through gaps. Shiplap’s characteristic reveal (gap) between boards can allow small particles to fall through, though this is mainly a concern in ceilings over unfinished attic spaces.
Aesthetically, shiplap’s visible shadow lines create a more casual, farmhouse-style look, while tongue and groove produces a smoother, more refined surface. Both look excellent on ceilings — the choice is purely stylistic.
Cost Breakdown
| Component | Cost per Square Foot |
|---|---|
| T&G boards (pine, material only) | $1.50 – $4.00 |
| T&G boards (cedar, material only) | $3.00 – $7.00 |
| Furring strips | $0.25 – $0.50 |
| Fasteners (nails, screws) | $0.10 – $0.25 |
| Paint or stain | $0.25 – $0.75 |
| Professional installation labor | $3.00 – $6.00 |
| Total DIY (pine) | $2.10 – $5.50 |
| Total professional (pine) | $5.10 – $11.50 |
For a typical 200-square-foot ceiling (14×14 room), expect $420 to $1,100 for a DIY pine installation or $1,020 to $2,300 for professional installation. Cedar ceilings cost approximately 50% to 75% more. These costs compare favorably to other ceiling upgrades like coffered ceilings ($15 to $30 per square foot) or decorative plaster ($10 to $25 per square foot).
Painting vs. Staining
Painted Tongue and Groove Ceiling
White painted T&G ceilings are the most popular option in 2026. A crisp white ceiling adds brightness, pairs with any wall color, and creates the classic coastal, farmhouse, or traditional look. Other popular paint colors include soft gray, pale blue (the traditional porch ceiling “haint blue”), and warm cream.
For the best painted finish: prime all boards (front, back, and edges) before installation to prevent moisture movement from causing cracks at joints. Use a quality primer and two coats of ceiling paint in a flat or matte sheen. Painting boards before installation is far easier than painting an installed ceiling.
Stained or Natural Tongue and Groove Ceiling
Stained or natural-finish ceilings showcase the wood’s character and grain. Cedar and knotty pine look exceptional with clear polyurethane or a light oil finish. Darker stains (walnut, early American, provincial) add drama and pair well with lighter walls for contrast.
For stained finishes, use solid wood rather than MDF — only real wood has the grain structure that stain reveals. Apply stain and at least one coat of finish before installation to ensure full edge coverage and prevent unfinished lines from appearing when boards contract in dry weather.
Room Suitability Guide
| Room | Recommended Material | Recommended Finish | Notes |
|---|---|---|---|
| Living room / great room | Pine or cedar | White paint or natural stain | Dramatic impact, improves acoustics |
| Bedroom | Pine or poplar | White or soft gray paint | Cozy, architectural detail |
| Kitchen | Pine (sealed) or cedar | White paint | Seal well to resist grease/steam |
| Bathroom | Cedar (preferred) or sealed pine | Clear seal or paint | Cedar’s moisture resistance ideal |
| Covered porch / sunroom | Cedar | Clear seal or haint blue paint | Cedar resists outdoor conditions |
| Basement | MDF or pine | White paint | Brightens low-ceiling spaces |
| Home office | Poplar or clear pine | White or stained | Professional, refined look |
Coffered Ceiling Alternative
A coffered ceiling uses a grid of recessed panels framed by beams, creating a more formal and structured look than flat tongue and groove. Coffered ceilings are significantly more expensive ($15 to $30 per square foot installed) and complex to build, but they add substantial architectural drama and perceived home value.
Some homeowners combine both approaches: tongue and groove panels within a coffered grid frame. This hybrid design delivers maximum visual impact and is a signature feature in high-end custom homes. If a coffered ceiling exceeds your budget, a tongue and groove ceiling with added decorative beams provides a similar sense of depth at roughly half the cost.
Frequently Asked Questions
How much does a tongue and groove ceiling cost?
A pine tongue and groove ceiling costs $2.10 to $5.50 per square foot for DIY installation or $5.10 to $11.50 per square foot for professional installation. For a 200-square-foot ceiling, that is $420 to $1,100 DIY or $1,020 to $2,300 professionally installed. Cedar costs 50% to 75% more.
Can I install tongue and groove ceiling over drywall?
Yes, and this is the most common retrofit method. Install 1×3 furring strips through the drywall into ceiling joists, then nail T&G boards to the furring strips. This avoids drywall removal and provides a solid nailing surface. The ceiling drops approximately 1.5 inches.
What is the best wood for a tongue and groove ceiling?
Pine is the best all-around choice for most interior ceilings due to its affordability, availability, and versatility with paint or stain. Cedar is best for porches, sunrooms, and bathrooms due to its natural moisture and insect resistance. Poplar is best for premium painted finishes.
Should I paint tongue and groove before or after installation?
Before installation is strongly recommended. Painting or staining boards before installing ensures full edge and tongue coverage, preventing unfinished lines from showing when boards contract in dry weather. It is also far easier to achieve a smooth finish on boards laid flat on sawhorses than overhead on a ceiling.
What direction should tongue and groove ceiling boards run?
Run boards perpendicular to the dominant sight line when entering the room — typically parallel to the shorter wall dimension. This draws the eye across the room and makes the space feel wider. In rooms with a prominent feature (fireplace, large windows), run boards toward that feature to guide the eye. Structurally, boards should run perpendicular to ceiling joists or furring strips.
Is shiplap or tongue and groove better for ceilings?
Both work well on ceilings. Tongue and groove creates a tighter, more refined surface and better prevents debris from falling through joints. Shiplap creates visible shadow lines for a more casual, farmhouse aesthetic. For ceilings over unfinished attic spaces, T&G is the better functional choice.
How long does it take to install a tongue and groove ceiling?
A skilled DIYer can install 80 to 120 square feet per day, including furring strip preparation. A 200-square-foot ceiling (typical bedroom or office) takes two to three days for a first-time DIYer. Professional crews complete the same project in one day.