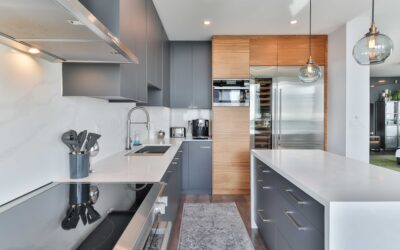
Overhead kitchen fixtures cast your own shadow directly onto the countertop where you chop, read recipes, and prep dinner. That’s the single biggest reason kitchens feel dim even with bright ceiling lights. Under cabinet LED lighting solves the problem by putting a clean, shadow-free wash of light exactly where you work. It’s one of the highest-impact upgrades you can make for the money, and modern LED options have made it affordable, cool-running, and easy to install in an afternoon.
Part of our Kitchen Remodeling guide — explore the full guide →
This guide breaks down the three main fixture types, the specs that actually matter, and how to wire it all up whether you want plug-in simplicity or a hardwired, switch-controlled finish.
- The Three Main Types of Under Cabinet Lights
- Color Temperature: The Spec That Makes or Breaks the Look
- How Much Brightness Do You Need?
- Plug-In vs Hardwired
- Step-by-Step: Installing Plug-In LED Bar Lights
- Hiding the Light Source
- Understanding Voltage and Transformers
- Dimming and Smart Controls
- Common Mistakes to Avoid
- What It Costs
- Final Recommendations
The Three Main Types of Under Cabinet Lights
Nearly every product falls into one of three families, and each suits a different priority.
LED Strip Lights (Tape Lights)
Flexible ribbons of LEDs on adhesive backing, usually sold by the reel and cut to length at marked intervals. They deliver the most even, continuous line of light with no hot spots, and they hide well behind a cabinet’s front lip. Strips are ideal when you want a seamless glow across a long run of cabinets. The tradeoff is that they require a low-voltage transformer and slightly more planning.
Puck Lights
Small round fixtures, roughly 2.5 to 3 inches across, mounted individually. They throw distinct pools of light rather than a continuous line, which some people prefer for a spotlight effect over a sink or a decorative display. Battery-powered puck lights are the easiest possible install, though hardwired versions exist too.
Linear Bar Lights
Rigid aluminum-housed bars that link together end to end. They’re the middle ground: brighter and more durable than tape, easier to mount than cut strips, and they include their own diffuser for even output. For most kitchens, linkable bar lights are the sweet spot between quality and simplicity.
Color Temperature: The Spec That Makes or Breaks the Look
Color temperature is measured in Kelvin (K), and choosing wrong is the most common regret homeowners have. Here’s how the range plays out in a kitchen:
- 2700K–3000K (warm white): A cozy, slightly yellow glow that matches traditional incandescent bulbs. Great for warm-toned wood cabinets and a relaxed atmosphere.
- 3500K–4000K (neutral white): A clean, natural light that renders food colors accurately and pairs well with white or gray cabinets. This is my most-recommended range for task lighting.
- 5000K+ (daylight): Very crisp and blue-white. It maximizes visibility but can feel clinical in a home kitchen.
Also check the CRI, or Color Rendering Index. Aim for CRI 90 or higher so your vegetables, meats, and countertop colors look true rather than washed out. Many bargain strips sit at CRI 80, and the difference is visible.
How Much Brightness Do You Need?
Brightness is measured in lumens, not watts. For task lighting over a counter, target roughly 200 to 300 lumens per linear foot of cabinet. A 3-foot cabinet section, then, wants a fixture producing 600 to 900 lumens. Undershooting leaves the counter dim; overshooting can create glare bouncing off a glossy backsplash.
If your goal is subtle accent lighting rather than a workspace, half that output is plenty. Dimmable systems give you the flexibility to run bright while cooking and low for ambiance in the evening, and I recommend dimmable whenever the budget allows.
Plug-In vs Hardwired
Your power method determines both the install difficulty and the finished look.
Plug-in systems run a cord to a standard outlet and often include an inline switch or remote. They’re renter-friendly, require no electrical work, and install in under an hour. The downside is a visible cord and the loss of a receptacle.
Hardwired systems connect to your home’s wiring and are controlled by a wall switch, giving the cleanest, most permanent result with no visible cords. This is the professional look, but it means running cable inside the wall and tapping into a circuit, which is a job for a licensed electrician if you’re not comfortable pulling wire and working in a junction box.
Step-by-Step: Installing Plug-In LED Bar Lights
Here’s the typical process for the most popular DIY setup, linkable bar lights powered by a plug-in adapter.
- Measure and plan. Measure each cabinet run and add up the length. Buy bars and linking cables to match, plus one adapter rated for the total wattage.
- Clean the mounting surface. Wipe the underside of the cabinet with rubbing alcohol so adhesive or screws seat cleanly.
- Position the fixtures. Mount each bar toward the front edge of the cabinet, not the back. Front placement lights the counter; back placement lights the backsplash and leaves the work surface dim.
- Secure them. Use the included screws for a permanent hold, or the adhesive backing for a faster job.
- Link and connect. Chain the bars with the connector cables, tuck the wiring along the cabinet lip, and route the final cord to the nearest outlet.
- Test. Power up, check the color and brightness, and adjust any angled fixtures to eliminate glare.
Budget one to two hours for a standard kitchen. The most tedious part is neatly hiding the connector cables, so buy a few adhesive cord clips to keep everything tidy.
Hiding the Light Source
The best under cabinet installs hide the fixture itself so you see the glow but not the LEDs. Most cabinets have a face frame or a bottom lip that drops down 1/2 to 3/4 inch below the cabinet floor. Mount your lights just behind that lip and they disappear from normal sightlines. If your cabinets are flush with no lip, a slim aluminum channel with a frosted diffuser both hides the diodes and softens any dotting effect from individual LEDs.
Understanding Voltage and Transformers
Most quality under cabinet LED systems run on low voltage, typically 12V or 24V DC, stepped down from your household 120V by a transformer, also called a driver or power supply. This matters for two reasons. First, low-voltage systems are safer and cooler to run under wood cabinets. Second, you must size the transformer to your total load. Add up the wattage of every fixture in the run and choose a driver rated at least 20 percent above that number, so it isn’t running at full capacity and overheating.
For plug-in kits the transformer is built into the cord adapter, so this is handled for you as long as you don’t exceed the kit’s maximum length. For hardwired tape-light systems you’ll select and locate a separate driver, ideally tucked inside a cabinet or in an accessible spot, since drivers occasionally fail and are the most likely component to need replacement over the system’s life.
Dimming and Smart Controls
Dimmability transforms how useful the lighting feels. Bright neutral light while you cook, then a warm low glow for evening ambiance, all from the same fixtures. Not every LED system dims, and not every dimmer works with LEDs, so confirm compatibility before buying. Many modern kits include an inline dimmer or a remote, while hardwired systems can tie into a wall-mounted LED-rated dimmer.
Smart options add another layer. Some under cabinet systems connect to Wi-Fi or a hub so you can schedule them, adjust color temperature on the fly with tunable-white models, or control them by voice. If you like the idea of the lights coming on automatically at dusk or acting as a gentle nightlight, a motion sensor or smart plug is an inexpensive add-on worth considering.
Common Mistakes to Avoid
- Mounting at the back of the cabinet. This lights the backsplash and leaves your work surface dim. Always mount toward the front lip.
- Mixing color temperatures. If your other kitchen lighting is warm 2700K and your under cabinet lights are cool 5000K, the clash is jarring. Keep temperatures consistent.
- Buying low-CRI bargain strips. Food and countertops look dull under CRI 80 light. Spend a little more for CRI 90+.
- Undersizing the transformer. An overloaded driver runs hot and fails early. Size it with headroom.
- Skipping a diffuser on exposed strips. Bare LEDs create a dotted “hot spot” reflection on glossy counters. A frosted channel fixes it.
What It Costs
A basic plug-in puck kit runs $20 to $40. Quality linkable LED bar systems for an average kitchen land around $80 to $200 depending on length and features like dimming and color tuning. High-CRI tape light with a channel and dedicated transformer can reach $150 to $300 for a large kitchen. If you hire an electrician to hardwire the system, add $200 to $500 in labor depending on how far cable must be fished and whether a new switch is added.
Final Recommendations
For most homeowners, I recommend linkable LED bar lights in the 3500K to 4000K range with CRI 90+, mounted toward the front lip of the cabinets and controlled by a dimmer. That combination gives you accurate, glare-free task light that flatters both your kitchen and your cooking. Start with a plug-in version to confirm you love the placement and color, and upgrade to hardwired later if you want to erase the last visible cord. Whichever route you take, under cabinet LED lighting delivers more everyday usefulness per dollar than almost any other kitchen improvement.