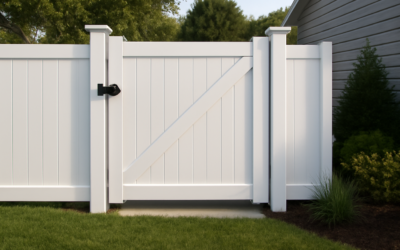
Getting vinyl fence clearance right is the difference between a fence that looks crisp for two decades and one that bows, drags, or traps a drift of leaves and snow against its bottom rail. Clearance simply means the deliberate gaps you leave: between the panel and the ground, between the gate and its posts, and between the fence and anything it runs alongside. Skip the math and you invite warping, mowing headaches, and the occasional run-in with a building inspector.
Part of our Decks & Outdoor guide — explore the full guide →
This guide walks through every clearance that matters, the numbers experienced installers actually use, and the small adjustments that keep a vinyl fence performing in real yards that are rarely as flat as a blueprint.
Why Clearance Matters More With Vinyl
Vinyl, technically PVC, expands and contracts with temperature far more than wood or metal. A 6-foot panel can grow nearly a quarter inch on a hot afternoon and shrink again overnight. If a rail is jammed tight against the soil, that movement has nowhere to go, and the result is a buckled section or a cracked weld at the corner.
Ground contact is the other enemy. Vinyl will not rot, but dirt, mulch, and standing moisture pressed against the bottom rail invite mildew staining, insect nesting, and ice damage in freezing climates. A proper gap keeps the assembly dry, lets a string trimmer pass underneath, and makes the whole fence look intentional rather than sunk into the earth.
Ground Clearance: The Bottom Gap
For most residential privacy and picket fences, leave 2 to 4 inches between the bottom rail and the ground. Two inches is the practical minimum on a flat lot; 3 to 4 inches is smarter on lawns where you mow, on slopes, or anywhere snow accumulates.
- Flat, manicured lawn: 2 to 3 inches keeps grass from growing into the rail while looking tidy.
- Sloped or uneven ground: step the panels and keep a minimum 2-inch gap at the highest point of each section.
- Snow country: 3 to 4 inches lets snow settle without pushing on the rail and gives meltwater a path.
- Pets or small children: tighten to roughly 2 inches, or add a bottom-rail kit, so animals cannot squeeze under.
On hilly ground you have two options. Stepping holds each panel level and creates a staircase look with triangular gaps under the high end. Racking, where the panel skews to follow the grade, keeps a consistent gap but requires rackable panels rated for your slope, usually up to about 15 to 30 degrees depending on the system.
Post Depth and Footing Clearance
Clearance below grade is just as important as above it. Set line posts at least one-third of the post’s above-ground height into the soil. For a standard 6-foot fence that means roughly a 24- to 30-inch hole, deeper for gate and corner posts that carry more load.
Always dig below your local frost line. In cold regions that can mean 36 inches or more; an inspector will check it. Pour concrete footings 8 to 12 inches in diameter, slope the top so water sheds away, and leave the bottom of the post a couple inches above the very bottom of the hole so it sits in concrete, not in a puddle. Let footings cure 24 to 48 hours before hanging heavy gates.
Gate Clearance and Swing
Gates are where most clearance mistakes show up, because vinyl gate posts can flex over time and a tight gate quickly binds. Build in these gaps from the start:
- Latch side: 3/8 to 1/2 inch between the gate edge and the post so seasonal movement does not jam the latch.
- Hinge side: 1/4 to 3/8 inch, enough for the hinge hardware to operate freely.
- Bottom of gate: match or slightly exceed your fence ground clearance, typically 2 to 3 inches, so the gate never drags as posts settle.
For openings wider than about 4 feet, use a double gate or add a diagonal anti-sag cable, since a long single vinyl gate will droop. Concrete the gate posts especially well; they take the most abuse of any post in the run.
Property Line and Setback Clearance
Before you dig, find out how far the fence must sit from the property line, sidewalk, and street. Many municipalities require the fence to be set back 2 to 6 inches inside your line, and corner lots often have a “sight triangle” near intersections where height is capped at around 3 feet for visibility.
Call 811 a few business days ahead to have buried utilities marked; that clearance is free and prevents a dangerous and expensive strike. Check height limits too, commonly 6 feet for backyards and 3 to 4 feet for front yards, and confirm whether a permit is required. If you share the line with a neighbor, a quick conversation now saves a dispute later.
Common Clearance Mistakes to Avoid
Burying the bottom rail in mulch or regraded soil is the most frequent error, and it undoes the very reason you chose vinyl. Setting posts in summer with zero expansion gap is a close second; the fence looks perfect in August and pops a joint in February.
- Do not skip the frost-depth requirement to save digging, frost heave will lift posts and skew panels.
- Do not assume your yard is level, run a string line and check with a torpedo level at every post.
- Do not over-tighten gate hardware against the post; leave the recommended gaps.
- Do not pour footings on the same day you expect to hang gates, give concrete time to set.
Final Thoughts on Getting It Right
Dial in your vinyl fence clearance and the rest of the project tends to fall into place. Keep 2 to 4 inches under the rails, dig posts a third of their height and below the frost line, leave roughly 3/8 inch around the gate, and respect your local setbacks. These numbers cost nothing during installation and pay off every season the fence stands straight, drains clean, and opens smoothly. When you are unsure about frost depth, setbacks, or a steep grade, a short call to your building department or a fencing pro is cheap insurance against tearing the whole thing out and starting over.