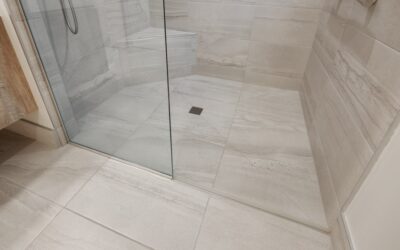
Spills, pet accidents, leaky dishwashers, and the occasional flood are facts of life, and they’re exactly why waterproof floors have taken over kitchens, baths, basements, and laundry rooms. Getting waterproof flooring installation right is what separates a floor that laughs off a burst pipe from one that buckles at the first standing water. The materials are only half the equation; proper subfloor prep, expansion gaps, and seam handling determine whether the floor truly keeps water out. This guide breaks down the main waterproof systems, how each installs, and how to decide between tackling it yourself and hiring a pro.
Part of our Roofing guide — explore the full guide →
What Counts as Truly Waterproof
Not all “water-resistant” flooring is waterproof, and the difference matters. Water-resistant floors tolerate quick wipe-ups; waterproof floors can sit under standing water without swelling or delaminating. The genuinely waterproof categories are:
- Luxury vinyl plank and tile (LVP/LVT): 100 percent waterproof PVC construction, the most popular choice for whole-home installs.
- Rigid-core SPC and WPC: Stone-plastic and wood-plastic composite cores that add stability and a more solid feel underfoot.
- Porcelain and ceramic tile: The original waterproof floor when set with proper thinset and grout.
- Sheet vinyl: Seamless rolls that leave almost no entry point for water.
Laminate, even “waterproof” laminate, sits a step behind these because its fiberboard core is vulnerable if the seal fails.
Subfloor Prep: The Foundation of a Waterproof Job
A waterproof floor is only as good as what’s beneath it. The subfloor must be clean, dry, and flat, typically within 3/16 inch over 10 feet for click-lock products. High spots get ground down and low spots filled with leveling compound, because rigid-core planks bridge dips and can crack or develop hollow spots over an uneven base.
Moisture testing matters too, especially over concrete slabs and basements. Even waterproof flooring benefits from a vapor barrier underlayment over concrete to keep slab moisture from collecting under the floor. Skip prep, and you’ll get clicking, flexing, and gapping no matter how good the planks are.
Installation Methods by Material
Each waterproof floor installs differently, and matching method to material is key:
- Click-lock LVP/SPC (floating): Planks snap together and float over the subfloor with no glue. The most DIY-friendly method, leaving a 1/4-inch expansion gap around the perimeter.
- Glue-down LVP: Adhered directly to the subfloor for a solid feel and high-traffic durability, common in commercial spaces.
- Sheet vinyl: Cut to fit and glued or loose-laid, minimizing seams in wet areas.
- Tile: Set in thinset over cement backer board or an uncoupling membrane, then grouted and sealed.
The Critical Expansion Gap
Floating floors expand and contract with temperature, and ignoring that movement is a top cause of failure. Leave a 1/4- to 3/8-inch gap between the flooring and every wall, pipe, and fixed object, then hide it under baseboard or quarter-round. Without this gap, planks have nowhere to move and will buckle into peaks or pop apart at the seams.
Spacers along the walls during installation keep the gap consistent. For large rooms over 30 to 40 feet in any direction, the manufacturer may require a transition or expansion break, so check the spec sheet before you start.
DIY vs. Professional Installation
Click-lock LVP is one of the most achievable DIY flooring projects, and a handy homeowner can floor a room in a weekend with a utility knife, tapping block, spacers, and a few hand tools. Tile and glue-down installs are more demanding, requiring trowels, mortar timing, and finishing skills that reward experience.
Cost-wise, DIY click-lock LVP runs roughly $2 to $5 per square foot in materials. Professional installation adds $1.50 to $4 per square foot for vinyl and $5 to $10 for tile. For a 300-square-foot kitchen, expect $1,200 to $4,500 installed depending on material and labor. If your subfloor needs significant leveling or you’re tiling, hiring a pro often pays for itself in a flawless, leak-proof result.
Underlayment and Vapor Barriers
The right underlayment improves comfort, sound, and moisture protection beneath a waterproof floor. Many rigid-core LVP and SPC products come with an attached pad, which speeds installation, but over concrete you’ll often still want a 6-mil poly vapor barrier or a vapor-rated underlayment to stop slab moisture from collecting underneath.
For floors over a crawl space or basement, controlling moisture from below matters as much as the floor’s own waterproofing. A standalone underlayment adds cushioning and reduces the hollow, clicky sound that floating floors can make over hard subfloors. Check the manufacturer’s instructions, because some warranties require a specific underlayment or prohibit doubling up pads, which can make the floor too spongy and stress the locking joints.
Tools and Materials Checklist
Having the right gear on hand makes a waterproof flooring install go smoothly. For a click-lock LVP project, gather these basics before you start:
- Utility knife and extra blades for scoring and snapping planks.
- Tapping block and pull bar to seat joints without damaging plank edges.
- Spacers to maintain a consistent expansion gap at the walls.
- Tape measure, square, and chalk line for accurate layout.
- Jigsaw or oscillating tool for cutting around pipes and doorways.
- Underlayment and vapor barrier if not pre-attached.
For tile, add a notched trowel, tile saw or snap cutter, grout float, and mixing tools. Gathering everything in advance keeps the job moving and prevents mid-install trips to the store that disrupt your workflow.
Sealing Seams and Wet Zones
Even waterproof planks meet at seams, and in bathrooms and laundry rooms those joints deserve extra attention. A bead of 100 percent silicone caulk along the perimeter and around toilets, tubs, and pipe penetrations blocks water from sneaking beneath the floor. For tile, sealing the grout, especially with cement-based grout, keeps moisture from wicking into the joints.
Done correctly, waterproof flooring installation gives you a surface that survives spills, mopping, pet accidents, and even minor floods without damage. Match the right material to the room, prep the subfloor flat and dry, respect the expansion gap, and seal the wet zones, and you’ll have a floor that keeps water exactly where it belongs: on top, where you can wipe it away.
Prefer to explore on your own?
See how new flooring looks in your actual room in seconds — free, no signup.
Try the free Floor Studio →