If your tub wall has three handles — hot, cold, and a center knob that sends water up to the showerhead — you are looking at plumbing that predates roughly 1990 in most American homes. A 3 knob shower faucet is a three-handle tub-and-shower valve: two compression or cartridge stems mix the temperature, and a diverter valve in the middle routes the mix to either the tub spout or the shower arm. The design is simple, endlessly rebuildable, and no longer legal to install new in most jurisdictions — a combination that shapes every decision you will make about yours. Repairing one is a $10-to-$40 parts job most homeowners can handle; replacing one properly means opening the wall. Knowing which path fits your situation is what this guide is for.
Part of our Bathroom Remodeling & Flooring guide — explore the full guide →
How the Three Handles Divide the Work
Behind the wall, all three handles thread into a single cast valve body. The outer two are stop valves — hot on the left, cold on the right — each holding either a rubber-washer compression stem (older) or a replaceable cartridge (later models). Open both, and mixed water flows to the tub spout by default. The center handle operates the diverter, a third stem that closes off the tub port and forces water up the riser to the showerhead. This architecture explains the two classic symptoms. A drip from the spout or showerhead when everything is off means a hot or cold stem is no longer sealing (feel the drip — warm water points left, cold points right). Water coming out of both the spout and the showerhead at once, or weak shower flow with a strong spout stream, means the diverter stem’s washer or seat has worn and can no longer fully close the tub port.
Fixing the Drip: Stems, Washers, and Seats
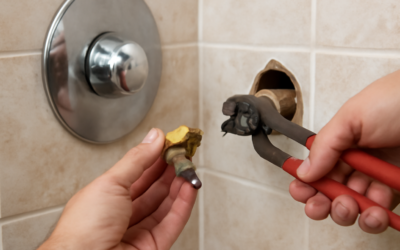
A dripping three-handle valve is one of plumbing’s most repairable failures. The sequence:
- Shut off the water — at fixture stops if you are lucky enough to have them, otherwise at the main.
- Pry the index cap off the offending handle, remove the handle screw, and pull the handle. A $12 handle puller pays for itself the first time a handle is corroded onto its splines.
- Remove the trim sleeve and escutcheon to expose the stem’s hex or bonnet nut. Deep-socket shower valve sockets (a $15 set) reach recessed nuts an ordinary wrench cannot.
- Unscrew the stem, take it — whole — to the hardware store, and match it. Replacement stems run $8 to $20; if only the washer is worn, a new washer and bib screw costs under $2.
- Inspect the valve seat inside the body with a flashlight. A pitted or grooved seat will chew up the new washer in months. Seats unscrew with a $6 seat wrench and cost $3 to $6 to replace; alternately, a seat-dressing tool grinds a marginal seat flat in place.
- Grease the stem threads with plumber’s silicone grease, reassemble, and snug the packing nut just enough to stop weeping at the handle.
Do both hot and cold sides while you are in there — the un-failed side is the same age. Brand matters for parts: Price Pfister, Gerber, Central Brass, Sayco, and Union Brass stems all differ, and broach patterns (the spline shape) identify the maker when the trim has no logo. Take photos and the old stem when shopping.
Fixing the Diverter
The center diverter rebuilds exactly like the outer stems — pull the handle, extract the stem, replace the washer or the whole diverter stem ($10 to $25). Symptoms justifying the fix: showerhead flow that has gone weak while spout flow stays strong, water splitting between spout and head, or a diverter knob that spins without firm stops. While the stem is out, flush the valve body by cracking the water on briefly with a bucket held over the opening; decades of mineral grit often sit in the diverter port, and a ten-second flush restores flow that owners assumed was a failing showerhead. If the showerhead is still weak afterward, unscrew it and soak it in vinegar overnight — a clogged head mimics a bad diverter convincingly.
Why You Can’t Buy a New One: The Code Issue
Modern plumbing codes (IPC and UPC alike) require tub and shower valves to be pressure-balancing or thermostatic — designs that prevent the scald-and-shock event every older-home shower veteran knows, where a toilet flush turns the shower momentarily searing. Three-handle valves cannot meet this requirement, so no new-install product exists; manufacturers sell only repair parts and trim kits. The practical consequences: repairs are fully legal and sensible; like-for-like replacement of a failed three-handle body is a gray zone generally tolerated as repair in most places; but any remodel that opens the wall triggers the requirement for a single-handle pressure-balancing valve in most jurisdictions. That is not a burden worth engineering around — anti-scald valves are genuinely safer, particularly for children and older adults, and a quality pressure-balancing valve (Delta R10000 rough-in with Monitor trim, Moen Posi-Temp) runs just $60 to $180 in parts.
Converting to a Single-Handle Valve
The conversion is a half-day job for a plumber and a solid weekend for a confident DIYer with soldering or press-fitting skills. Access comes either from an access panel behind the tub wall (check the closet or hallway behind the plumbing wall) or by cutting the tile/surround face. The old body is cut out, the new valve sweated or pressed into the hot, cold, spout, and riser lines, and the wall patched. The finish problem is the three old holes in the tile: a remodel cover plate — a large escutcheon sold exactly for three-handle-to-single conversions ($20 to $40, made by Delta, Moen, and universal brands) — spans all three openings so you do not need to retile. Budget $350 to $800 for a plumber-done conversion with a cover plate, or $150 to $250 in materials DIY. If the bathroom is due for renovation within a few years, rebuild the old valve cheaply now and do the conversion properly with the remodel.
Habits That Extend a Three-Handle Valve’s Life
A rebuilt valve lasts longer with a few cheap habits. Close the hot and cold handles with a gentle quarter-turn past water-off, never a hard crank — compression washers die young under gorilla torque, and a valve that needs muscle to stop dripping is telling you the washer or seat is due, not asking for more force. Exercise the diverter monthly in homes where the tub rarely runs; a diverter that sits closed for a year seizes in place, and thirty seconds of full-travel movement keeps it free. If your home’s water pressure exceeds 80 PSI (a $12 gauge on a hose bib tells you), a pressure-reducing valve at the main protects every washer in the house, this valve included. Hard-water households can halve washer wear by dropping the water heater to 120°F — hotter water cooks rubber — and by cleaning aerator-style showerheads with vinegar twice a year so the valve is not fighting backpressure.
Keep a small parts kit taped inside the vanity: one spare stem per side once you have identified the brand, a seat, a tube of silicone grease, and the sizes written on the bag. The failure always comes on a holiday weekend, and the difference between a ten-minute swap and three days of dripping is whether the parts are already in the house.
Repair or Replace: The Decision in Practice
Rebuild the three-handle valve when the finish trim still pleases you, the valve body is sound, and the budget is tight — $40 in stems and seats buys another decade from a cast-brass body, and vintage trim suits many older bathrooms honestly. Convert to single-handle when the body itself leaks inside the wall (water stains below or behind the tub wall are the tell), when parts for an obscure brand have become a scavenger hunt, when anyone scald-vulnerable uses the shower, or whenever the wall is open for any other reason. Either way, learn your valve’s brand before the next failure, keep the old stem in a labeled bag after any rebuild, and add fixture shutoffs if the system lacks them. Three knobs’ worth of 1960s engineering will keep serving fine — as long as someone keeps feeding it fresh washers.