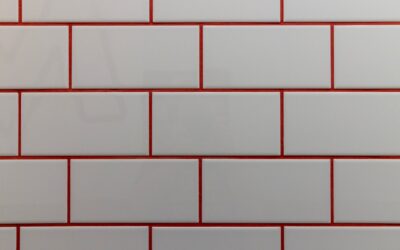
Somewhere around 2015, the 3×6 subway tile that had ruled American bathrooms for a century got a bigger sibling, and I’ve been installing it ever since. A 4×12 subway tile shower keeps everything people love about the classic brick look while doubling the tile’s footprint: crisper walls, roughly 40 percent fewer grout lines, and a subtly more modern read. But the 4×12 format has its own rules. The longer body punishes wavy walls, the traditional 50 percent offset can actually work against you at this size, and layout math that was forgiving at 3×6 gets expensive when every course is a foot long. Here’s how I handle the size, specifically.
Part of our Bathroom Remodeling & Flooring guide — explore the full guide →
Why 4×12 Instead of 3×6
Scale is the whole story. In a standard 32×60 shower with walls tiled to 84 inches, you’re setting roughly 95 square feet. At 3×6, that’s about 760 tiles; at 4×12, about 285. The practical consequences:
- Grout maintenance drops hard. Fewer linear feet of joints means less scrubbing, less sealing, less of the stuff that ages a shower. Grout is always the first thing to look dirty; 4×12 simply has less of it.
- Labor gets cheaper. Setting 285 tiles instead of 760 saves me a full day on a typical alcove. If you’re paying $10 to $20 per square foot for labor, larger format usually lands at the bottom of the range.
- The wall reads calmer. 3×6 in a small shower can look busy — a grid of 700 little bricks. 4×12 gives you long horizontal lines that visually widen a narrow stall.
- It’s still unmistakably subway. The 1:3 ratio keeps the brick DNA. You get contemporary without the commitment of 12×24 slab-look walls.
Cost-wise, 4×12 ceramic runs $1.50 to $4 per square foot at the big-box and tile-shop level — a hair above commodity 3×6 but squarely budget-friendly. Glazed porcelain versions run $3 to $6; handmade-look editions with wavy edges, $6 to $12.
The Offset Rule Most People Miss
Here’s the 4×12-specific trap. Everyone’s instinct is the classic 50 percent running bond — each course offset by half a tile. At 3×6 that’s fine. At 12 inches long, many manufacturers explicitly warn against 50 percent offset, and the industry standard (ANSI A108.02) says tiles 15 inches or longer should use a 33 percent maximum offset. At 12 inches, 4×12 sits just under that line, but the physics that drive the rule are already in play: tiles crown slightly in firing, highest at the center. A 50 percent offset puts every tile’s high center right next to its neighbors’ low ends — maximum lippage, where edges cast shadows and catch fingernails.
My practice in a 4×12 subway shower:
- 33 percent (third) offset — each course steps over 4 inches. Reduces center-to-end lippage, and the stair-step diagonal it creates looks deliberate and slightly custom.
- 50 percent offset only with flat tile. Rectified, dead-flat porcelain 4×12 can handle it; cheap pressed ceramic with visible crown cannot. Lay four tiles on the floor, offset them, and run your finger across the joints before you commit 95 square feet to it.
- Leveling clips regardless. A $40 bag of clip-and-wedge spacers is mandatory at this size, in my crew’s practice. They pull each course flat while the thinset cures.
Layouts That Work at This Scale
Horizontal running bond (the default)
Third-offset horizontal is 90 percent of the 4×12 showers I set. With a 60-inch back wall, each course is exactly five tiles — clean math, minimal cuts. Balance the layout so cut tiles at both ends of a wall are equal, never a sliver against a corner.
Vertical stack
Standing 4x12s on end in a straight grid pulls the eye up — outstanding in showers with 8- or 9-foot ceilings and the fastest look-per-dollar modernizer in the format. Grout lines align through every course, so your setting has to be precise; the grid forgives nothing.
Horizontal stack
Straight columns, long lines, very architectural. Same precision warning. This is my pick when the client wants “spa” without paying spa prices.
Herringbone
4×12 herringbone in a shower is dramatic and expensive: add 15 percent waste for the diagonal perimeter cuts and about 30 to 50 percent to the setting labor. In a niche or above a bench as an accent panel, though, it costs almost nothing and looks terrific.
Grout Lines and Color at 4×12
Joint size makes or breaks the format. My standards: 1/16 inch on rectified porcelain, 1/8 inch on standard pressed ceramic (its size variation needs the forgiveness), and 3/16 on handmade-look wavy-edge tile where irregularity is the point. On color, the calculus shifts with fewer joints: contrasting grout (charcoal on white) at 4×12 reads as clean graphic lines rather than a busy grid, because there are 40 percent fewer of them. Matched grout melts the wall into a near-monolithic surface. Either works; what doesn’t work is bright white grout on a shower floor of any kind, but that’s a different article.
Setting 4×12 in a Shower: The Contractor Details
- Flatten the walls first. The single most important step. A 12-inch tile bridges dips that a 6-inch tile follows, which turns wall waviness into lippage. Industry spec for this size is 1/4 inch in 10 feet; I straightedge every stud bay and shim or float before backer goes up. An hour of prep saves the whole job.
- Waterproof like always. Cement board plus liquid membrane, or foam board with sealed seams — format changes nothing here.
- Back-butter the field. At 48 square inches per tile, I comb the wall and skim the tile back to hit proper coverage (95 percent in showers). Spot-bonding is how you get hollow clicks and cracked corners.
- Start from a level ledger. Course one carries everything above it. A laser line and a screwed-off ledger board guarantee the fifth course doesn’t drift.
- Plan cuts at the ceiling and corners. Work the layout on paper so full tiles hit eye level and cuts hide up top. Twelve-inch tiles make every ugly cut twelve inches of ugly.
Budget Snapshot: 32×60 Alcove, Walls to 84 Inches
| Item | Quantity | Cost |
|---|---|---|
| 4×12 glazed ceramic @ $2.29/sq ft | 105 sq ft (10% overage) | $240 |
| Backer board + waterproofing | 3 walls | $290 |
| Thinset, grout, silicone | — | $140 |
| Leveling clips + trim profile | — | $95 |
| Labor (if hired) | ~95 sq ft | $1,100–$1,800 |
DIY materials land around $765; contractor-installed walls typically $2,000 to $2,700 over an existing pan. Both numbers run 10 to 20 percent under the same shower in 3×6, almost entirely on labor.
Pairing the Pan, Niche, and Trim
A 4×12 wall wants coordinated supporting cast. On the shower floor, the format pairs cleanly with 2×2 porcelain mosaic in a tone pulled from the wall tile — matched, not identical, since the floor needs slip texture the glossy wall shouldn’t have. For the niche, two moves work: run the same 4×12 through the niche with the courses aligned to the field (the disciplined look, and course alignment is exactly the kind of detail that separates pro work from weekend work), or line the niche in a contrasting slim mosaic and let it read as a jewel box. Shelf edges get mitered tile or a metal profile; raw cut edges inside a niche at eye level are the most common finishing miss I see. Around the perimeter, matching 4×12 bullnose exists in some lines but not most, so plan on metal edge profiles — a matte profile in the grout color disappears, while black or brass turns the edge into a design line. And at the ceiling, if you’re running tile up and over a soffit or onto the shower ceiling, keep the vertical joints aligned through the transition. Twelve-inch tiles make aligned joints obvious and misaligned ones glaring.
If you’re deciding between formats tonight, here’s my short version: pick 4×12 when your walls can be made flat, you want the subway look with less grout and a more current line, and your shower has at least 32 inches of wall to let the 12-inch length breathe. Use third offset unless your tile is rectified-flat, clip every course level, and put the money you saved on labor into a better grout — an epoxy or high-performance cement grout at $30 to $60 more per shower is the upgrade that keeps a 4×12 subway shower looking new when its 3×6 grandparents have gone gray at the joints.
Prefer to explore on your own?
See how new flooring looks in your actual room in seconds — free, no signup.
Try the free Floor Studio →