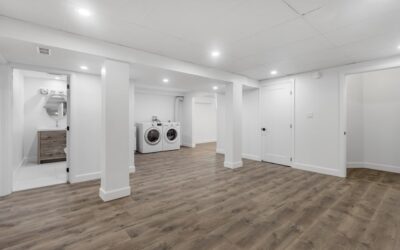
A finished basement is the cheapest square footage you will ever add to your house, but only if you build it on a foundation that controls moisture and meets code. The best basement finishing ideas start with the unglamorous parts — vapor barriers, insulation, egress, and drainage — before any drywall or paint. Get those right and you can drop in whatever layout fits your family, from media room to in-law suite to home gym.
- Start with Moisture Management
- Insulation and Vapor Barrier Strategy
- Flooring Choices That Survive Below Grade
- Egress Windows Are Non-Negotiable for Bedrooms
- Ceiling Options: Drywall vs Drop Ceiling
- Lighting a Windowless Space
- Layout Ideas That Make Sense
- Bathroom Additions Below Grade
- Don’t Forget the Mechanical Room
Start with Moisture Management
Even basements that feel dry have higher humidity than the rest of the house. Before framing a single wall, address any active water issues. Install a perimeter drain with a sump pump if you do not have one, run a dehumidifier sized for the square footage, and watch the space through one full rainy season.
Apply DryLok or RadonSeal Concrete Sealer to interior foundation walls. For basements with persistent dampness, consider an interior drainage system like Basement Systems’ WaterGuard, which routes water to a sump pit. A Honeywell or Aprilaire dehumidifier rated for 70 pints a day keeps relative humidity below 50 percent and prevents mold.
Insulation and Vapor Barrier Strategy
The current best practice for basement walls is two inches of rigid foam — XPS or polyiso — applied directly to the concrete, taped at all seams, then framed in front with 2×4 walls and faced with drywall. This eliminates the dew point inside the wall cavity and prevents mold behind the finished surfaces.
For floors, lay a dimpled membrane like DMX 1-Step or Delta-FL over the slab, then install your finished floor on top. This product creates an air gap between concrete and flooring that handles minor moisture and makes the floor warmer underfoot. Skip the old method of plastic sheeting and 2×4 sleepers — it traps moisture and breeds mold within a few years.
Flooring Choices That Survive Below Grade
Solid hardwood and traditional laminate are not basement-friendly. Both warp when humidity rises. The smarter options are luxury vinyl plank, engineered hardwood, or polished concrete with rugs.
- Luxury vinyl plank (LVP): $2-$5 per sq ft, 100 percent waterproof, easy DIY install
- Engineered hardwood: $4-$9 per sq ft, more stable than solid wood in humidity
- Polished concrete: $3-$8 per sq ft, modern look, very durable
- Carpet tiles: $2-$4 per sq ft, replaceable individually if one stains
- Porcelain tile: $3-$10 per sq ft installed, ideal for laundry or bathroom areas
For basements that have ever taken on water, LVP is the no-regret choice. Brands like COREtec Pro, Shaw Floorte, and Mohawk SolidTech tolerate occasional flooding and dry out without buckling.
Egress Windows Are Non-Negotiable for Bedrooms
If your basement plan includes a bedroom, code requires an egress window — a window large enough for a person to climb out and a firefighter to enter. Standard requirements are a clear opening of 5.7 square feet, minimum 24 inches tall and 20 inches wide, with a sill no more than 44 inches above the floor.
Adding an egress window where one does not exist runs $3,000 to $6,000 including the well, cover, and exterior excavation. Skipping this step keeps your basement bedroom unpermitted and uninsurable. Brands like Bilco and Boman Kemp make code-compliant window wells with built-in escape ladders.
Ceiling Options: Drywall vs Drop Ceiling
A flat drywall ceiling looks cleanest and adds the most resale value, but it makes future plumbing and electrical access painful. Suspended drop ceilings — Armstrong or USG panels in a metal grid — give full access to overhead utilities and run $2 to $5 per square foot installed.
If you want the look of drywall with some access, install drywall with strategic access panels at every shutoff valve, junction box, and HVAC damper. Another option is a coffered or boxed ceiling that hides ductwork inside decorative drops, then drywalls the flat sections in between. This delivers a finished look without sacrificing access.
Lighting a Windowless Space
Most basements have minimal natural light, so plan three layers of artificial lighting in every zone. Recessed LED can lights at 6 feet on center provide ambient light. Add task lighting under cabinets, over bars, and at desk areas. Finish with accent lighting — sconces, picture lights, or a statement chandelier in a media area.
Use 3000K or 3500K bulbs for a warm but bright feel. Cooler 4000K light makes basements feel like an office or hospital. Smart switches from Lutron Caseta or Leviton Decora let you set scenes — bright for cleaning, dim for movie nights — without rewiring.
Layout Ideas That Make Sense
The most common basement zones — and the ones that pay off in resale — are media rooms, home gyms, guest suites, and play areas. A combined open floor plan with a media zone, a wet bar, and a gaming area uses square footage efficiently and feels generous.
If you have under 800 square feet, prioritize one or two functions rather than trying to cram in everything. A great media room with a bar beats a cramped layout with a gym, a guest room, and a craft corner all stepping on each other. Use furniture to define zones — a sectional facing a TV creates a room within a room without dropping more walls.
Bathroom Additions Below Grade
A basement bathroom adds $7,000 to $20,000 depending on whether the rough-ins exist. If your slab has stub-outs from the original build, a contractor can finish a three-quarter bath for under $10,000. Without stub-outs, you will need either a saw-cut into the slab to add drains or an upflush system like the Saniflo Saniaccess 3 ($1,200) that pumps waste up to the main line.
Even a small basement bathroom dramatically improves usability for guests, kids, and entertaining. It is the single best investment in finished basement square footage if your floor plan can absorb 30 to 40 square feet for the build-out.
Don’t Forget the Mechanical Room
Leave generous access around the furnace, water heater, and electrical panel. Code requires 30 inches of clearance in front of the panel and at least three feet of working space at the front of any HVAC equipment. Frame these areas with bifold or louvered doors so technicians can service equipment without taking down a wall.
Done thoughtfully, a finished basement adds 30 to 70 percent of the cost back at resale and meaningful livable space day to day. Take the time to build on dry, well-insulated bones and the rest of the project becomes the fun part.