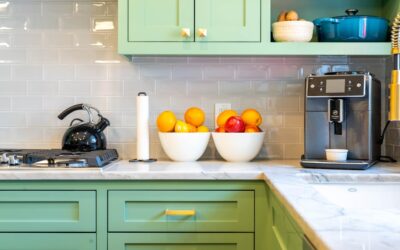
Swapping out dated knobs is the cheapest way to make a kitchen look expensive, yet homeowners routinely buy the wrong size and drill the holes in the wrong spot. Well-chosen cabinet hardware handles pull a room together the way jewelry finishes an outfit, and they cost a fraction of new doors. Get the sizing, finish, and placement right and a set of cabinet hardware handles can modernize a tired kitchen in an afternoon for under $200.
Part of our Kitchen Remodeling guide — explore the full guide →
Choosing Cabinet Hardware Handles by Size and Proportion
Scale is everything. A pull that looks fine in the store can vanish on a tall pantry door or overwhelm a small drawer. The measurement that matters is center-to-center, the distance between the mounting screws, not the overall length. Use this as a starting point:
- Drawers up to 12 inches wide: 3-inch or 3.75-inch center pulls.
- Drawers 12 to 24 inches: 5-inch pulls.
- Drawers 24 to 36 inches: 6.25-inch or 8-inch pulls, or two smaller pulls.
- Large drawers over 36 inches: 12-inch appliance-style pulls.
A common rule sizes the pull at roughly one-third the width of the drawer front. On doors, knobs generally suit uppers while pulls read better on lowers, though matching pulls everywhere gives a cleaner, more current look.
Knobs Versus Pulls: When to Use Each
Knobs are single-screw, faster to install, and traditionally go on doors. Pulls have two screws, offer a bigger grip, and are easier on arthritic hands or when your fingers are full. Many designers now run pulls on both doors and drawers for consistency, reserving knobs only for glass-front or decorative uppers. If your budget is tight, remember pulls cost more per piece because of the extra hardware, roughly $3 to $12 each versus $2 to $8 for knobs.
Finishes That Last and Coordinate
Finish is where personality shows, but durability varies. Solid brass and stainless steel resist corrosion for decades; cheaper zinc-alloy pieces with a plated coat can wear through at the grip within a few years of daily use.
- Matte black: Still the dominant modern choice, hides fingerprints, pairs with almost any cabinet color.
- Brushed nickel/satin nickel: The safe, timeless neutral that never dates badly.
- Champagne bronze/brushed gold: Warm and popular, but confirm the undertone matches your faucet.
- Polished chrome: Bright and easy to clean, though it shows water spots in a bath.
You do not have to match your hardware to your faucet exactly, but keeping metals within the same temperature family, all warm or all cool, keeps a kitchen from looking accidental. Order one sample of each finish before committing to 30 pieces; screen colors lie.
The Rules for Placing Handles
Placement is what separates a professional-looking job from a DIY tell. Follow these conventions and your cabinets will look intentional:
- Shaker door knobs: Centered on the vertical stile, at the corner where the rail meets the stile.
- Door pulls: Mounted vertically on the stile, with the bottom of the pull aligned about 2.5 to 3 inches from the door’s bottom corner on lowers, and the top corner on uppers.
- Drawer pulls: Centered horizontally and vertically on the drawer front, or centered on the top rail for slab drawers.
Consistency across every cabinet matters more than any single measurement. Pick your reference points, write them down, and repeat them on all 20 or 30 fronts.
Drilling New Holes Accurately
A cabinet hardware jig is the $15 tool that saves you from crooked, mismatched holes. It clamps to the door or drawer and gives repeatable drill points for any center-to-center spacing. Here is the reliable process:
- Mark your placement on one door, then set the jig to match.
- Back the door with a scrap block to prevent tear-out when the bit exits.
- Drill with a sharp 3/16-inch bit at the jig’s guides.
- Test-fit the handle before drilling the rest of the batch.
- Move the jig door to door without re-measuring each time.
If you are covering old holes from single-hole knobs while switching to two-screw pulls, you can either fill and repaint or choose pulls whose spacing hides the old hole. Wood filler plus touch-up paint disappears on painted cabinets but is nearly impossible to hide on stained wood.
Budgeting Your Hardware Update
Count every door and drawer first; a typical kitchen has 25 to 40 openings. At an average of $4 to $8 per piece for decent-quality hardware, a full kitchen runs $150 to $350 in parts. Designer lines from makers like Emtek or Top Knobs push that to $500 or more, while big-box multipacks can drop it under $100. Buy two or three extra pieces so a lost or damaged handle years later still matches.
Screws are the sneaky variable. Most handles ship with 1-inch machine screws sized for 3/4-inch doors. If your drawer fronts are thicker, or you are mounting through a false front and a box, buy longer 8-32 machine screws in the same length range so the threads seat fully. A $4 pack of assorted screws prevents a frustrating trip back to the store.
Matching Hardware to Your Cabinet Style
The handle should agree with the door it lives on. Shaker and slab doors, the backbone of transitional and modern kitchens, look best with clean bar pulls or simple round or T-knobs. Skip the ornate, and let the flat door and straight pull read as intentional. Raised-panel and beadboard doors lean traditional, so they carry cup pulls on drawers and rounded or birdcage knobs on doors more gracefully. A cup (bin) pull is a classic move on drawers, but remember it only mounts one way, so it does not work on doors, plan a knob or bar pull for those.
Length and profile also send a message. Long, thin European bar pulls skew contemporary; chunky, squared-off pulls read industrial; and softly rounded pulls feel timeless. When mixing, keep the metal finish identical across every piece even if you vary the shape between cup pulls on drawers and knobs on doors. That single-finish discipline is what keeps a mixed layout from looking accidental.
Grip comfort deserves as much thought as looks. Run your hand along a sample: a bar pull with a flat back edge can dig into your fingers, while one with a rounded or beveled underside is kinder to daily use. On drawers you open with a full hand, like a heavy pots-and-pans drawer, a larger 6- to 8-inch pull spreads the load and is easier to grab than a small knob. In a household with anyone who has arthritis or limited hand strength, favor pulls over knobs throughout, since a pull lets you hook a finger rather than pinch. Temperature is a subtle factor too; solid metal handles near an oven or a sunny window can warm up, so matte and brushed finishes, which read cooler and hide fingerprints, tend to be the friendlier everyday choice over polished chrome that shows every smudge.
A few errors show up again and again. The first is buying by overall length instead of center-to-center spacing, which leaves you drilling holes that do not match the handle. The second is going too small, timid 3-inch pulls on wide 30-inch drawers look undersized and get lost. The third is inconsistent placement, eyeballing each hole instead of using a jig, which produces a subtly crooked kitchen that the eye reads as sloppy even if it cannot name why.
Two more worth flagging: forgetting to check screw length against thick drawer fronts, and mounting pulls too low on tall pantry doors where they should sit near the top corner within comfortable reach. Finally, resist buying the whole set before testing one on a real door; a handle that photographs well can feel cheap or sharp-edged in the hand.
Final Tips for a Clean Result
Live with a single sample handle on a cabinet for a day before ordering the whole set; grip comfort and visual weight both change once it is on the door. Clean each handle with a soft cloth and mild soap, never abrasive pads, to protect the finish. With the right jig, a level eye, and consistent placement, a full set of cabinet hardware handles is a genuine weekend upgrade that makes the entire room feel new.
Timing the project well makes it smoother. Order all your hardware from a single batch or dye lot so the finish matches exactly, since brushed and antiqued finishes can vary slightly between production runs. Lay every handle out on a towel and confirm the count against your door-and-drawer tally before you drill the first hole, running short mid-project means waiting on a reorder that may not match. Work one cabinet from start to finish as a test, live with it for a day, then commit to the rest once you are sure of the placement and grip. Keep the packaging and receipt until the job is done in case you need to exchange a style that looked right online but disappoints in person. Small as it seems, this is the upgrade guests notice first when they run a hand along a drawer.