Wood balusters rot, aluminum spindles look generic, and glass panels cost a fortune. A cattle panel deck railing sidesteps all three, giving you an open, modern-farmhouse look with galvanized livestock panels that shrug off weather and cost a fraction of designer railing. The grid pattern preserves your view, holds up to hard use, and installs with basic tools, which is why it has become a favorite for DIY deck builders.
Part of our Decks & Outdoor guide — explore the full guide →
What Is a Cattle Panel Railing
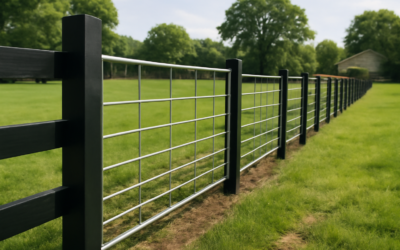
Cattle panels, also called hog or livestock panels, are welded steel grids sold at farm supply stores for fencing. They come in 16-foot lengths, usually 50 inches tall, made of thick galvanized wire welded into a rectangular mesh. Repurposed as deck infill, they slot into a wood or metal frame in place of traditional balusters.
The appeal is a clean industrial grid that feels open and airy. Unlike solid panels, the mesh does not block sightlines, so your deck feels larger and your view stays intact. The galvanized coating resists rust for years even in wet climates.
Why Homeowners Choose Cattle Panels
- Cost: A single 16-foot panel runs $25 to $40, dramatically cheaper than pre-made railing sections.
- Durability: Galvanized steel handles sun, rain, and snow without rotting or fading.
- Open views: The grid keeps sightlines clear, ideal for decks overlooking a yard or landscape.
- Strength: Welded steel resists impact far better than thin wood balusters.
- Style: The look suits farmhouse, modern, and rustic decks equally.
For a mid-size deck, you can often infill the entire perimeter for a couple hundred dollars in panels, a fraction of what composite or glass railing would cost.
Meeting Building Code
This is where careful planning matters. Deck railing codes exist for safety, and cattle panels have to comply just like any other infill. Most jurisdictions require guardrails at least 36 inches high on residential decks, and 42 inches in some areas, measured from the deck surface to the top of the rail.
The tricky part is the 4-inch sphere rule: no gap in the railing may allow a 4-inch sphere to pass through, to protect children. Standard cattle panel grid openings are often larger than 4 inches in at least one dimension, which means a raw panel may not pass inspection on its own. Solutions include layering a second panel offset to shrink the openings, adding welded wire mesh behind the panel, or confirming with your local inspector before you build. Always check local code first.
Building the Frame
Cattle panels are infill, not structure, so they need a sturdy frame to mount in. Most builds use pressure-treated 2×4 or 4×4 posts with a top and bottom rail, and the panel is captured between them.
- Set and secure your posts to code, typically no more than 6 feet apart and through-bolted to the deck framing.
- Cut cattle panels to length with an angle grinder or heavy bolt cutters, wearing gloves and eye protection.
- Sandwich the panel between two rails, or route a groove into the rail to capture the panel edge for a cleaner look.
- Fasten the frame rails to the posts with structural screws or bolts.
- Secure the panel with fence staples, screws with fender washers, or by capturing it fully in the routed groove.
Cutting galvanized steel throws sparks and sharp burrs. Wear a face shield and gloves, and file down cut ends so no one catches a hand on a raw wire.
Finishing and Rust Prevention
Galvanizing protects the panel, but every cut you make exposes bare steel that will eventually rust. After cutting, hit the cut ends with cold-galvanizing spray to reseal the coating. For a decorative finish, some builders paint the panels matte black with a spray designed for galvanized metal, which requires a proper etching primer to adhere.
Keep the wood frame sealed and stained on the same schedule as the rest of your deck. The steel will outlast the wood, so the frame is what needs ongoing maintenance.
Design Variations
The basic build accepts plenty of customization. A horizontal wood cap rail over the top gives a comfortable place to rest a drink and softens the industrial edge. Painting the panels black makes them recede visually so the view dominates, while leaving them galvanized silver leans into the farmhouse aesthetic.
Some homeowners frame each panel section individually with mitered wood surrounds for a picture-frame effect, elevating the look from rugged to refined. The panels are versatile enough to fit almost any deck style.
Maintenance Over the Years
The steel side of the railing needs almost nothing, an occasional rinse to clear pollen and grime keeps it looking sharp. Check the cut ends once a year for any rust starting where you exposed bare metal, and touch them up with cold-galvanizing spray if you see orange creeping in.
The wood frame is where your attention goes. Clean and reseal or restain it on the same schedule as your deck boards, typically every 2 to 3 years, to keep it from graying and checking. Retighten the fence staples or screws holding the panel if any work loose over a few seasons of expansion and contraction.
Is It the Right Choice for Your Deck
If you want durable, open, low-cost railing with real character, a cattle panel deck railing is tough to beat. It handles weather better than wood, costs far less than manufactured systems, and delivers a look that reads as intentional rather than cheap. The one non-negotiable is code compliance, verify the gap and height rules with your local inspector before you cut a single panel. Nail that, and you get a railing that looks great and lasts for decades. For a weekend of work and a couple hundred dollars in panels and lumber, few deck upgrades deliver as much visual impact or as much durability per dollar spent.