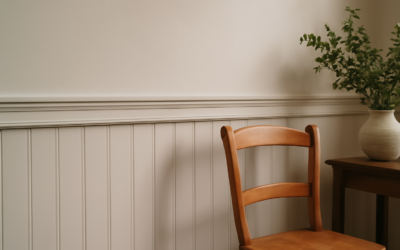
Chair rail trim is the horizontal molding that runs around a room roughly a third of the way up the wall, originally designed to protect plaster from the backs of chairs and today used just as much for its decorative charm. Whether you want to add architectural interest to a plain dining room, create a two-tone paint scheme, or cap a run of wainscoting, chair rail is one of the most approachable and affordable trim upgrades a homeowner can tackle. This guide walks through the correct height, popular profiles, costs, design pairings, and step-by-step installation so you can add this classic detail with confidence.
- What Is Chair Rail Trim?
- The Right Height for Chair Rail
- Popular Chair Rail Styles
- What Chair Rail Trim Costs
- Pairing Chair Rail with Wainscoting and Paint
- Tools and Materials You'll Need
- How to Install Chair Rail Trim
- Common Mistakes to Avoid
- Best Rooms for Chair Rail
- Chair Rail vs. Picture Rail vs. Wainscoting Cap
What Is Chair Rail Trim?
Chair rail is a strip of molding installed horizontally on a wall, typically between 24 and 36 inches from the floor. Its name comes from its original practical purpose: preventing chair backs from scuffing and denting walls in dining rooms and other seating areas. Over time it evolved into a decorative element that visually breaks up tall walls, adds a sense of scale, and provides a natural dividing line for two-tone paint schemes or the top edge of wainscoting and board and batten. Even in homes where chairs never touch the walls, chair rail endures because it lends rooms a finished, traditional elegance.
The Right Height for Chair Rail
Getting the height right is the most important design decision. The traditional rule places chair rail at about one-third of the wall height, which for a standard 8-foot (96-inch) ceiling works out to roughly 32 inches from the floor. Common practice runs between 30 and 36 inches. A few guidelines help:
- For 8-foot ceilings, 32 to 36 inches is typical.
- For taller 9- or 10-foot ceilings, you can raise the rail proportionally.
- Avoid placing it exactly at the wall’s vertical midpoint, which can look awkward; lower is generally more pleasing.
- Consider furniture; the rail should sit at or above the height of chair backs for the protective function.
Always mark the height with a level line around the entire room before installing, since a chair rail that drifts up or down is glaringly obvious.
Popular Chair Rail Styles
Chair rail profiles range from simple to ornate, letting you match the trim to your home’s character:
- Traditional profiled: Curved, detailed profiles that suit colonial and classic interiors.
- Simple flat or beveled: Clean, understated boards that fit modern and transitional spaces.
- Ogee and cap profiles: Elegant S-curves that add refinement.
- Built-up: Combining several small moldings to create a custom, substantial rail.
Choose a profile that complements your existing baseboards and door casings so the trim reads as a cohesive package rather than a mismatched afterthought.
What Chair Rail Trim Costs
Chair rail is inexpensive as trim projects go. Material costs:
- MDF chair rail: $1 to $3 per linear foot, primed and paint-ready.
- Solid wood (pine, poplar, oak): $2 to $6 per linear foot.
- Polyurethane or composite: $2 to $5 per linear foot, good for moisture-prone rooms.
A typical room needs 40 to 60 linear feet, so materials often total just $50 to $200. Professional installation adds roughly $2 to $5 per linear foot, or a few hundred dollars per room, but chair rail is a very DIY-friendly project that many homeowners complete themselves in an afternoon.
Pairing Chair Rail with Wainscoting and Paint
Chair rail truly shines when combined with other wall treatments. It commonly serves as the cap for wainscoting, board and batten, or beadboard installed on the lower third of the wall, creating a rich, layered look popular in dining rooms, entryways, and hallways. It is also the classic divider for two-tone paint: a darker or bolder color below the rail and a lighter shade above adds depth and sophistication. When pairing with wainscoting, plan the total height so the wainscoting and rail work together proportionally. These combinations turn a simple strip of molding into the anchor of a whole design scheme.
Tools and Materials You’ll Need
Installing chair rail requires basic trim tools: a miter saw or miter box for angle cuts, a coping saw for inside corners if you cope, a brad nailer or hammer and finish nails, a stud finder, a level (a laser level is ideal for marking a continuous line), a tape measure and pencil, wood glue, caulk, filler, and paint. A brad nailer speeds the job considerably but is not mandatory. Having everything staged before you begin makes for smooth, accurate work.
How to Install Chair Rail Trim
- Mark a level line at your chosen height around the entire room, checking with a level so it stays consistent even if floors are uneven.
- Locate the studs and mark them, since nailing into studs gives the rail solid anchoring.
- Measure and cut each wall’s piece, using miters for outside corners and either miters or coped joints for inside corners; coping gives tighter results on out-of-square walls.
- Apply a bead of glue to the back and nail the rail to the studs along your level line.
- Set the nails below the surface and fill the holes with wood filler.
- Caulk the top and bottom edges where the rail meets the wall for a seamless look.
- Sand, prime, and paint to finish.
Common Mistakes to Avoid
- Following the floor instead of a level line, which makes an uneven floor’s dips show up in the rail.
- Choosing a height that clashes with the room’s proportions, such as placing it too high.
- Mismatched profiles that conflict with existing baseboard and casing.
- Skipping caulk, leaving visible gaps against the wall.
- Poor corner joints, especially uncoped inside corners that gap on out-of-square walls.
Best Rooms for Chair Rail
While chair rail can work almost anywhere, certain rooms benefit most from the detail. Dining rooms are the traditional home for chair rail, where it protects walls from chair backs and lends the formal character the room calls for, often paired with a darker paint or wainscoting below. Entryways and foyers use chair rail to make a strong first impression and to guard walls in a high-traffic zone. Hallways gain visual interest and durability, since the rail takes the scuffs that furniture and passing traffic would otherwise inflict on the paint. Bathrooms and powder rooms feel more finished with a chair rail capping beadboard wainscoting, which also shields the lower wall from moisture. Even a home office or a child’s room can benefit, both for style and for the practical protection the rail provides. Rooms with tall ceilings especially benefit, because the horizontal line breaks up expansive walls and brings them to a more human, comfortable scale.
Chair Rail vs. Picture Rail vs. Wainscoting Cap
Homeowners sometimes confuse chair rail with similar horizontal moldings, so it helps to distinguish them. Chair rail sits low, around one-third up the wall, and protects walls at chair-back height. Picture rail, by contrast, is mounted much higher, near the ceiling, and was originally designed to hang artwork from hooks without putting holes in plaster; it creates a very different, more formal effect. A wainscoting cap is simply the top piece of trim that finishes a run of paneling, and while chair rail is frequently used as that cap, a dedicated cap molding with a flat top ledge is sometimes used instead. Understanding these distinctions helps you choose the right molding for your goal, whether you want to protect walls, hang art, or crown paneling. In many rooms, chair rail happily fills more than one of these roles at once.
Few upgrades add as much classic character for as little money as chair rail trim. Set it at the right height, match the profile to your existing woodwork, and take care with your corners and finish, and this simple horizontal molding will bring architectural warmth and a custom, put-together feel to any room, whether standing alone or crowning a run of wainscoting.