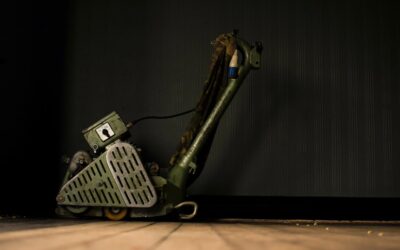
If you have ever tried to pry up old vinyl tile or chip away decades-old thinset with a hand scraper, you already know why a concrete floor scraper machine rental is worth every dollar. These machines turn a job that could eat three weekends of your life into an afternoon of loud, dusty, satisfying progress. Whether you are pulling up carpet glue before a hardwood install, stripping mastic under old sheet vinyl, or removing a failed epoxy coating, a rented scraper does in hours what a flat bar and elbow grease would take days to accomplish.
Part of our Epoxy, Concrete & Garage Floors guide — explore the full guide →
This guide walks through what these machines actually are, what they cost to rent by the day or week, how to pick the right blade and machine size for your project, and the operating techniques that keep you from gouging your slab or breathing in a garage full of dust. By the end you will know exactly what to ask the rental counter and how to run the machine like you have done it before.
What a Concrete Floor Scraper Machine Actually Is
Floor scrapers come in two broad families: walk-behind models and ride-on models. Walk-behind scrapers look like a squat, heavy push mower with a reciprocating or oscillating blade mounted low to the floor. They typically weigh 150 to 300 pounds, run on electric or propane power, and drive the blade forward and back thousands of times per minute to shear adhesive, tile, or thin coatings off the slab. Ride-on scrapers are larger machines you sit on like a small tractor, with a wider blade and far more downforce, built for commercial jobs where hundreds or thousands of square feet need to be cleared quickly.
For most homeowners and small contractors, the walk-behind electric scraper is the sweet spot. It fits through a standard doorway, runs on a regular 110-volt outlet in most cases, and is light enough for one person to load into a pickup bed with a ramp. Rental yards typically stock both electric and propane versions; electric is quieter and produces no exhaust fumes, which matters a great deal if you are working in a finished basement or an occupied home.
The blade itself is the business end of the machine. Blades attach to a reciprocating head and are swapped out depending on what you are removing. A wide, slightly curved blade works well for lifting sheet vinyl and glued-down carpet pad, while a narrower, more aggressive blade with a beveled edge is better suited to chipping hardened thinset or ceramic tile fragments off concrete. Most rental counters carry three or four blade widths and will help you match one to your job if you describe what is on the floor.
Typical Rental Rates and What Drives the Cost
Expect to pay somewhere between 65 and 110 dollars for a four-hour rental of a standard walk-behind electric scraper, 90 to 150 dollars for a full day, and 300 to 450 dollars for a full week at most independent rental yards and national chains. Prices vary by region and by brand of machine, with the more aggressive contractor-grade units renting for 15 to 25 percent more than the lighter-duty homeowner models. Ride-on scrapers, which are far less common at general rental counters and more likely found at specialty flooring rental suppliers, run 250 to 400 dollars a day and often require a truck or trailer to transport.
Beyond the base rental fee, budget for a damage waiver, usually 10 to 15 dollars a day, and a refundable cash or card deposit that can range from 100 to 500 dollars depending on the yard’s policy. Replacement blades are not always included in the base price. A fresh scraper blade costs anywhere from 8 to 25 dollars depending on width and hardness, and on a tough job with old thinset or multiple layers of flooring, you may go through two or three blades before you are done. Ask the counter whether blades are included or billed separately, since this detail changes the true cost of the job by 20 to 50 dollars.
Delivery is another line item worth asking about. Many yards will deliver and pick up a scraper for 40 to 75 dollars each way if you do not have a way to transport a 200-plus pound machine yourself. For a small room, renting for four hours and doing the pickup and drop-off yourself is almost always the cheapest path. For a whole basement or a multi-room job, a full-day or weekend rental with delivery often works out cheaper per square foot than repeated short rentals.
Sizing the Machine to Your Project
A small bathroom or bedroom, say under 150 square feet, can usually be cleared with the lightest electric walk-behind model in two to four hours once you get the technique down. A basement rec room or a full first-floor renovation in the 500 to 1,500 square foot range calls for a full-day rental and, ideally, the mid-weight contractor unit rather than the lightest homeowner model, since the extra downforce saves real time over a long session. Anything larger than that, or any commercial space, generally justifies looking at a ride-on unit or hiring a flooring demolition contractor who owns their own equipment outright.
Also factor in what is actually stuck to the slab. Carpet pad glue and cutback adhesive under old vinyl tile are relatively soft and yield quickly to a standard blade. Thinset mortar residue from a torn-out ceramic or porcelain tile installation is a different animal entirely; it is rock hard and will chew through blades faster and slow your production rate considerably. If you know you are dealing with old thinset, tell the rental counter up front so they can steer you toward a more aggressive blade and possibly a heavier machine, and budget extra time and blade replacements into your plan.
Step-by-Step: Running the Machine
Start by clearing the room completely and doing a walk-through for protruding nails, staples, or transition strips that could catch the blade or damage the machine. Sweep loose debris and vacuum any grit, since a clean starting surface lets you see progress and avoids grinding sand into the mechanism. Put on safety glasses, hearing protection, and a properly rated respirator, since even without active demolition dust, scraping stirs up fine particulate that you do not want in your lungs over a multi-hour session.
Set the blade angle low and start in a corner, letting the machine’s reciprocating action do the work rather than forcing it forward. Pushing too hard is the single most common rookie mistake; the blade needs to skim under the material at a shallow angle, not gouge straight down. Work in overlapping passes about six inches wide, and resist the urge to make one heroic pass across the whole room. Short, controlled strokes with steady forward pressure clear material faster and with far less blade wear than long aggressive shoves.
When the blade starts skipping or bouncing instead of biting cleanly, that is your signal it has dulled or chipped and needs to be swapped, which takes two to five minutes on most models with a simple bolt or clamp release. Keep a spare blade or two on hand rather than making a mid-job trip back to the rental counter. As you clear each section, vacuum immediately behind the machine so you are always scraping on a visible, debris-free surface, which both speeds the work and protects the blade from grinding against loose chips.
Dust Control and Safety
Concrete floor scraping generates a surprising amount of fine dust, especially when removing old thinset, paint, or coatings that may contain lead or asbestos in homes built before the 1980s. If your home falls into that era and you are unsure what is under the flooring, have a sample tested before you start tearing into it, since disturbing asbestos-containing mastic with a power scraper is a genuine health hazard and, in many states, a legal issue if not handled properly.
For dust that is not hazardous, run a shop vacuum continuously if your machine has a dust port, or run a portable air scrubber or box fan exhausting through a window to keep particulate moving out of the workspace rather than settling on every surface in the house. Seal off doorways to the rest of the home with plastic sheeting and painter’s tape, and change your respirator cartridge if you notice it becoming harder to breathe through, which usually means it is loaded with fine dust.
Electrical safety matters too. These machines draw meaningful current, and running one on an extension cord that is too thin or too long causes voltage drop that can trip breakers or overheat the cord. Use a 12-gauge extension cord rated for the amperage on the machine’s nameplate, and avoid daisy-chaining multiple cords together if you can help it.
DIY Rental Versus Hiring a Pro
Renting the machine yourself makes the most financial sense for a single room or two, where the total rental cost lands well under 200 dollars and you can complete the job in a day. It also makes sense if you enjoy the hands-on work and have the time to spend a Saturday on it. The tradeoff is your own labor, the learning curve of the first hour getting a feel for the machine, and the physical toll, since pushing a scraper for six or eight hours is genuinely tiring work on your back and forearms.
For larger jobs, or if the underlying material turns out to be unusually stubborn, a flooring demolition contractor with their own commercial-grade equipment often finishes a job in a fraction of the time a rental and a first-timer would take, and many charge by the square foot in a range that is competitive with a multi-day rental once you add up machine cost, blades, and your own hours. Get two or three quotes before committing to either path, and use what you have learned about rental pricing here as your baseline for comparison.
Getting the Slab Ready After Scraping
Once the bulk of the material is off, you will almost always be left with a thin residual film of adhesive or a slightly uneven surface where the scraper could not reach into corners and along walls. A hand scraper or a smaller detail tool handles the edges the machine could not, and a floor grinder or diamond cup wheel on an angle grinder knocks down any remaining ridges before you install new flooring. Sweep and vacuum thoroughly, then inspect the slab under raking light, which reveals high spots and leftover glue far more clearly than looking straight down.
If you are installing a moisture-sensitive product like engineered hardwood or a glue-down luxury vinyl, consider a moisture test on the bare concrete before you proceed, since scraping does not change the slab’s underlying moisture condition and old adhesive residue can sometimes mask an existing moisture problem. Getting this step right protects the investment you just made in renting the scraper and doing the demolition properly in the first place.