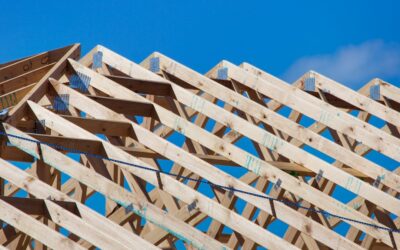
If you have ever looked up at a new basement ceiling and seen a lattice of wood chords and zigzag webs instead of solid joists, you were looking at engineered floor trusses. These factory-built frames span farther than dimensional lumber, stay flat and quiet, and leave open space between the webs for ductwork, drain lines and wiring. They are designed one project at a time by the truss manufacturer, which is why they show up in custom homes, additions and large open floor plans.
The quick answer for planners: most residential floor trusses are 12 to 24 inches deep, commonly spaced 19.2 or 24 inches on center, and can span roughly 20 to 30 feet or more depending on depth and loading. Wood floor trusses use 2×4 lumber laid flat for the chords and webs, while metal-web trusses use wood chords connected by stamped steel webs. Costs are usually quoted per linear foot or per truss, and lead times range from one to several weeks.
- How Engineered Floor Trusses Are Designed
- Wood vs. Metal-Web Floor Trusses
- Typical Depths, Spans and Spacing
- Floor Truss vs. I-Joist vs. Dimensional Lumber
- Ordering and Lead Times
- Installation Tips and Mistakes to Avoid
- Troubleshooting a Truss Floor
- Floor Truss Cost Ranges
- When to Call a Pro
- Frequently Asked Questions
Unlike lumber you pick off a rack, floor trusses are engineered to your plan. The truss designer works from your layout, loads and bearing points, and the result is a set of stamped drawings that your framer must follow exactly.
How Engineered Floor Trusses Are Designed
A floor truss is a set of top and bottom chords held apart by diagonal and vertical webs. The chords handle bending forces (compression on top, tension on the bottom) and the webs carry shear between them. Joints are connected with steel truss plates pressed into the wood under heavy hydraulic pressure at the plant.
Truss software calculates every member for the specific loads on your floor: the weight of the subfloor and finishes, live loads from occupancy, partitions, and any point loads from walls or posts above. Designers also check deflection, because a floor that does not break can still feel bouncy. Many builders request stiffer-than-minimum criteria under tile or stone floors to protect grout lines and prevent cracking.
Every set comes with a layout drawing showing truss marks, spacing, bearing locations and required bracing. Trusses are not interchangeable. A truss marked for a bearing wall in the middle of the span will not perform correctly if installed where a clear-span truss belongs.
Wood vs. Metal-Web Floor Trusses
| Type | Construction | Strengths |
|---|---|---|
| Open-web wood | 2×4 chords and webs laid flat, plated joints | Wide nailing surface, large open chases, trimmable ends on some designs |
| Metal-web | Wood chords joined by V-shaped steel webs | Lighter, long spans, very open web space for ducts |
| Light-gauge steel | Cold-formed steel chords and webs | Noncombustible, dimensionally stable; used mainly in commercial or multifamily work |
Wood floor trusses are the standard residential choice. With chords laid flat, they offer a 3-1/2 inch wide top surface for gluing and fastening the subfloor, which helps reduce squeaks. Many designs include a “trimmable” end panel that lets the framer adjust length slightly on site.
Metal-web trusses use the same wood chords but replace the wood webs with stamped steel. That makes them lighter and leaves bigger openings for round ductwork. Steel floor trusses built entirely from light-gauge steel are more common in commercial and multifamily buildings, where noncombustible construction or very long spans drive the choice.
Typical Depths, Spans and Spacing
Depth is the main lever for span. As a general planning range for residential loads:
- 12 to 14 inch depth: often spans in the high teens to about 20 feet.
- 16 inch depth: commonly reaches the low to mid 20s.
- 18 to 24 inch depth: can span roughly 25 to 30 feet or more.
Spacing of 19.2 or 24 inches on center is typical with 3/4 inch tongue-and-groove subfloor glued and fastened. Tighter spacing, such as 16 inches, may be specified for stiffer floors or heavy finishes. These figures are rough guides only. Your truss manufacturer’s design governs the actual span, and changes to loads, such as adding a large soaking tub or a kitchen island with stone counters, must be communicated before production.
Floor trusses frequently include a ribbon or strongback channel near mid-span. A strongback is a 2×6 run continuously through the webs, on edge, and fastened to vertical web members. It ties the trusses together so they share load and dramatically reduces bounce.
Floor Truss vs. I-Joist vs. Dimensional Lumber
Engineered floor trusses compete with I-joists and solid lumber. Solid 2×10 or 2×12 joists are cheap and available off the shelf but limited in span and prone to shrinkage and squeaks. I-joists are light, long and stocked by lumberyards, with knockouts for small holes, though large ducts often need soffits.
Trusses win when you need long clear spans, deep floors and open web space for mechanicals. They lose on lead time and flexibility, because you cannot cut or modify them on site without engineering approval. For basement ceilings with complicated HVAC, though, the ability to run trunk lines through the floor depth instead of under it can save a finished ceiling height of several inches.
Ordering and Lead Times
Plan the order early. The usual sequence looks like this:
- Submit plans. Send architectural plans with dimensions, bearing walls, stair openings, plumbing locations and finish types to the truss supplier.
- Review shop drawings. The supplier returns a layout and individual truss designs. Check bearing locations, duct chases and stair openings carefully.
- Approve and schedule. Once approved, production typically takes one to four weeks, longer during peak building season.
- Delivery. Trusses arrive banded on a flatbed. Have a level, dry staging area ready and keep them off the ground on blocking.
Mark mechanical chase locations on the plans before approval. Running the main duct trunk through a planned chase is far cheaper than redesigning trusses after delivery.
Installation Tips and Mistakes to Avoid
Installation is a framing crew’s job, but knowing the basics helps you supervise or ask the right questions.
- Follow the layout exactly. Each truss has a mark and location. Install them in the specified positions with the correct end up.
- Check bearing. Trusses must bear on the walls or beams the design assumes, with the specified bearing length. Some trusses are top-chord bearing, hanging from a ledger or rim.
- Brace as you go. Install temporary bracing and permanent strongbacks per the drawings. Unbraced trusses can topple like dominoes.
- Use proper hangers and fasteners. Where trusses hang from beams, use the hangers and nail counts specified.
- Never cut, notch or drill chords or webs. Plumbers and electricians must route through the open web space, not through the members. A damaged truss needs a repair detail from the manufacturer’s engineer.
- Glue and screw the subfloor. Construction adhesive plus ring-shank nails or screws, per the subfloor maker, keeps floors quiet for decades.
- Keep them dry. Cover stored trusses and get the building dried in quickly to limit moisture swelling of the subfloor.
Troubleshooting a Truss Floor
Bouncy floors usually point to missing or loose strongbacks, or to trusses spaced wider than intended. Squeaks often come from subfloor that was nailed without adhesive or from fasteners that missed the chord. Sagging or cracked tile can signal a load the truss was never designed for, such as a heavy stone island added late. If you find a cut web, a crushed bearing or a loose plate, do not patch it yourself. Ask the truss manufacturer for an engineered repair detail; many supply them quickly at little or no cost.
Floor Truss Cost Ranges
Floor truss cost depends on depth, span, lumber prices and complexity. Wood floor trusses are often quoted at a few dollars to roughly ten dollars or more per linear foot, which can put a typical residential truss in the range of one to a few hundred dollars each. Metal-web versions can be similar or slightly higher depending on the supplier. Delivery, special trusses for stair openings, and girder trusses add to the total.
Installation labor is usually lower per square foot than stick framing a comparable floor, since trusses go up quickly. The savings in mechanical routing and finished ceiling height often offset a higher material price, especially in basements and open-plan homes.
When to Call a Pro
Floor systems are structural. New construction and additions using trusses require stamped truss designs, a building permit and framing inspection. Hire an experienced framing contractor for installation, and involve a structural engineer for any modification, repair or added load. If you are building an addition that needs new footings, call 811 before digging, and confirm HOA and zoning approvals before ordering. Licensed electricians, plumbers and HVAC contractors should route their work through the designed chases.
Frequently Asked Questions
How far can engineered floor trusses span?
Residential floor trusses commonly span about 20 to 30 feet, with deeper trusses reaching farther. The exact span comes from the manufacturer’s design for your loads.
Are floor trusses better than I-joists?
Trusses offer longer spans and open space for ducts and plumbing, while I-joists are stocked locally and easier to adjust on site. The better choice depends on span, mechanical layout and schedule.
Can you cut or drill a floor truss?
No. Chords, webs and plates must not be cut, notched or drilled. Run services through the open web space, and get an engineered repair detail if a truss is damaged.
How long does it take to get floor trusses?
After shop drawings are approved, production often takes one to four weeks, and longer during busy building seasons.
What does a strongback do in a truss floor?
A strongback is a continuous 2×6 on edge run through the webs near mid-span. It ties trusses together, spreads loads and reduces floor bounce.
Prefer to explore on your own?
See how new flooring looks in your actual room in seconds — free, no signup.
Try the free Floor Studio →