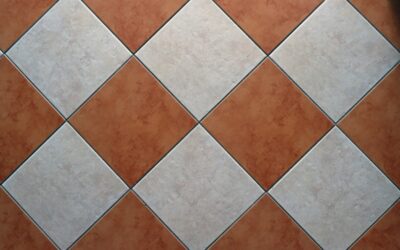
People obsess over which tile to buy and barely think about the spaces between them, yet those gaps quietly make or break the finished look. Grout lines are far more than filler; they determine how a tiled surface reads, how forgiving it is of imperfect tile, and how much cleaning it will demand over the years. Get the width, color, and spacing right and the installation looks intentional and professional. Get them wrong and even premium tile can look sloppy.
Part of our Tile & Grout guide — explore the full guide →
Why Grout Lines Matter
Grout does three jobs at once. It locks tiles in place and absorbs minor movement so they do not crack against each other. It accommodates the small dimensional differences that exist even in machine-cut tile. And it defines the visual rhythm of the surface, framing each tile or letting them blend into a seamless field.
Because grout is more porous and less durable than tile, the lines are also the part most likely to stain, discolor, or crack. Smart choices up front reduce maintenance for the life of the floor or wall.
Choosing the Right Grout Line Width
Width is the first decision, and it depends on the tile type, its edge, and the look you want. Here are the general ranges installers work within.
- Narrow lines (1/16 to 1/8 inch): Best for rectified tile with precisely cut, square edges. Creates a sleek, modern, nearly seamless surface.
- Standard lines (1/8 to 3/16 inch): The most common range for everyday floor and wall tile, balancing looks and forgiveness.
- Wide lines (1/4 to 1/2 inch): Suited to handmade, rustic, or irregular tile where wider joints absorb size variation.
A key rule: the less uniform your tile, the wider the grout line should be. Tight joints expose every tiny size difference, so rustic and handmade tiles need room to breathe. Rectified tiles, milled to exact dimensions, can run very tight.
The Case for Wider and Narrower Lines
Beyond the look, width affects performance. Tighter lines mean less grout to clean and a more continuous surface, but they leave little margin for error and demand a flat substrate. Wider lines hide lippage and tile size variation, making installation more forgiving, but they create more grout to maintain and a busier appearance. There is also a structural minimum: most manufacturers and industry standards advise grout joints of at least 1/16 inch, since butting tiles together with no gap invites cracking and chipping.
Grout Color: Match or Contrast
Color does as much heavy lifting as width. The same tile looks completely different depending on whether the grout blends in or stands out.
Matching Grout
A grout that matches the tile minimizes the lines, creating a smooth, unified surface that makes a space feel larger and calmer. This is the go-to for large-format tile and busy patterns you do not want to fight.
Contrasting Grout
A contrasting color turns grout into a design feature, emphasizing the tile shape and pattern. Dark grout with white tile, or the reverse, gives a graphic, intentional look popular with subway, hexagon, and patterned tile.
A practical middle path for floors: choose a mid-tone gray or a warm tan rather than bright white. These colors hide everyday dirt far better and stay attractive longer between deep cleanings.
Sanded vs. Unsanded Grout
Grout line width also dictates which grout you must use. The two main types are not interchangeable.
- Sanded grout: Contains fine sand for strength and is required for joints 1/8 inch and wider, standard for most floors.
- Unsanded grout: Smoother and used for narrow joints under 1/8 inch, and for delicate surfaces like polished stone or glass that sand could scratch.
For wet areas and heavy use, epoxy grout is worth considering. It resists stains and moisture, rarely needs sealing, and stands up to mold, though it costs more and sets fast, leaving less working time.
Getting Even, Consistent Lines
Crisp, uniform grout lines come from disciplined installation. A few practices make the difference.
- Use tile spacers of the chosen width to keep joints perfectly even across the whole surface.
- Start with a flat substrate; a wavy floor causes lippage that no grout line can hide.
- Mix grout to the right consistency, like thick peanut butter, so it packs joints fully without slumping.
- Tool the joints consistently with a grout float held at the same angle for a uniform depth.
- Clean as you go, wiping haze with a damp sponge before it dries into a stubborn film.
Keeping Grout Lines Clean and Crack-Free
Maintenance protects both looks and longevity. Seal cement grout after it cures, usually 48 to 72 hours, and reseal annually in wet or high-traffic spots. Clean with pH-neutral products and a soft brush rather than harsh acids that erode and discolor grout. Where tile meets a tub, a wall, or a floor, use flexible caulk instead of rigid grout, because those movement joints crack if filled with grout. Address small cracks early before water gets behind the tile.
Grout Lines for Different Tile Types
The ideal grout line changes with the kind of tile you are installing, so it helps to think in categories rather than applying one rule everywhere.
- Large-format and rectified tile: Use tight lines, often 1/16 to 1/8 inch, paired with matching grout for a seamless, modern surface.
- Subway tile: A 1/16 to 1/8 inch line is classic; contrasting grout sharpens the brick pattern, matching grout softens it.
- Mosaic and penny tile: Comes pre-spaced on mesh sheets; the small joints add traction, which is why mosaics are popular on shower floors.
- Handmade and rustic tile: Wider joints of 1/4 inch or more absorb the size variation inherent in artisan tile.
- Wood-look plank tile: Tight, offset joints with a matching grout reinforce the illusion of real planks.
Matching the line to the tile is what makes an installation read as deliberate. The wrong width can make precise tile look sloppy or rustic tile look cramped and stressed.
The Bottom Line
Grout lines deserve as much thought as the tile itself. Match the width to your tile’s precision, pick a color that achieves the look and hides dirt to the degree you want, and use the correct grout type for the joint size. Install with spacers over a flat substrate, then seal and clean on schedule. Do that, and your grout lines will frame beautiful tile for decades instead of becoming the eyesore that drags the whole surface down.