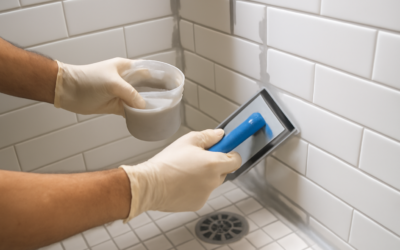
If you have ever scrubbed dingy, stained grout lines and wished there were a better way, this is it. Epoxy tile grout replaces the cement and water of traditional grout with epoxy resins and a hardener, creating joints that are virtually waterproof, highly stain-resistant, and tough enough to shrug off the chemicals and moisture that wreck ordinary grout. In kitchens, showers, and commercial settings, it has become the gold standard for joints that stay clean and intact for the long haul.
Part of our Epoxy, Concrete & Garage Floors guide — explore the full guide →
The performance comes with a steeper price and a faster, less forgiving installation. This guide explains how epoxy grout differs from cement, where it makes the most sense, and how to apply it without leaving a stubborn haze behind.
How It Differs From Cement Grout
Standard grout is a cement-based powder mixed with water. It is affordable and easy to work with, but it is porous, which means it absorbs water and stains, can crack over time, and must be sealed and resealed to stay looking good. Epoxy grout, by contrast, is made from epoxy resins blended with a hardener and fine filler. Once cured, it forms a dense, non-porous joint that resists stains, water, grease, and most household chemicals.
The practical upshot: cement grout needs ongoing sealing and tends to discolor, while epoxy grout typically needs no sealing at all and keeps its color for years. That difference is why busy kitchens and wet showers increasingly call for epoxy.
The Advantages of Epoxy Grout
- Stain resistance: spilled wine, coffee, and grease wipe away instead of soaking in.
- Waterproof: the non-porous joint resists water penetration, ideal for showers and backsplashes.
- No sealing required: unlike cement grout, it does not need periodic sealer to stay protected.
- Durability: it resists cracking and chemical attack, holding up in high-traffic and commercial spaces.
- Color consistency: it keeps a uniform color rather than blotching or fading over time.
For anyone tired of maintaining grout, these benefits are compelling, especially in the rooms that see the most water and mess.
The Trade-Offs to Consider
No product is perfect, and epoxy grout asks more of the installer. It costs noticeably more than cement grout, often several times the price per unit. It sets fast, giving you a short working window before it becomes unworkable. It is thicker and stickier to handle, and it is unforgiving of haze: if you do not clean the tile surface promptly and thoroughly, the cured residue is very difficult to remove.
For these reasons, many homeowners hire a pro for large epoxy jobs, or practice on a small area first. It is workable as a DIY project, but it rewards preparation and quick, decisive work far more than cement grout does.
Where to Use It
Epoxy grout earns its premium in demanding locations:
- Kitchen backsplashes and countertops exposed to grease and food
- Showers, tub surrounds, and other wet areas
- Floors in entryways, mudrooms, and high-traffic zones
- Commercial kitchens and restrooms with strict hygiene needs
- Anywhere stain resistance and low maintenance are priorities
For a low-traffic, dry accent wall, cement grout may be the more practical, economical choice. Save the epoxy for the places where its waterproofing and stain resistance truly pay off.
How to Apply It Cleanly
Success with epoxy grout is mostly about speed and cleanliness. Read the manufacturer’s data sheet first, ventilate the area, and wear gloves and eye protection.
- Let the tile adhesive cure fully and clean the joints of all dust and debris.
- Mix only a small batch you can apply within the short working time. Mixing too much guarantees waste, because it sets fast.
- Pack the grout firmly into the joints with a rubber float held at an angle, filling them completely.
- Immediately remove the bulk of the excess with the float edge.
- Wash the tile surface with a damp sponge and clean water, changing the water often. This haze-removal step is critical and must happen before the residue hardens.
- Do a final detailed cleaning pass once the joints firm up, then let everything cure fully, often 24 to 72 hours, before exposing it to water.
Work in small sections so you can grout and clean each before moving on. The single biggest mistake is letting epoxy haze dry on the tile, so keep your sponge and water moving the entire time.
Cost and Long-Term Value
Epoxy grout costs more upfront, both in material and often in labor, than cement grout. But the long-term math frequently favors it. You skip the ongoing cost and chore of resealing, you avoid the cycle of staining and scrubbing, and the joints last longer without cracking. In a shower or a hardworking kitchen, that lower maintenance burden and longer life often justify the higher initial price.
For a small backsplash, the price difference is minor in the context of the whole project. For a large floor, weigh the added cost against how much you value low maintenance and durability.
Color Options and Appearance
Epoxy grout comes in a wide range of colors, and because the color is consistent throughout the cured material, it does not fade or blotch the way cement grout can. Manufacturers also offer translucent and metallic epoxy grouts, the latter producing the shimmering gold, silver, and bronze joints popular in feature walls. This color stability is a genuine advantage: the grout you install looks the same years later, with no resealing required to keep it vivid.
One thing to note is that epoxy grout can have a slightly different look and feel than cement, sometimes a faint sheen rather than a flat matte finish. For most homeowners this is unnoticeable or even attractive, but if you want a perfectly traditional matte joint, ask to see a cured sample first so the finish matches your expectations.
Tips for a Successful DIY Job
If you tackle epoxy grout yourself, set yourself up to win. Mix small batches, because the fast set time punishes anyone who mixes more than they can use. Keep two buckets of clean water and several sponges on hand, and change the water frequently during haze removal. Work in small sections, grouting and cleaning each before moving on rather than grouting a whole wall and then trying to clean it. Wear gloves, since the resin is sticky and hard to remove from skin, and ventilate the space well. Above all, do not stop to take a break mid-section; once the epoxy starts to set, the window for clean removal closes quickly. Practice on a small, low-visibility area first to get a feel for the timing before committing to a prominent surface.
Final Thoughts
Epoxy tile grout delivers waterproof, stain-resistant, low-maintenance joints that cement grout simply cannot match, making it the smart choice for showers, kitchens, and high-traffic floors. The catch is a faster, less forgiving installation that demands good ventilation, quick work, and meticulous haze removal. Match it to the wet, busy areas where it shines, follow the data sheet closely, and you will enjoy clean, durable grout lines for many years without the constant upkeep.
Prefer to explore on your own?
See how new flooring looks in your actual room in seconds — free, no signup.
Try the free Floor Studio →