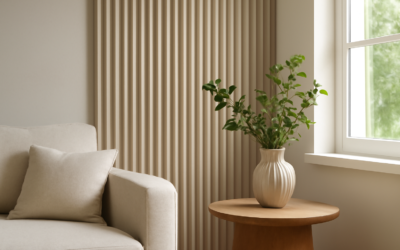
Texture is the design detail that separates a flat, forgettable wall from one that stops you in your tracks, and fluted wood tile delivers exactly that with its rhythmic ribbed surface and warm wood tone. Borrowing the vertical-groove look of fluted paneling and pairing it with the durability of tile or engineered wood, this material has become one of the most requested accent surfaces in modern homes. This guide explains what fluted wood tile actually is, where it works, what it costs, and how to install it.
Part of our Tile & Grout guide — explore the full guide →
What Is Fluted Wood Tile
Fluted refers to a series of parallel, rounded vertical grooves, the same profile you see on classical columns. Applied to a wood-look surface, that ribbing creates a three-dimensional play of light and shadow that flat tile can’t match. The term covers a few different products, and knowing which one you’re buying matters:
- Fluted porcelain tile: ceramic tile with a molded ribbed surface and a printed wood-grain finish. Fully waterproof and durable.
- Real wood fluted panels: solid or engineered wood slats or MDF-backed battens with a veneer, sold as decorative wall paneling.
- Fluted wood-look wall tile: gypsum, polymer, or composite panels molded to look like wood battens.
The porcelain version is the most versatile because it handles moisture, which is why designers reach for it in bathrooms and kitchens where true wood would swell. Always confirm the substrate before buying, since a real-wood fluted panel and a porcelain fluted tile install and perform very differently.
Where Fluted Wood Tile Works Best
This is primarily a vertical, decorative material. The grooves that make it beautiful also trap dust and create trip and cleaning issues underfoot, so fluted surfaces belong on walls and features far more often than floors.
- Accent and feature walls in living rooms, bedrooms, and entryways.
- Bathroom and shower walls (porcelain versions) for a warm, spa-like texture.
- Fireplace surrounds where the vertical lines draw the eye upward.
- Kitchen island fronts and bar faces for tactile interest.
- Headboard walls and TV feature walls to add depth without color.
- Reception desks and commercial millwork for a high-end retail feel.
If you love the look for a floor, choose a low-relief porcelain plank with subtle grooves rather than a deep-fluted panel, and confirm it carries a floor-rated PEI and slip rating.
The Look: Why Fluted Texture Works
Vertical fluting does two things for a room. It adds height, drawing the eye upward and making ceilings feel taller, which is why it’s popular in rooms with standard 8-foot ceilings. It also creates constantly changing shadow lines, so a single warm-wood wall reads as rich and dynamic rather than flat. Under directional or warm lighting, the ridges cast soft shadows that shift as you move through the space, giving even a neutral palette real depth. The wood tone keeps the effect warm and organic, which is why fluted wood tile pairs so well with the Japandi, mid-century, and warm-minimalist looks dominating current interiors.
Fluted Wood Tile Cost
Pricing varies widely by material. Here are typical 2026 U.S. ranges:
- Fluted porcelain wall tile: $8 to $20 per square foot.
- Premium large-format fluted porcelain: $20 to $35 per square foot.
- Engineered wood fluted panels: $10 to $25 per square foot.
- MDF or composite fluted panels: $6 to $15 per square foot.
Installation adds $10 to $25 per square foot for porcelain, since the ribbed surface makes cuts and alignment more demanding than flat tile. Wood and MDF panels are often cheaper to install because they screw or adhesive-mount to the wall, running $5 to $12 per square foot in labor. A feature wall of roughly 60 square feet in mid-range fluted porcelain typically lands between $1,000 and $2,500 installed. Order 10 to 15 percent extra so your groove pattern lines up around cuts and outlets.
How to Install Fluted Wood Tile
The single most important rule with any fluted product is keeping the vertical lines plumb and the grooves aligned tile to tile. A misaligned groove is instantly visible and ruins the effect. For porcelain fluted tile:
- Start with a flat, plumb wall. Skim-coat or shim any waviness first, because the rigid tile telegraphs substrate flaws.
- Snap a plumb reference line and dry-lay a column to plan how grooves meet at seams and corners.
- Use a notched trowel and quality thinset such as MAPEI Ultraflex or Custom Building Products VersaBond, and back-butter for full coverage on the deeply profiled backs.
- Align grooves precisely across every joint, using leveling clips to keep faces flush.
- Cut with a wet saw and a fine porcelain blade, feeding slowly to keep the ribbed edge from chipping.
- Grout only if the product calls for it; many fluted tiles butt together with minimal or no visible joint. Use a color-matched, non-sanded grout where needed.
For real-wood or MDF panels, the panels typically install with construction adhesive and finish nails or a rail system. These belong only in dry areas, never a shower or splash zone, since moisture will delaminate the veneer and swell the MDF.
Cleaning and Maintenance
The grooves are the one maintenance catch. Dust and grime settle in the channels, so plan to run a soft dusting brush or vacuum brush attachment down the flutes periodically. Porcelain fluted tile wipes clean with a damp microfiber cloth and pH-neutral cleaner, and its glaze resists water and stains without sealing. Wood and MDF panels need dry dusting and an occasional wipe with a barely damp cloth; never soak them. In a porcelain shower, squeegee the flutes after use to prevent hard-water buildup in the channels. Avoid abrasive pads that could scratch the printed wood-look surface on porcelain.
Pros and Cons to Consider
Advantages
- Dramatic three-dimensional texture that elevates plain walls.
- Warm wood look with, in porcelain form, full waterproofing and durability.
- Makes ceilings feel taller and rooms feel richer.
- On-trend with Japandi, mid-century, and warm-minimalist styles.
Drawbacks
- Grooves collect dust and demand more careful cleaning.
- Installation is exacting; misaligned flutes are obvious.
- Real-wood versions can’t go in wet or humid areas.
- Best as an accent; overusing it can feel busy.
Design Ideas With Fluted Wood Tile
Because the texture is the star, keep the surrounding palette calm. A single fluted wood accent wall behind a bed or sofa gives a room a focal point without color clutter. In bathrooms, run fluted porcelain floor-to-ceiling on one shower wall and keep the rest in a simple matte tile so the texture reads as intentional. Pair warm-toned flutes with black or bronze fixtures, boucle upholstery, and soft indirect lighting to lean into the Japandi mood. Uplighting or a wall-wash fixture placed close to the surface exaggerates the shadow lines beautifully at night. Avoid surrounding it with other heavily patterned materials, which compete for attention. If you want the flutes to feel truly integrated rather than bolted on, run them full height from floor to ceiling and wrap the outside corners with matching trim or a mitered edge so the ribbing appears continuous. Half-height wainscot applications also work well in dining rooms and hallways, capped with a simple wood rail that echoes the warm tone.
Final Thoughts on Fluted Wood Tile
Adding fluted wood tile is one of the highest-impact ways to bring warmth, depth, and modern texture into a home. Choose porcelain for wet or high-traffic areas and real-wood panels for dry accent walls, keep the grooves plumb and aligned during installation, and give the flutes an occasional dusting, and you’ll have a feature surface that turns an ordinary wall into the most talked-about element in the room. Treat it as an accent, light it well, and let the ribbed texture do the work.
Prefer to explore on your own?
See how new flooring looks in your actual room in seconds — free, no signup.
Try the free Floor Studio →